
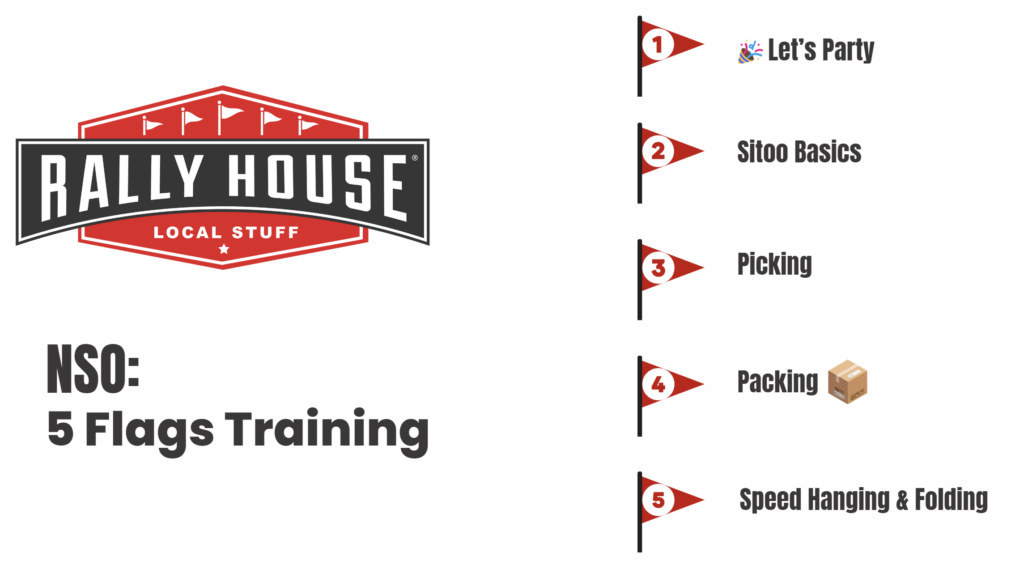
New Store Opening (NSO) Training: 5 Flags Trainings

New Store Training Timeline
- Complete during Week 1 (Fixture Build Week).
- If unable to complete during Week 1, must be completed Monday of Week 2 (Merchandising Week).
BOOKMARK this Training Folder for easy access.
NSO Orientation & Welcome
Click here to open the Orientation section of CORE.
Primary goal is to introduce them to the company and cover we began as a gift store and have built to the Ultimate Fan destination.
- Motto
- Welcome video
- 3E philosophy
- Do’s & Don’t’s (as time permits)
- Yealink usage (as time permits)
- System review (as time permits)
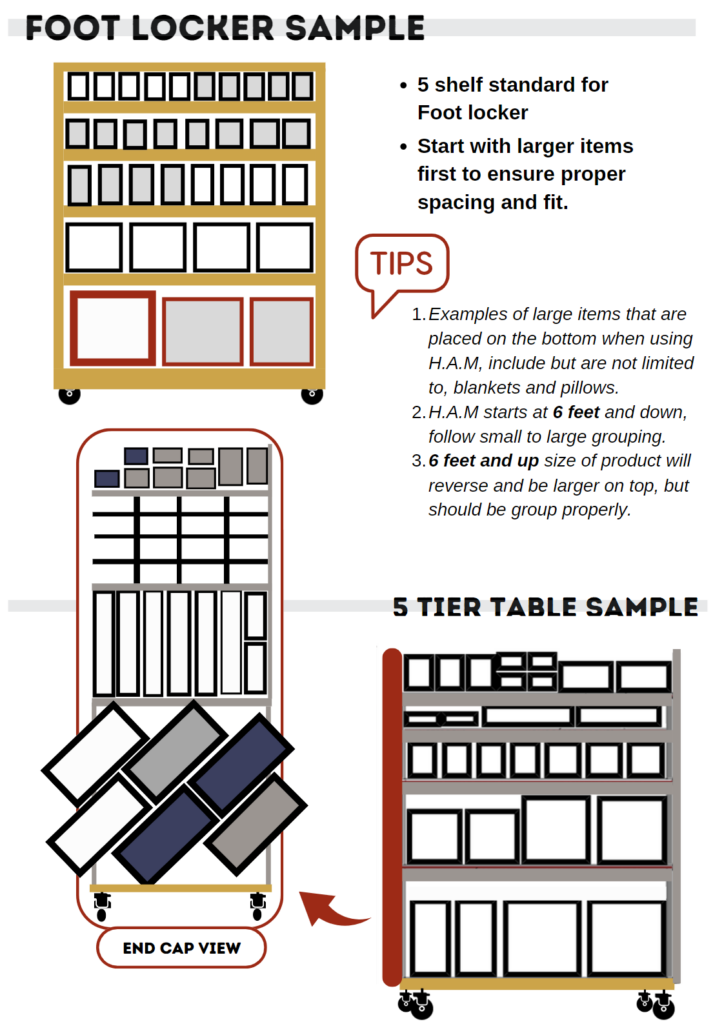
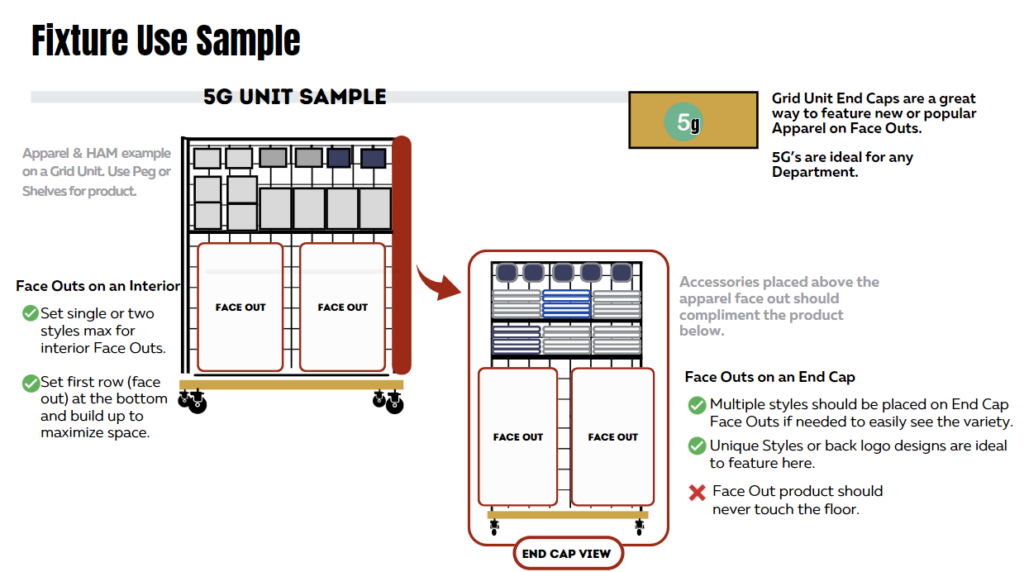
Merchandising Resources: HAM Guides
There are two guides that cover HAM
- HAM Process
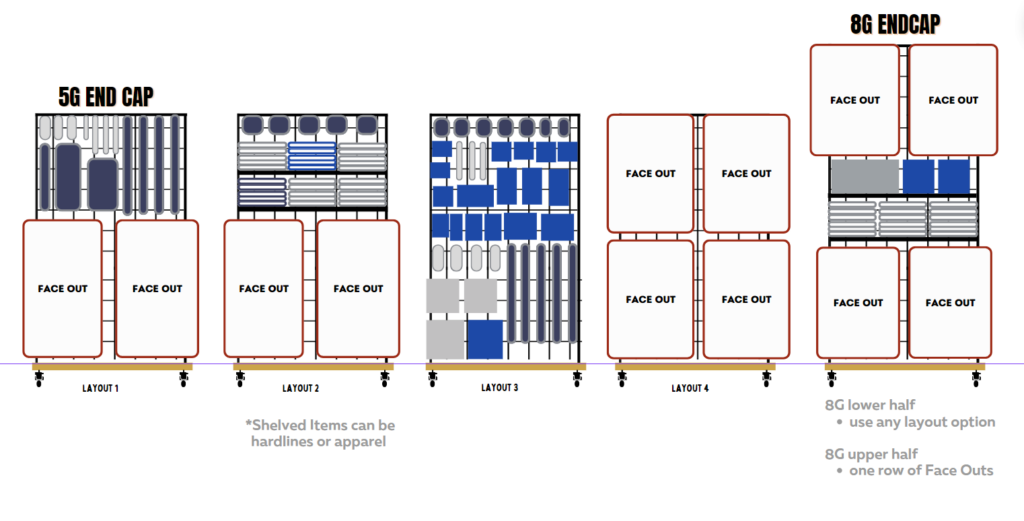
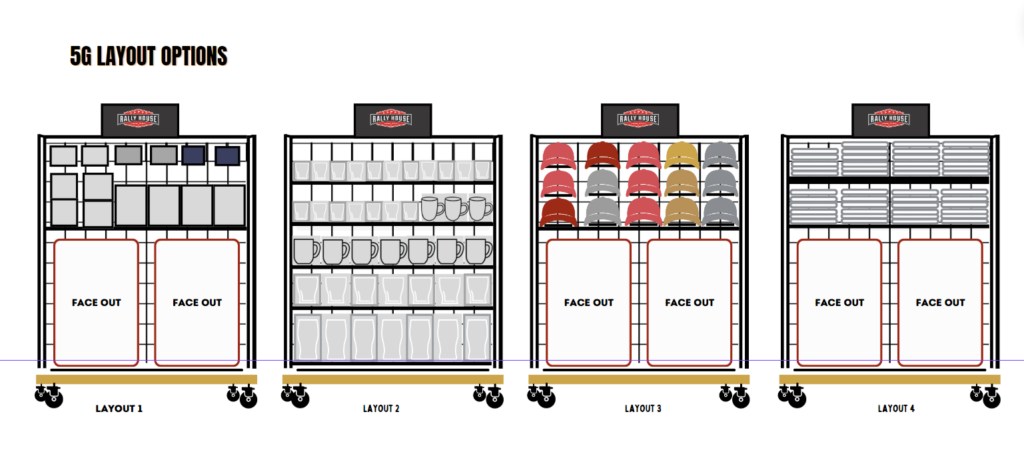
- Fixture Use: G Units
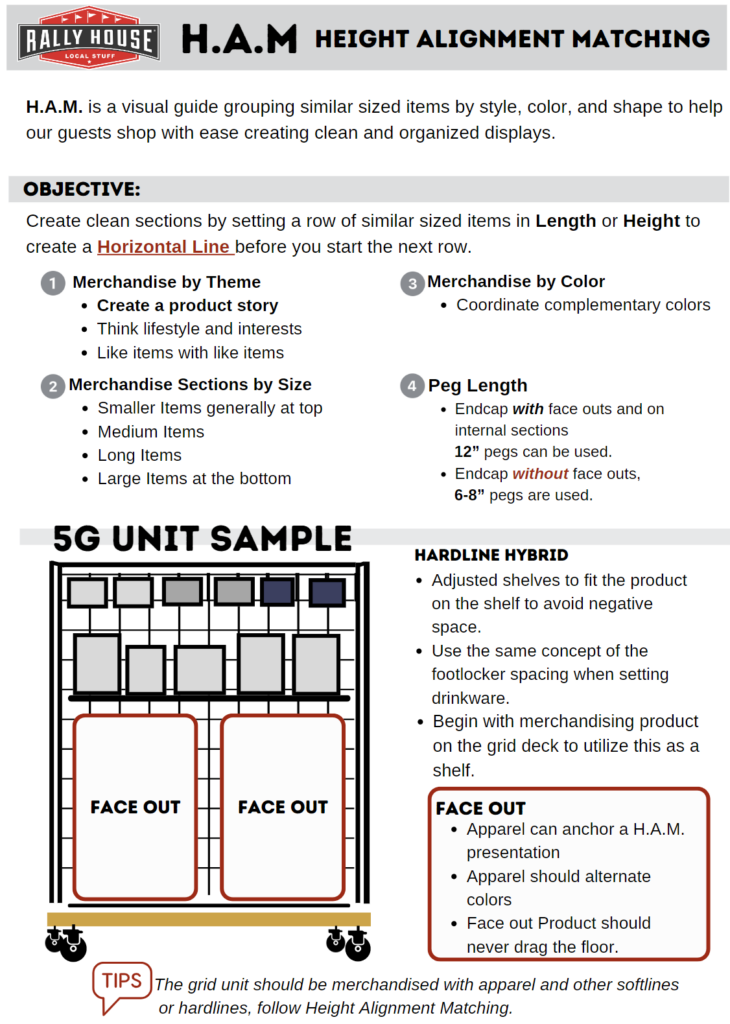
G UNIT FIXTURE USE SAMPLES
Let’s Party
To begin your Party Training simply click this link Party Service Model.
Once you click into the link follow the direction provided.
- You will need to scroll and click into folders to access material.
- Ensure you have sound up on your device.
Once the Party training is complete, return to the “NSO: 5 Flags training” folder to proceed.
Sitoo Basics
It’s time to learn how to ring in our POS system called Sitoo.
- New Team Members watches the Video
- Enter Practice Mode and follow the Practice Activity Card
- Click here for additional One Pagers and Resources.
Picking
Customer Order: Picking Process!
- New Team Members watches the Video
- Print the Pick & Pack One Pagers for a quick guide to follow.
Packing
Customer Order: Packing Process!
- New Team Members watch the video.
- Print the Pick & Pack One Pagers for a quick guide to follow.
Speed Hanging/Folding
Opening Weekend
Watch the Video: How to SPEED fold with the flip board
- NOTE: the video shows Men’s (black board) & WMNS/Kids (blue board)
Boards and when to use
- Black Board: mens & womens
- Blue Board: youth
- Red Board: infant, toddler, little kids
How to stack folded T-Shirts to proper size run
Review the guide below for proper stacks
Watch the Video: How to Speed Hang
For some EFFICIENT FUN try out the Flip Board Challenge!
- Fastest Fold: See who on the team can get a 7 second fold to standard!
- Full Stack: See who on the team can create the fastest and cleanest full size run stack!
- Apply the same concept to speed hanging!
Team Member Location Change
NSO hires and others team members traveling to train at a different location MUST follow this Process.
When hiring for new stores prior to opening, new team members must be hired into the requisition opened at that new store location. When new team members are training in a different location until the time they are needed at the new store, they must be transferred to the training store in Workday and then back to their home store when they begin working there.
Team Member Location Change Process
Hiring into the open requisition for the new location accounts for the headcount/position to be filled at that location.
The transfer in Workday is necessary so that:
- They can have access to Zipline at the training store. Stores must be opened and active to have a Zipline account which is required to have the dual access option, resulting in us not having this option to provide to team members hired in at the new location until after opening day.
- They have Legion access for the training location.
- They receive Workday tasks associated with the location they are working at such as tax forms.
NSO IT Documents
Printed copies will be delivered.
Please do not print unless necessary.
OPS Back Office NSO Process
SharePoint Link to Shared Working Documents
Store Mapping
Creating a New Store Opening Map
All Visio files are uploaded to the Operations Visio Files folder.
Timeline
- The CPM will put a due date on the case. 2 weeks after the due date listed, they go in for permits.
- After the CPM opens the support case, ideally the map is completed and map meeting had 4 weeks after that date. Having the map meeting within the 4 weeks allows for all changes that need to be made to be caught by OPS/Field leadership/CPM.
Construction Map Process
Create the Construction Map using Visio.
- Open the support case that the CPM entered for the new store floor plan.
- Locate the drawing of the space on the case – check Links and Files.
- For additional information if wanted, check the NSO Resources page in the Rally House SharePoint. Find the NSO folder Store Folders, then select the folder for the store you are working on. All relevant documents, photos, etc. should be in this folder.
- Open Visio on your computer and create a new floor plan.
- Using the LOD and any other relevant store plans and photos, build out the store using a snip of the plan provided and laying into Visio and “tracing”.
- 🔗Construction Map Creation Video
- Put the screen shot of the plan that you are tracing on a tab and rename to “Tracer”
- Put the Construction Map onto a new tab and rename to “Construction LOD”
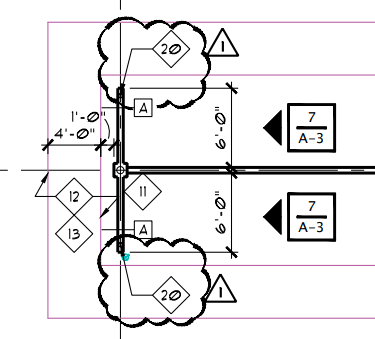
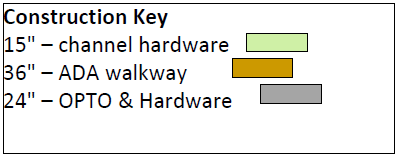
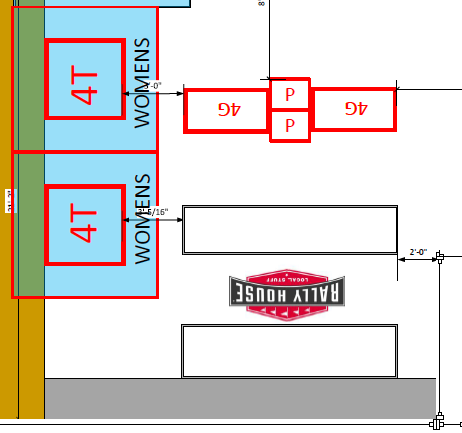
- Place standards, OPTO, and ADA walkways around the store.
- Standards box is 15″ wide (12″ faceout + 3″ bracket), lime green in color
- OPTO box is 24″ wide, grey in color
- If applicable to the store
- ADA walkway is 36″, golden brown in color
- Put the Construction Key on the map.
- Cashwraps – Shioleno Cashwrap Drawings – Current
- Determine the size of the cashwrap & register count.
- <$1M: 10.3′ Cashwrap (3 if space allows)
- If small space that only allows for 2 POS but is in $1M-$2M bracket, 3 registers (2 permanent, 1 CC only)
- $1M-$2M: Start with 13.6′ Cashwrap
- If small space that only allows for 2 POS but is in $2M-$3M bracket, 3 registers (3 permanent, 1 CC only)
- $2M-$3M: 16.9′ Cashwrap if space allows
- $3M+: Review each case individually
- <$1M: 10.3′ Cashwrap (3 if space allows)
- Determine the placement of the cashwrap.
- Often the CPM will have one already on the plan that is provided or a suggestion from Aaron where it should go.
- OPS needs to sign off on the placement or suggest a new placement in store.
- Does the register lane work with the flooring?
- Does the cashwrap/register lane path block customers or make it weird/unnatural?
- Standard is 4′ away from the front door but can be moved to 1′-2′ to make it work to have a fixture point between the cashwrap and wall.
- Determine if left or right entry cashwrap.
- Manager station goes closet to the front door. This dictates entry side.
- Determine the size of the cashwrap & register count.
- Determine if the store needs a PSR.
- Stores that are >7K sq. feet and 1.5 mil in sales qualify for a PSR unless there is something unusual about the space.
- Unusual would be 6 spaces in our store. Example: Crocker Park
- Stores that are >7K sq. feet and 1.5 mil in sales qualify for a PSR unless there is something unusual about the space.
- Review the flooring of the space. Flooring is usually written out in Floor Plan Notes or outlined with pink lines on the plan.
- Is there flooring transitions?
- Is there a race track?
- Does the flooring that construction is suggesting work with fixtures?
- Most changes occur when there is a center wall in the store. Flooring needs to allow for fixtures to come off all walls in the center.
- In this example, we know that 1′ of space before the racetrack would not allow for any fixture to be placed in front of the feature wall. This needs changed and submitted to the CPM.
- Most changes occur when there is a center wall in the store. Flooring needs to allow for fixtures to come off all walls in the center.
- Place ocho/G unit fixtures on the construction plan where you anticipate fixtures going.
- Create an information key.
- Create a PDF of the plan.
- Submit the Construction plan under “Files” on the support case and assign the case back to the CPM.
- If OPS is recommending changes, write out the change(s) and WHY.
- The CPM will review the proposed plan with Aaron. They will send back comments.
- Make any adjustments that are needed and submit back.
- When Aaron approves the Construction plan, the CPM will let you know that it is approved.

⛔RELOCATIONS OR REMODELS⛔
- If this is a relo or a remodel you will need the fixture count from the store of what they own.
- Open a support case requesting this information.
Team Layout Fixture Map Process
Create the Team Layout and Fixture map once the construction plan is approved.
- We don’t want to proceed until we know what the “shell” of the store is going to be as adding/demoing walls, flooring, doors, cashwrap movement can change how a store lays out drastically.
- The store will need a blank LOD and a fixture map.
- Make a copy of the Construction Map, paste onto a new tab, and rename “Blank LOD”.
- Nothing else is needed for this until you upload to NetSuite.
- Make a copy of the Construction Map, paste onto a new tab, and rename “Team Layout”
- This is the copy that you will map.
- Make a copy of the Construction Map, paste onto a new tab, and rename “Blank LOD”.
- To determine the teams that the store will carry, log in to Admin and go to SAM > RHAM. Go to the store you are working on to view the list of teams the store will carry and the sales projections for each team.
- Copy this list over to a Team Allocation Template.
- Save the excel as “Store (3 Digits) Team Allocation.
- Enter team names in Column A and enter team sales projections in Column B.
- This will calculate the % of store that each team is in terms of sales in Column C.
- Assign the team on the excel their team color.
- Local is always hot pink.
- If all teams in the market are the same color (Pittsburgh) use various shades of the color.
- Enter the total number of fixture points on the map in Cell E2.
- This will calculate the approximate number of fixture points each team should have based on % of sales in Column E.
- Use Column F to keep track of how many fixture points you actually give to each store.
- Based on the actual given to the team the excel will populate the number of fixtures for mens, womens, and youth sections.
- Within mens, it will populate how many ocho fixtures should be used for the department in the team.
- Based on the actual given to the team the excel will populate the number of fixtures for mens, womens, and youth sections.

- Create Sales Projection Review Zipline for the District and Regional Manager.
- Once the floor plan is complete, add in fixtures to determine the flow within the store. For each fixture, you will need to create a box that is to scale to represent the fixture and a larger box around it (18 inches on each side) that represents the walkway around the fixture. For initial fixture blocking, use an Ocho-sized box.
- PRO TIP 📢 Use the “Favorites” file in the Operations Visio File Sharepoint so you don’t have to create new ones for most common fixtures
- 5 Tier Table Dimensions: 36” W x 42” L
- Tabletop 4-Way Dimensions: 45” W x 45” L
- Footlocker Dimensions: 30” W x 45” L
- Double Salesman Dimensions: 21” W x 60” L
- Ocho Dimensions: 28” W x 64” L
- Grid Unit Dimensions (with faceouts on each end): 25” W x 68” L
- T-Shirt Tower Dimensions: 24” W x 24” L
- Placing fixtures:
- Most stores:
- Keep 8’ Grid Units in the back half of the store. 8′ Grid units can be used for youth, womens, or mens.
- Youth product works best on 5’ Grid Units and/or 8’ Grid Units.
- Large team sections will need at least 1 5’ Grid Unit with shelves to be designated for hardlines.
- Double salesman racks should primarily be used for sale product.
- Men’s product works best on Ochos and/or 5’ Grid Units.
- Women’s product works best on 5’ Grid Units. Ochos can be used for womens product.
- Small Stores <8K sq. ft.
- More 8Gs needed in back half of stores for capacity. Can be used for mens and womens.
- Most stores:
- Begin placing teams on the map by marking fixtures with the designated color for each specific team.
- Use the sales projections you pulled to help determine how much space and how many fixture points each team needs.
- Teams that are usually overallocated over their projection:
- Michigan
- Ohio State
- Teams that are usually overallocated over their projection:
- Check NetSuite search Ops- Local Color Store to see if they are a campus store.
- If campus store we most often do the following “shops”
- Kids – Kid’s Shop
- Hardlines – needs 8-12 fixtures
- Bedding, Home Decor, Kitchen, Drinkware Ceramic, Drinkware Stainless, Kitchen, Pet, Auto, Flags, Golf, Office
- Womens – College Vault (if participates in College Vault), Women’s Family
- Mens – Executive Brands, College Vault (if participates in College Vault), School Of (should lead into unisex), Alumni (should lead into unisex), men’s family
- Unisex – Graphic T-Shirts
- If campus store we most often do the following “shops”
- For team placement, consider which teams are currently in season (MLB or NFL), and which teams will be the most popular in this location (colleges or stadiums nearby). Generally, the in-season and most popular team(s) should be at the front of the store.
- For stores that are opening in September-October, 2 versions need to made IF their MLB team is doing well: MLB lead and NFL lead.
- Use the sales projections you pulled to help determine how much space and how many fixture points each team needs.
- Once all teams are on the map, send a copy to the DM and RD to review and provide feedback on the team selection, team size, and team placement. Make changes to the map as needed based on their feedback.
Final Map Details
- Create a list of fixtures to the side of the map with the quantity of each fixture used. Label this list “Fixture Key”.
- If there are fixture moves occurring in the market, this key needs to specify exactly what needs to be ordered vs. moved. This key is how procurement orders fixtures.

- Map the backroom with the following items:
- Break Area: break table, fridge, microwave, LP poster, labor law poster
- BOH Fixtures: supply and hardware shelving units, bakers rack(s), HBR(s), z-rack(s)
- Hooks (to be installed by contractor): broom and mop, ladder, vacuum, hand truck
- Best to be placed by the mop sink
- Add in Marketing Graphics
- Fitting Room or Fitting Rooms
- Cashwrap Bowtie
- If campus store you’ll need your hanging department and color specific signage
Map Meeting
- Schedule and host the map meeting.
- Required Attendees: Aaron Liebert, District Manager, Regional Director, Chloe Devoy, Paul Grossman, Construction Project Manager, Matthew Peyton, Colin Novick, Monty King
- Optional Attendees: Peg Liebert, Brandon Clawson
- During the map meeting, present the team layout in the store and bring up anything that needs to be called out. If any changes are proposed, make live edits if possible so that the group can review and discuss.
- After the map meeting, make any necessary final changes.
- Upload the completed and approved map to the store’s support case and assign back to the CPM and store page in NetSuite under Operational Store Map.
- Upload the blank LOD to the store page in NetSuite under Blank Store Map.
- Fill out the cashwrap and register plan on the NetSuite store page.
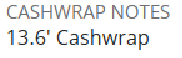
- Facilities/R&M Tab
- Under Cashwrap Notes type out the length of cashwrap that is wanted for the space
- 10.3′ Cashwrap
- 13.6′ Cashwrap
- 16.9′ Cashwrap
- Under Cashwrap Notes type out the length of cashwrap that is wanted for the space
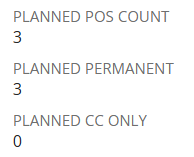
- IT Tab
- Planned POS Count – total POS
- The total of permanent + CC only should equal this number
- Planned Permanent – spaces with cashdrawer spot
- Planned CC Only – when register needs to be used at the manager station and is cashless
- Planned POS Count – total POS
- Facilities/R&M Tab