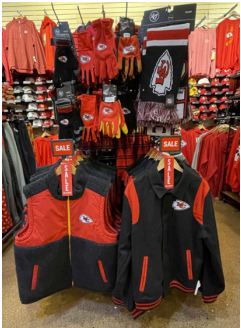
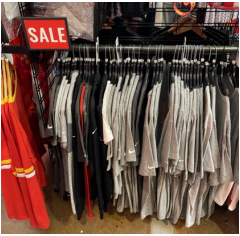
INTRODUCTION
THE PLAY:
Coming Soon
IMPACT:
Coming Soon
ON FIELD TERMINOLOGY
- Word: Definition
- Word: Definition
- Word: Definition
- Word: Definition
- Word: Definition
- Word: Definition
THE PLAY:
Coming Soon
IMPACT:
Coming Soon
GAME PLAN
Fixture & Hardware Terminology
Slatwall and Slatgrid Hardware
12” Slatwall Faceout |
|
8” Slatwall Faceout |
|
12” Slatwall Peg |
|
8” Slatwall Peg |
|
4” Slatwall Peg |
|
44” Metal Shelf |
|
24” Metal Shelf |
|
Channel Bracket Hardware
3” Hangrail Bracket – this is placed into the wall standards to allow the hangrail to be placed on the wall |
|
Hangrail – various sizes – placed into the hangrail bracket and then has faceouts and pegs placed onto the hangrail |
|
Hangrail Tubing Joiners – allows the hangrails to be joined together to limit hangrail bracket use |
|
12” Saddle Mount Hook |
|
12” Saddle Mount Faceout |
|
Shelf Bracket |
|
Shelf – can be black or white |
|
Grid Unit Accessories
Grid Hangbar – centers of grid units |
|
44” Metal Shelf – centers of grid units |
|
24” Metal Shelf – endcaps of grid units |
|
Store Floor Fixtures
Ocho |
|
Tabletop 4-Way (TT 4-Way) |
|
Chrome 4-Way |
|
Double Salesman Rack |
|
Grid Deck |
|
Grid Clip |
|
5-Tier Table |
|
Plush Basket |
|
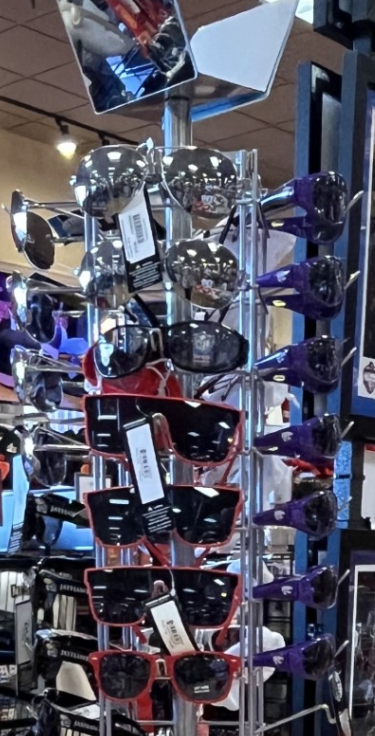
| Sunglass Fixture | ![]() |
Clip Strips |
|
Multi-Purpose Spinner |
|
| Jewelry Pegboard Spinner – typically campus stores only | ![]() |
| Bracelet Bar – typically campus stores only | ![]() |
Tabletop Grid Panel |
|
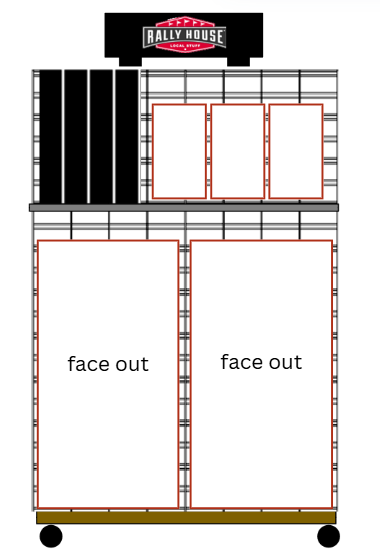
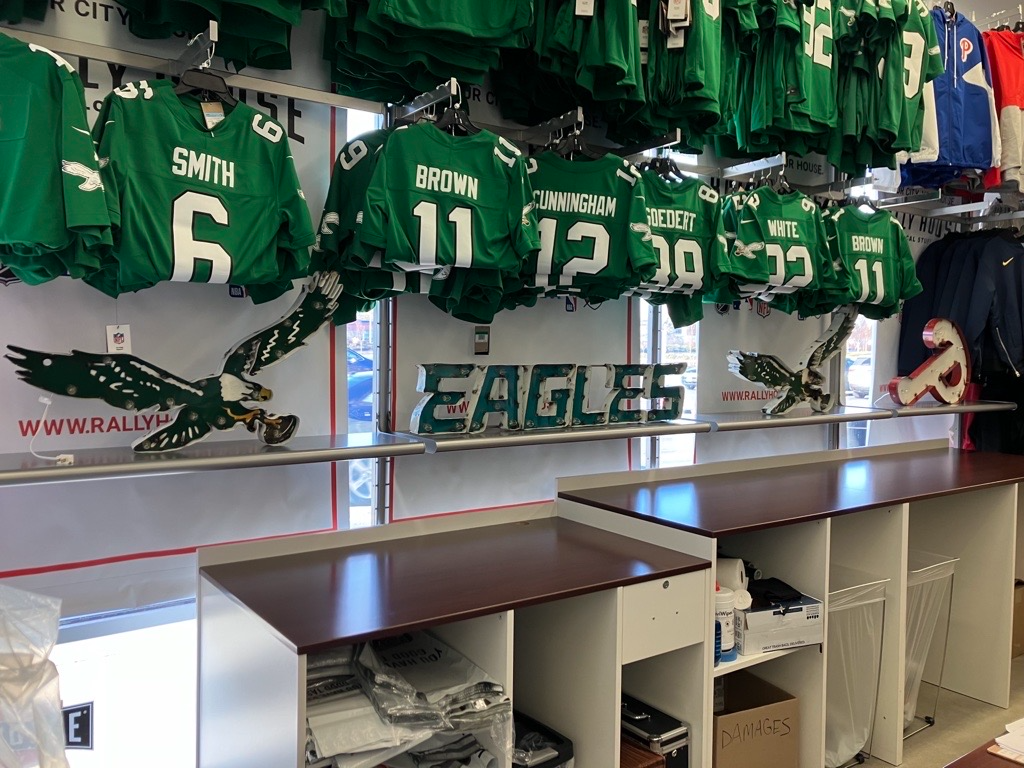
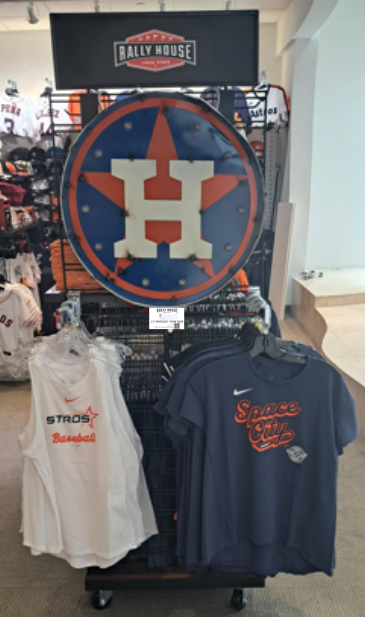
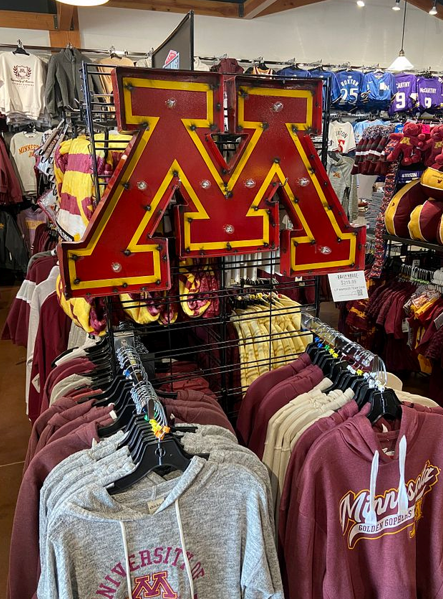
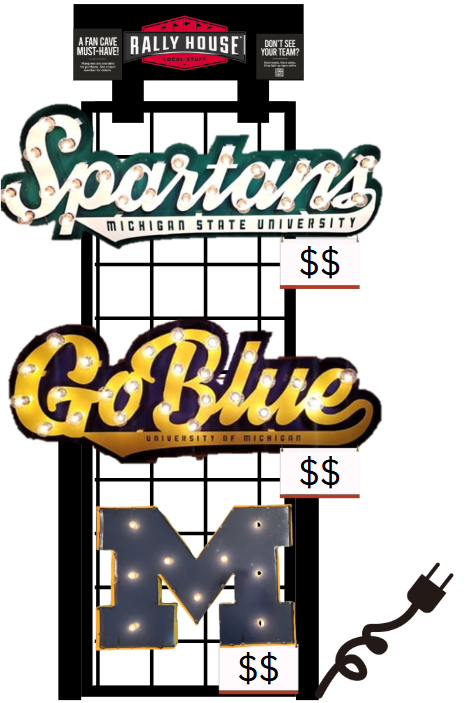
Marquee Fixture |
|
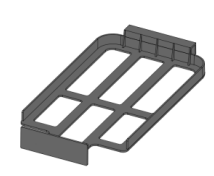
Hat Tray – Slatwall |
|
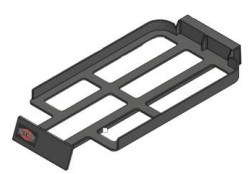
Hat Tray – U Cup |
|
Hat Tray – Grid |
|
| Cowboy Hat Displayer | ![]() |
Backroom and Function Fixtures
Baker’s Rack |
|
Hat Backstock Rack (HBR) |
|
Double Z-Rack |
|
Available to Merchandise (ATM) |
|
Apparel Hanging Cart (AHC) |
|
Workstation |
|
Mail Cart – *Mall Stores Only |
|
Shopping Cart |
|
Customer Order Picking Cart |
|
In-Store Pick Up Fixture |
|
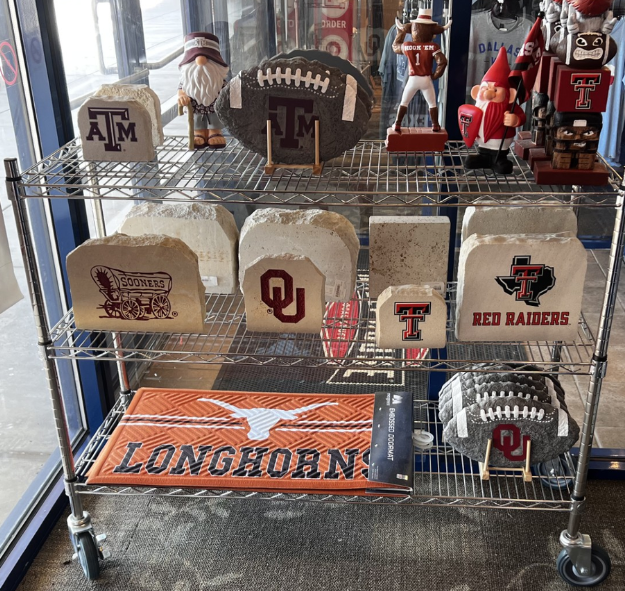
Garden Stone and Rug Fixture (4 shelves starting in 2024) |
|
Sign Holders by Fixture
| Fixture | Sign Holder |
Double Salesman Rack![]() |
|
G Unit Hangbar![]() |
|
G Unit or Wall Faceout – must be rectangular end as shown in photo![]() |
|
Tabletop 4-Way Faceout![]() |
|
Ballet Bar![]() |
|
Ocho Faceout ![]() |
|
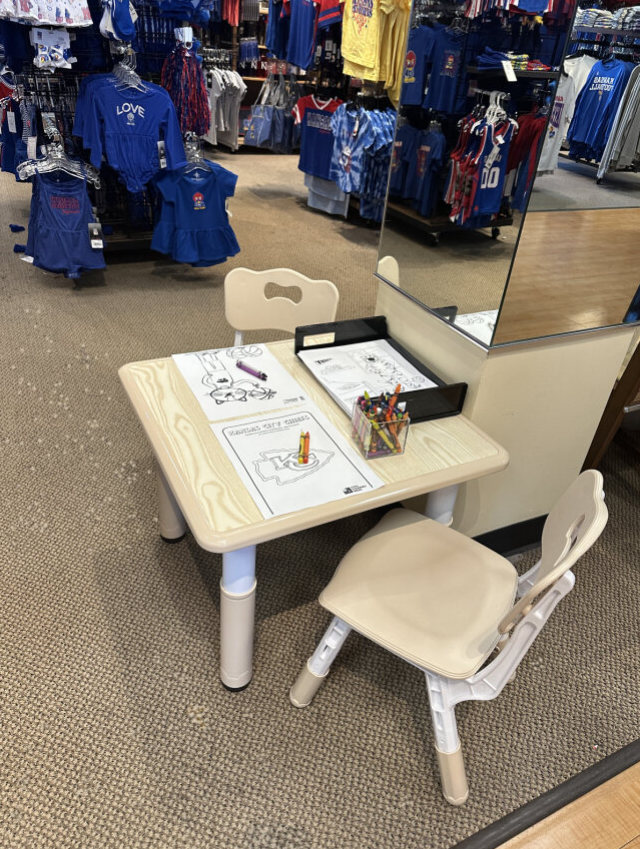
Coloring Tables
Our kids coloring tables create a dedicated dwell zone for our youngest fans—a place for kids to color and have fun while parents’ shop. The goal is to keep the Party going for families by keeping kids engaged and parents comfortable taking their time in-store.
Game Plan for Setup & Execution🔽
- Placement Is Key
- Set up the coloring table near the fitting room, women’s shop, or another open, visible area of your store. This keeps kids engaged while staying within easy sight of their parents.
- The coloring table will consist of a table with two chairs, two acrylic cups, and crayons.
- Team Spirit Matters
- 🔗Print coloring pages for every team carried in your store so kids can connect with the same teams their families love to shop.
- If there is a team your store is looking for but don’t see, open a case to Operations!
- Stock the Essentials
- Maintain a steady supply of Crayons from the amazon supply list (Store Equipment) to ensure the station is always game-day ready.
- Tables, chairs, and acrylic cups can be requested via a NetSuite case.
- Keep Things Sharp
- Stores should follow the Sunday Super Clean Checklist for weekly cleaning.
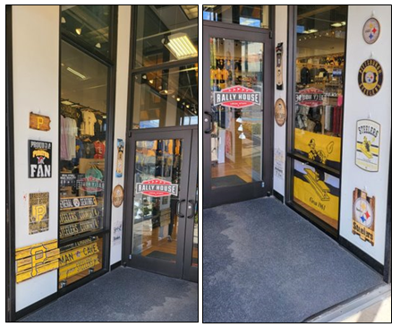
Vestibules
- Vestibules that have drywall should merchandise the interior with examples of home décor items for the teams that they carry.
- To do this, the store will need to purchase command hooks.
- A Paid In/Out can be completed for command hooks.
- Each command hook should only have one home décor item on them.
- This is a display location.
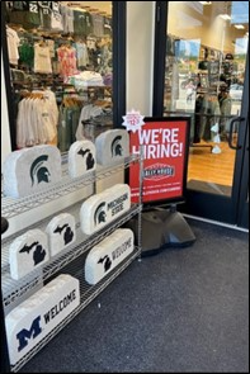
- Rock fixtures that are on the inside or outside of any vestibule should be the short version so that guests can see into the store.
- If you need a short version of a rock fixture, open a support case to Operations.
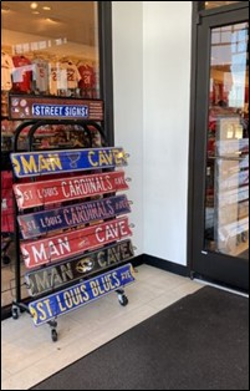
- Street sign fixtures that are on the inside or outside of any vestibule should be the short version so that guests can see into the store.
- If you need a short version of a street sign fixture, open a support case to Buying.
- Stores should not place miscellaneous signs, fixtures, etc. in the vestibule without Field Leader approval.
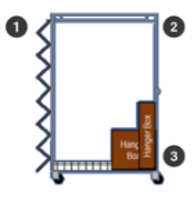
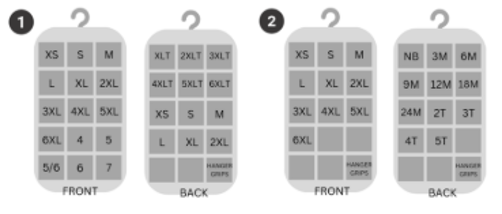
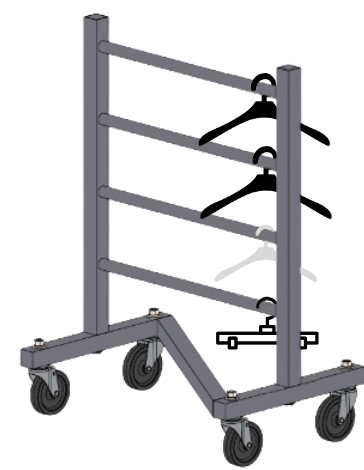
Apparel Hanging Cart Planogram
1. Size bead hangers.
- Size bead organizer 1 goes on one and size bead organizer 2 goes on the opposite end.
2. Hangers are placed on the top hangbar that corresponds to the product that is being hung.
3. Hanger boxes with supplemental hangers are placed on the grid bottom.
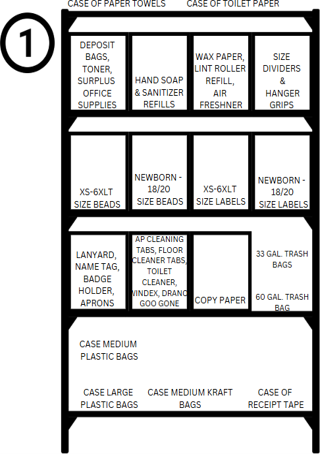
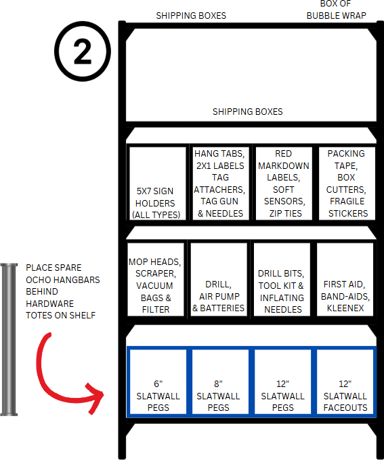
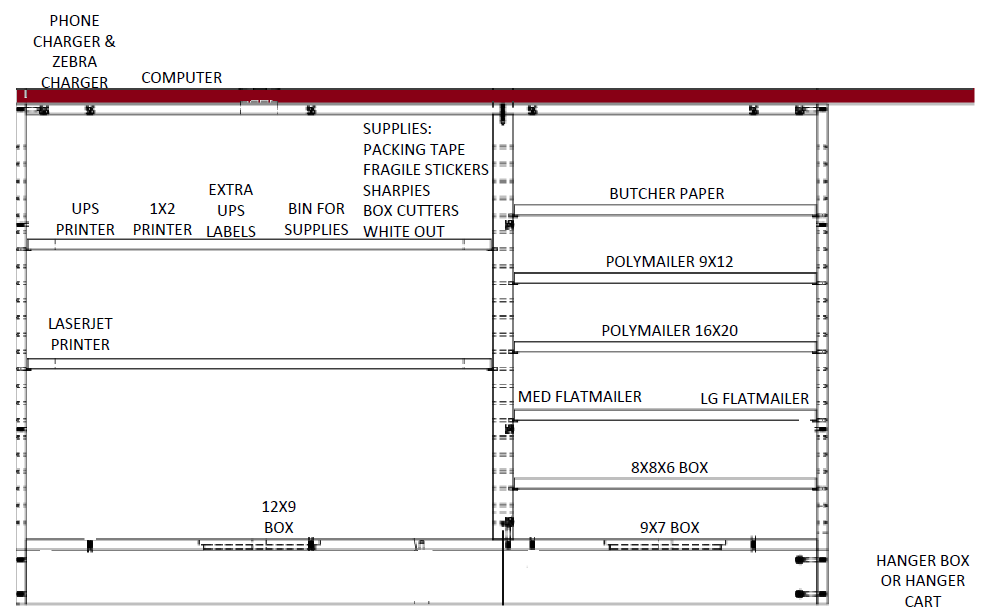
Pack, Ship, Receive Planogram
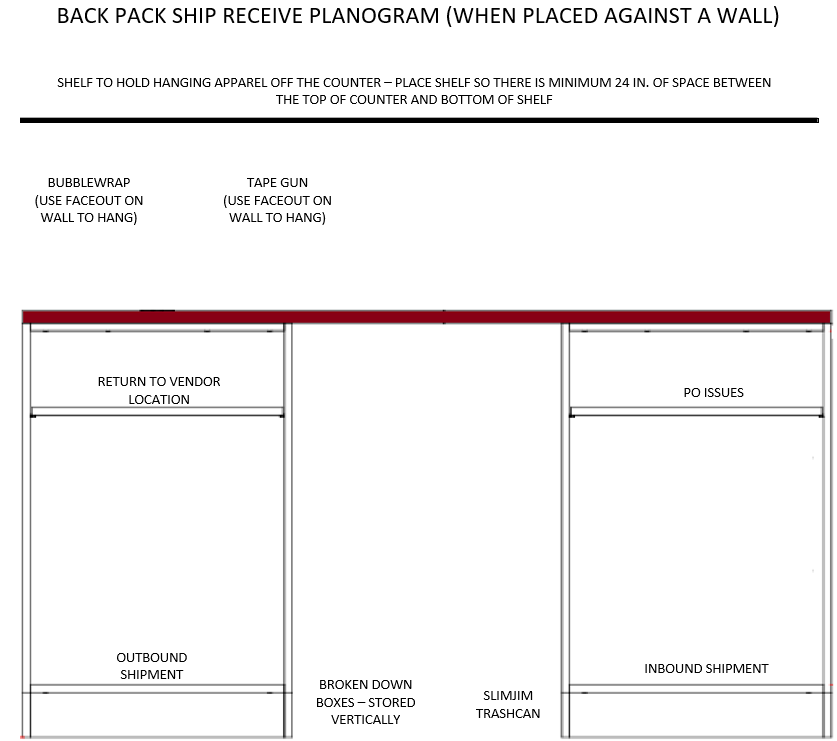
- The below planogram is for the newest version of the Rally House issued PSR. It is the expectation that the PSR is set to planogram at all times.
- There are older versions of the PSR and stores that have a PSR that is non-Rally House issued.
- This planogram is set for a PSR that is placed against the wall in a store. If your PSR is not set against a wall then the shelf above the back PSR do not apply to your store.
- Pack, Ship, Receive Labels
Fixture Building Instructions
Double Salesman Rack
5 Tier Table
Footlocker
Grid Unit
Speciality Store 3 Tier Basket
Sunglass Floor Spinner
Tabletop 4 Way
Uline 3 Tier Square Basket
THE PLAY:
Coming Soon
IMPACT:
Coming Soon
GAME PLAN
Seasonality & Store Flips
Why Seasonality & Store Flips Matter
We move product by sport league, team, department, and season to create a shopping experience that feels personal, timely, and exciting. Guests don’t just shop; they come in looking to celebrate their team, prepare for the season, or find the perfect gift. Our merchandising meets them in those moments.
✅Guests naturally shop with the seasons. Whether it’s gearing up for football season, dressing for colder weather, or gift-hunting during the holidays.
✅Connects with guest needs in the moment when they see their team front and center or finds what they need for the season.
✅Keeps the store experience feeling fresh and exciting with regular product movement and seasonal refreshes. This makes each visit feel new to the guest.
✅Boosts sell-through of time-sensitive or seasonal product by having it where it should be.
Store Flips
Stores flip primarily for three reasons: team placement, seasonality, or event specific. It’s about showing up for the guest in the moment they care most. When a fan walks in and sees their team riding a playoff wave, or the perfect gear for the weather or event this weekend, it creates excitement, builds trust, and drives conversion. Our goal is to be timely, relevant, and emotionally connected to what matters to our guests right now.
Team Placement: Reflect the Moment
We lead with the teams that matter right now because that’s what important to our guest.
- Teams are flipped based on current standings and upcoming league activity.
- A team that’s out of the playoffs should give way to the next rising contender.
- If a season is ending (e.g. NFL in February), we move that league back and make room for what’s starting next (e.g. MLB or March Madness).
- Review team placement weekly during high-traffic sports seasons.
- Use the Team Sales Report on NetSuite with these settings:
- Date Filter: Last Year
- Run the report for the same 60-day window coming up this year.
Ex: Feb 1 – Apr 1, 2024 → review for Feb 1 – Apr 1, 2025- Yet team performance matters! If your team is heading to the playoffs this year and did not last year, this needs to be considered. Who was hot then? Who is hot now?
- Ask when reviewing data:
- What teams sold best in this window?
- Who was hot then? Who is hot now?
- Are all leagues being considered? MLB, NBA, NHL, NFL, NCAA
- Use the Team Sales Report on NetSuite with these settings:
Seasonality: Match the Guests’s Needs
Guests don’t think in “quarters,” they think in moments — tailgating for game day, family weekend, snow game, rivalry game, and more.
- Seasonal changes can happen quarterly, monthly, weekly, or even daily.
- Quarterly seasonal changes can be the more obvious to complete.
- Tank tops for spring/summer and fleece for fall/winter.
- Getting dated merchandise in that needs to be featured to sell now such as fall themed or head to head football t-shirts.
- If your NCAA team has family weekend next week, it’s important get our family apparel items set and ready for fans to shop easily.
- On game day, the correct product for the weather today or game theme/event needs to be evaluated and pulled front and forward or be featured.
- Green t-shirts for a green out game or head to head product for the who we are playing today.
- Hot hands and heavy weight apparel for low temperatures/snow.
- Ponchos and umbrellas for rain.
- Sunscreen and tank tops for hot and sunny
- Quarterly seasonal changes can be the more obvious to complete.
Every Fixture Tells a Story
- Every fixture is a change to inspire a purchase and add-on.
- Endcaps of ochos and G units, tabletops, spinners, and clip strips should all be highlighting what is important for the guest to shop.
- Ensure that the fixture has a product story.
- E.g., knit hats, fleece, and hot hands show a cold weather product story.
- Use Visual Line Manager to see what’s selling
General Seasonality Calendar
| Month | Highlight | Campus Store Call Out |
| January | Holiday moves back into team section on non-dominate fixtures – exception souvenir stores NFL Playoffs Clearance | |
| February | Valentine’s Day -> St. Patrick’s Day | |
| March | St. Patrick’s Day -> MLB Opening Day | |
| April | Mother’s Day and Graduation | Diploma Fixtures & Alumni Highlight |
| May | Mother’s Day and Graduation | Same as April |
| June | Father’s Day and Graduation -> Summer (red, white & blue and/or grilling & BBQ) | New student orientation – feature family and class of product 1 week before orientation |
| July | Summer (red, white & blue and/or grilling & BBQ) -> NFL Training Camp & Clearance | New student orientation – feature family and class of product 1 week before orientation |
| August | Tailgate/Football | Freshman move-in – feature family and class of product 1 week before move-in date |
| September | Tailgate/Football Crew/Hoods based on store weather and seasonality | Fall theme shirts Head to Head shirts Team Schedule shirts Family Weekend – family apparel and hardlines Homecoming – alumni apparel and hardlinesFall theme shirts Head to Head shirts Team Schedule shirts Family Weekend – family apparel and hardlines Homecoming – alumni apparel and hardlines |
| October | Crew/Hoods based on store weather and seasonality | Same as September |
| November | Holiday gifts & holiday theme apparel | Diploma Fixtures & Alumni Highlight |
| December | Holiday gifts & holiday theme apparel | Same as November |
Planning for a Store Flip
- Planning Overview
NFL Spring & Mid-Summer Flips: A Huddle message will be sent to guide your prep.
Other Leagues/Seasons: Stay aware of your local market and plan flips as needed.
Post-Season: Use performance data to decide if the assortment needs refreshing.
- Store Manager To-Do’s
Complete the Flip Assessment with your DM.
District Manager to lead a store visit and discuss with Store Manager(s):
Which teams are flipping?
What fixtures need to be moved?
8G units are primarily placed in the back half of the store in the row against the wall. 8Gs and 5Gs likely need to have the merchandise swapped between the two teams to keep 8Gs in the back half of the store.
Are there high capacity fixtures in a low volume team that need moved?
Create a fixture map showing placement for both teams (maps on NetSuite).
Locate blank store maps on NetSuite store page.
When will you begin and end your flip?
Who will be completing the flip?
What prep work needs to be completed?
Replenishment for the teams flipping should occur prior to beginning the flip. This is also an opportunity to look for bulking hanging apparel.
Basic t-shirts may need to be folded down for the team that is condensing and can be done before the planned flip day(s).
Does the store need to order any hardware such as faceouts, pegs, or hat trays?
Does the store need to order any size labels or size beads?
- Timeline & Labor
Flip should happen during an away game week for the in-season team.
Use normal labor; if projected sales are $15K+ during that week, request extra hours from your DM.
Be clean, efficient and non-disruptive to guests
Flip should be completed within one week.
Plan who is doing what and when. Replenish inventory before the flip begins.
- Flip Steps by Department
- Kids
- Flip first.
- Move fixtures if staying the same; otherwise, begin 8G/5G swaps.
- Count wall faceouts to determine needed space.
- Use carts/racks to move product.
- Womens
- Same steps as Kids: flip fixtures, update 8Gs/5Gs, adjust jetrails (if applicable), and move product using proper equipment.
- Mens
- Start with Hat Walls:
- Count faceouts for both teams to plan new layout.
- Use baker’s rack to move hats in order.
- Reset according to 🔗Hat Wall Guide.
- Set wall apparel around Hat Wall.
- Flip floor fixtures and update 8Gs/5Gs as needed.
- Start with Hat Walls:
- Hardlines
- Move fixtures or use carts to transfer product safely.
- Avoid placing glassware near shelf edges.
- Watch It in Action
- Kids
Required Equipment by Product Type
| Department | Equipment Needed |
|---|---|
| Hats | Baker’s Rack |
| Hardlines | Mall Cart or Shopping Cart |
| Hanging Apparel | Apparel Hanging Cart / Salesman Rack / Z-Rack |
| Folded Apparel | Baker’s Rack |
| All Departments | Additional hardware (faceouts, pegs, etc.) as needed |

Hanging & Folding Guidelines
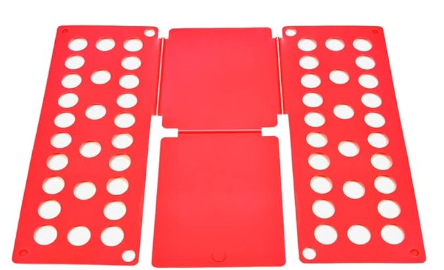
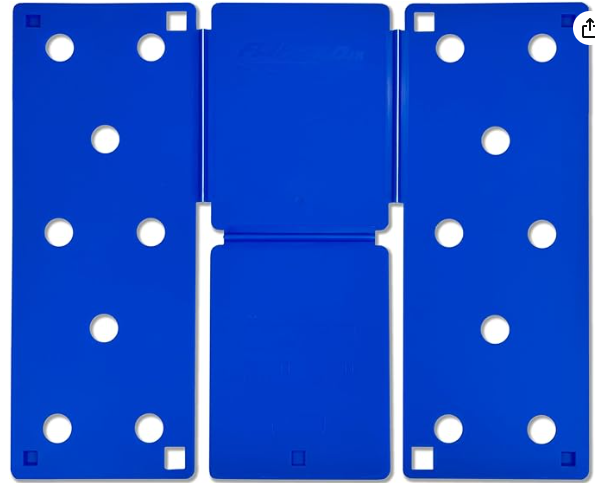
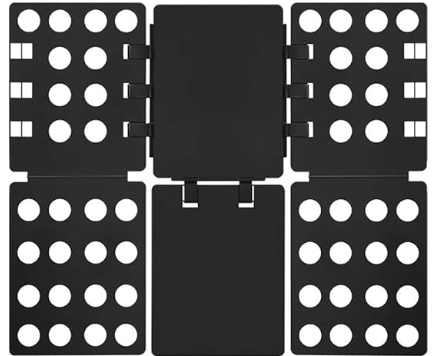
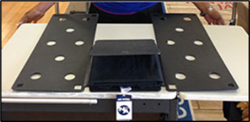
Folding Board Styles
Infant/Toddler/Kids Folding Board
15.75″x18.9″
Youth Folding Board
23″x19″
Women’s/Mens Folding Board
27.5″x22.5″
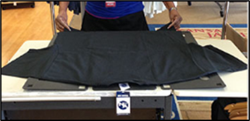
Women’s/Men’s Fold
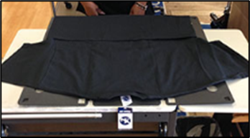
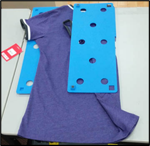
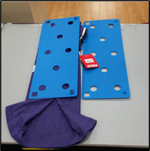
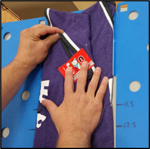
STEP 1
Use the men’s folding board (black board). Lay the shirt flat with the design face down.
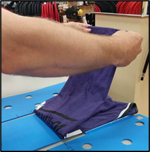
STEP 2
Fold the shirt up to the bottom edge of the folding board.
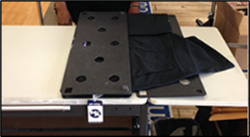
STEP 3
Flip one side on the folding board to the right.
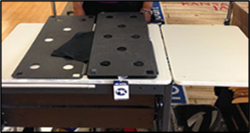
STEP 4
Flip the other side of the folding board to the left.
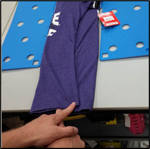
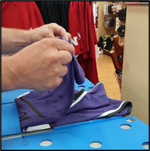
STEP 5
Fold the sleeve of the shirt in towards the body of the shirt.
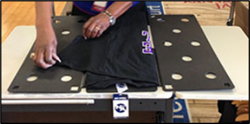
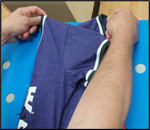
STEP 6
Flip the center board up in order to fold the t-shirt in half.
- If the shirt is long sleeved, place a “long sleeve” sticker to the left of the size sticker.
Youth Fold
STEP 1
Lay the t-shirt face down onto the folding board.
STEP 2
Start with the side without the tag on the shirt and flip the board towards the middle of the shirt.
STEP 3
Flip the other side of the board over making sure the tag is still visible.
STEP 4
Fold the sides of the bottom of the shirt together making the bottom of the shirt narrower than the top.
STEP 5
Adjust the top of the shirt to make sure it is slightly wider than the bottom of the shirt.
STEP 6
Fold the sleeve with the tag toward the inside of the shirt making sure the tag is flat.
STEP 7
Lift the bottom of the t-shirt and fold it away towards the reference line.
If the shirt is planned for a 12” shelf use the 11.5” reference mark. If the shirt is planned for a 14” shelf use the 13.5” reference mark.
STEP 8
Tuck the bottom material under and tuck between the top and the bottom of the shirt when folding for a 12” shelf.
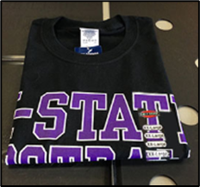
Flip the shirt over and place a size sticker 2” from the right side of the shirt.
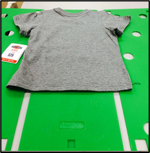
Kid’s Fold
STEP 1
Lay the t-shirt flat with design face down. Using the holes of the board as a guide, make sure the shirt is centered.
STEP 2
Without using the flipping paddles of the board, fold one side of the t-shirt in toward the center.
STEP 3
Fold in the other side of the t-shirt. When folding the t-shirt, ensure that the tag is folded inside the shirt and is easily accessible to customers and sales team.
STEP 4
Once both sides of the shirt are folded correctly, flip the tail of the t-shirt using the bottom flip paddle. The tail of the shirt will not need to meet the top.
STEP 5
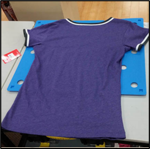
When correctly folded t-shirt will have the shape as shown in the image to the left.
STEP 6
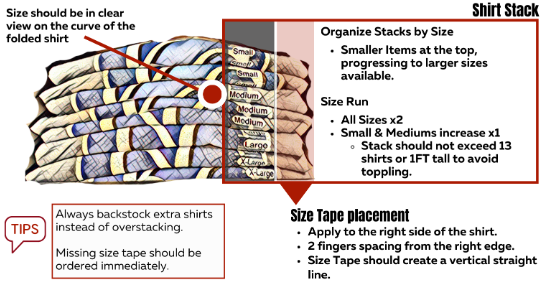
Wrap the size sticker around the fold of the t-shirt. In order to prevent a crease, place fingers at fold line and wrap sticker around. Size stickers are placed 2” from the side of the folded t-shirt. A handy measuring tip is to place two fingers on the edge of the shirt and position sticker next to fingers.
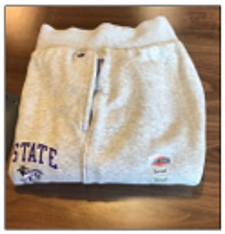
Sweatpants Fold
STEP 1
Grab the sweatpants by the side seams.
Fold in the front seam into the sweatpants.
STEP 2
Fold the legs up to the waist.
STEP 3
Depending on the space where the pants where be placed either a half fold or a double fold will be needed.
STEP 4
If possible, try to make sure that the logo on the sweatpants can be seen.
Place a size sticker in the right corner of the pants two finger spaces from the right side.
How to Hang Pants
Properly hanging pants helps create a clean, organized presentation and maximizes space. When pants aren’t hung correctly, they can appear messy and take up valuable room. Watch the video below for a quick guide on how to hang pants the right way.
Process Steps
1. Grab the pants by the side seams.
2. Fold the front seam in, pointing toward the back seam.
3. Fold the back seam in, pointing toward the front seam.
4. Attach the hanger onto each side of the pants.
Hangers
Hangers at the Cashwrap
There are two methods for organizing hangers at the cashwrap.
- Plastic Hanger Sleeves
- Plastic hanger sleeves come in two sizes – medium and large.
- These two sizes correspond to the kraft hanger sleeves that are available for stores and sit inside of the plastic sleeve to reduce damage to the kraft sleeve.
- Large is for adult hangers.
- Medium is for kids and pant hangers.
- Plastic hanger sleeves are kept in the hanger locations for the front cashwrap.
- Do not remove size beads.
- When full and at the end of the night, the hangers in the sleeves are moved to the Apparel Hanging Cart.
- Hanger Cart
- Hangers are organized by type on each of the bars – adult top, kid top, and pant.
- Do not remove size beads.
- When full and at the end of the night, the hangers on the cart are moved to the Apparel Hanging Cart
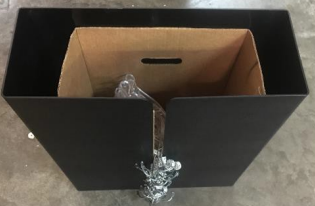
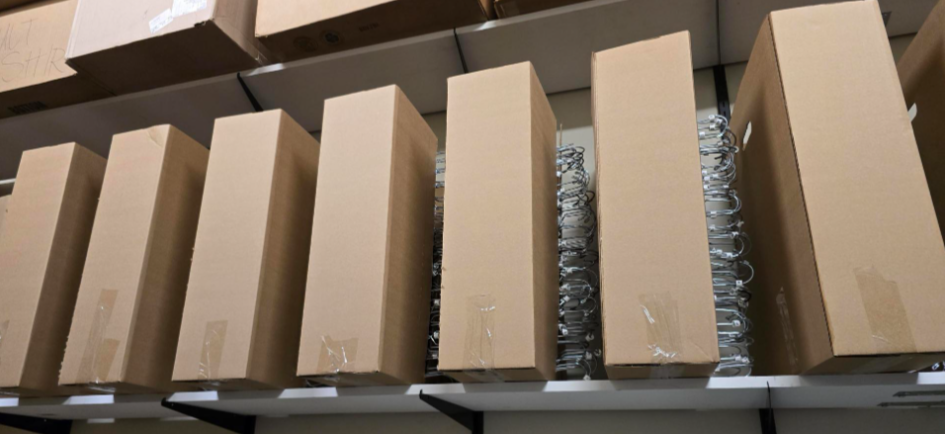
Hanger Storage
- There are periods of time when stores sell more product than they are receiving into the store (i.e., Holiday season) and need to store hangers.
- The first option is to store hangers in the kraft hanger sleeve and place on the shelving in the backroom above backroom fixtures.
- As needed, hangers will need to be placed in a 14x14x14 box rather than the cardboard sleeve.
- This is done when the store has run out of kraft hanger sleeves and needs them for cashwrap functions.
Types of Hangers and Grips
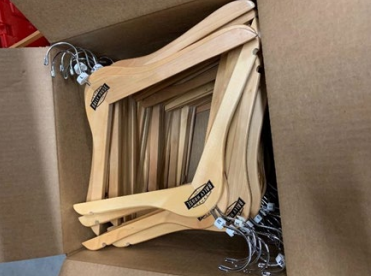
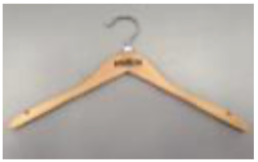
Wooden Top Hanger
Men’s, Women’s, and Youth size 8 and above
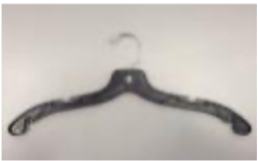
Black Plastic Top Hanger
Men’s, Women’s, and Youth size 8 and above
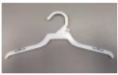
Clear Hanger
Women’s Tank Tops and Youth
White Plastic Hanger
Baby, Toddler, Children, and Youth up to size 7
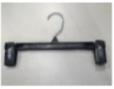
8″ Bottom Hanger
Men’s, Women’s, and Youth Bottoms
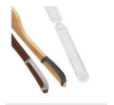
Clear Strip Grip
Placed on plastic top hangers on Women’s Plus Size or wide neck items
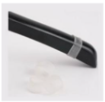
Round Clear Grip
Placed on wooden top hangers on Women’s Plus Size or wide neck items
Diamond Pattern
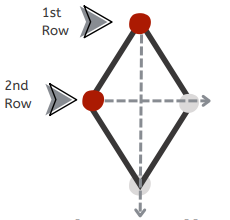
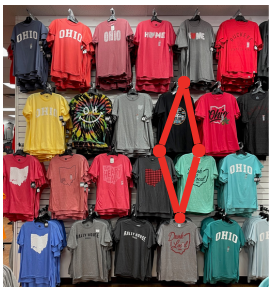
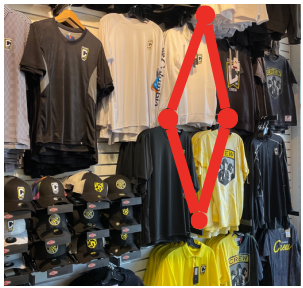
The Diamond pattern is an alternative way to space F/O (face outs) to utilize your wall space at the optimal capacity.
When to Use
Much like an actual diamond, the use of this pattern is more rare and reserved for special situations.
Diamond pattern should be used for:
- Short or unusual height walls.
- When you need to go 3 or 4 F/O (face outs) high.
- Walls with gaps that do not allow for other merchandising.
- Request approval to use this in your stores.
- Please partner with your District Manager when selecting this option.
The Pattern
The Diamond shape is made by alternating face out alignment every other row.
- Amount of rows will vary based off wall size.
- Placement of the face out may need to be slightly above the bottom of the hanging shirts, centered in between to fit correctly.
- 1st & 3rd rows vertically align.
- 2nd & 4th rows vertically align.
Clip Strips
Merchandising Clip Strips
Clip strips convert unused space into sales. They extend the product story, make add-ons effortless, and lift AT and UPT. When clip strips are full, seasonal, and visible, they drive impulse purchases and inspire our guests to keep exploring the product.
- Clip strips are to be set for seasonality.
- Example: If it is summer, hot hands or knit hats should not be on a clip strip.
Avoid duplication of SKUs or styles already merchandised on the fixture.
Items on clip strips should be double-exposed in the team section and on the clip strip.
Tools & Resources
Use the NetSuite search if you need help identifying product to fill clip strips.
- 🔗Clip Strip – Store View
- Open the search
- Filter by Team/Class
- All product has 24 units or higher to allow for exposure in register lane and team section.
Ideal Product Considerations
| Department | Ideas for Clip Strips |
|---|---|
| Kids |
|
| Womens |
|
| Mens |
|
Installing Clip Strips
1. Clip together the needed clip strip pieces by snapping them together.
- tabletop 4-way cup hook = 1 clip strip pieces
- 4’ grid unit/5’ grid unit/8′ grid unit = 2 clip strip pieces per corner.
- Each edge or corner has the 2 clip strip added, 4 total per fixture
- If installing on a grid unit, follow these directions:
- Use a 3” zip tie to zip tie the clip strip to the top of the grid unit on the corner/edge of the fixture facing outward.
- Use a 3” zip tie to zip tie the center of the clip strip to prevent bulging once product is placed.
- If placing on a tabletop 4-way cup hook, the clip strip can be placed on the cup hook using the hole that is at the top of the clip strip.
- There is no zip tie needed in this installation.
- Once clip strips are placed on a grid unit, they are not removed.
Feature Walls
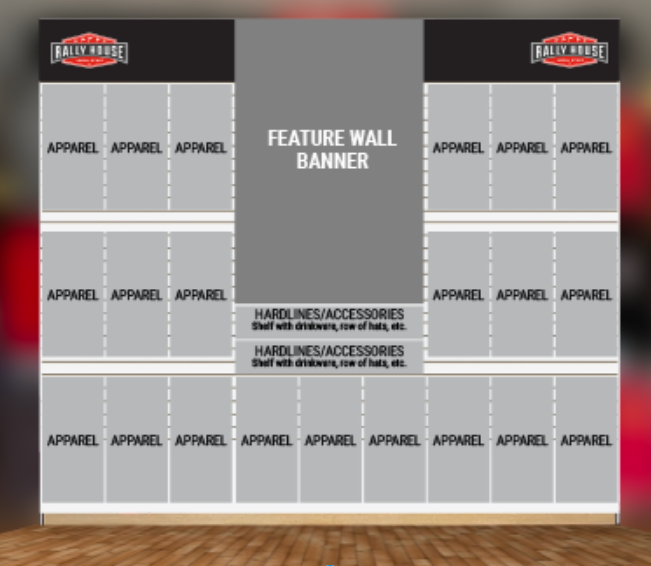
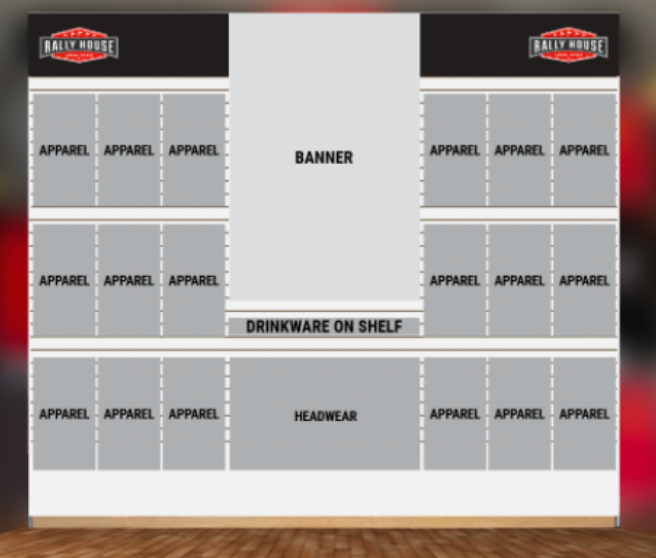
Select stores at Rally House have a feature wall that greets the customer when the customer enters into the store! The walls generate the first feeling a guest has and should be dominate team.
Marketing will send a team or Rally House banner for this wall.
- The banner is centered in the center of the feature wall.
- The product assortment for the wall matches the team on the banner.
- Under the banner a shelf is placed.
- On this shelf, highlight drinkware or home decor.
- Under the shelf, add in two or three rows of hat trays, depending on the height of the feature wall.
- If there is still space under the hat trays, an piece of home décor such as a street sign can be placed.
- On the left and right side of the banner, faceouts of apparel are hung.
- Apparel hung on the Feature Wall should be trending or new product. On-field or sideline items are encouraged.
- Reminder, any product that is on the Feature Wall should be represented in the team section.
- This means that the items are double exposed in the store.
G Unit Standards
- For retrofitted fixtures, in the center of the fixture, metal shelves are used.
- Two-foot wood shelves can be used on the end caps of the fixture.
- In the center of the fixture, 12” pegs are primarily used.
- There are a few instances where 6” pegs can be used such as jewelry. However, jewelry is likely better on the endcap.
- If the endcap has faceouts, 12” pegs can be used.
- If the endcap does not have faceouts, 6-8” pegs are used.
- Product is placed as low as it can go on the grid fixture without dragging on the ground.
- Start with placing apparel on the faceouts or placing large hardlines items on the deck before shelving out the unit.
- Hardlines:
- The 5G can be used for all hardlines in the center for a footlocker, when needed.
- When this is done, the shelves are adjusted to fit the product on the shelf so that there is not negative space.
- Begin with merchandising product on the grid deck to utilize this as a shelf.
- Hardlines that are placed on the grid units should be in the same size so that straight rows are created.
- Faceouts in the same row should not be placed at different heights.
Infant Grid Merchandising
- Grid units are a great high-capacity fixture.
- In the front of the store a 5′ grid unit is used and in the back of the store a 8′ grid unit is used for infant, in most cases.
- Depending on the assortment of infant product for the team, there are several ways to set a grid unit with infant product.
- Onesies are best to be hung.
- Ensure that the clasped are closed so the onesie does not drag.
- Items that are a set are to be hung.
- Basic infant t-shirts can be folded down.
- Onesies are best to be hung.
- Infant girls product should be merchandised with toddler and youth girls product.
- When this is done, the product is mostly separated by infant, toddler, and youth girl.
- When the three sizes of girls share a style, such as cheerleading outfits, these can be merchandised on the same faceout.
- The grid unit should be merchandised with apparel and other softlines or hardlines.
- A grid shelf or pegs can be used to hold other apparels or hardlines.
- The additional softlines and hardlines that are added to the grid unit should correspond with the apparel product that is merchandised on the grid unit.
- In infant, these are items such as booties, binky’s, softee balls, nightlights, bibs and more.
- The end panels of the fixture should also be a mix of apparel and hardlines.
- There may be in instance where half of the grid fixture is infant and the other half of the fixture is toddler.
Toddler Grid Merchandising
- Grid units are a great high-capacity fixture.
- In the front of the store a 5′ grid unit is used and in the back of the store a 8′ grid unit is used for toddler, in most cases.
- Depending on the assortment of toddler product for the team, there are several ways to set a grid unit with infant product.
- Items that are a set are to be hung.
- Basic toddler can be folded down.
- Toddler girls product should be merchandised with infant and youth girls product.
- When this is done, the product is mostly separated by infant, toddler, and youth girl.
- When the three sizes of girls share a style, such as cheerleading outfits, these can be merchandised on the same faceout.
- The grid unit should be merchandised with apparel and other softlines or hardlines.
- A grid shelf or pegs can be used to hold other apparels or hardlines.
- The additional softlines and hardlines that are added to the grid unit should correspond with the apparel product that is merchandised on the grid unit.
- In toddler, these are items such as softee balls, nightlights, toddler socks and hats, and more.
- The end panels of the fixture should also be a mix of apparel and hardlines.
- There may be in instance where half of the grid fixture is infant and the other half of the fixture is toddler.
Youth Grid Merchandising
- There may be times where a grid unit is needed to merchandise youth product.
- Youth product is often placed on the wall space behind the infant and toddler grid fixture(s).
- Youth girls product should be merchandised with infant and youth girls product.
- When this is done, the product is mostly separated by infant, toddler, and youth girl.
- When the three sizes of girls share a style, such as cheerleading outfits, these can be merchandised on the same faceout.
- The grid unit should be merchandised with apparel and other softlines or hardlines.
- A grid shelf or pegs can be used to hold other apparels or hardlines.
- The additional softlines and hardlines that are added to the grid unit should correspond with the apparel product that is merchandised on the grid unit.
- In youth, these are items such as socks, hats, youth slippers, rubber bracelets, and more.
- The end panels of the fixture should also be a mix of apparel and hardlines.
Men’s Grid Merchandising
- Grid units are a great high-capacity fixture.
- 5’ grid units can be used in both the front and back of the store.
- 8’ grid units should be used in the back half of the store and are best in the back row of team sections.
- The grid unit should be merchandised with apparel and other softlines or hardlines.
- A grid shelf or pegs can be used to hold other softlines or hardlines.
- The additional softlines and hardlines that are added to the grid unit should correspond with the apparel product that is merchandised on the grid unit.
- Example: If there are men’s polos on the grid unit, golf accessories and visors are a great addition to the fixture.
- The grid hang rod can be used to merchandise men’s pants, shorts, big & tall, SALE, or 1’s and 2’s.
- When the grid hang rod is used, product is merchandised by size.
- Ensure that there are size ring indicators used on the grid hang rod.
Women’s Grid Merchandising
- Grid units are a great high-capacity fixture.
- 5’ grid units can be used in both the front and back of the store.
- 8’ grid units should be used in the back half of the store and are best in the back row of team sections.
- The grid unit should be merchandised with apparel and other softlines or hardlines.
- A grid shelf or pegs can be used to hold other apparels or hardlines.
- The additional softlines and hardlines that are added to the grid unit should correspond with the apparel product that is merchandised on the grid unit.
- Example: If there are women’s crew necks on the unit, women’s scarves and gloves are a great addition.
- The grid hang rod can be used to merchandise pants, shorts, SALE, or 1’s and 2’s.
- When the grid hang rod is used, product is merchandised by size.
- Ensure that that there are size ring indicators used on the grid hang rod.
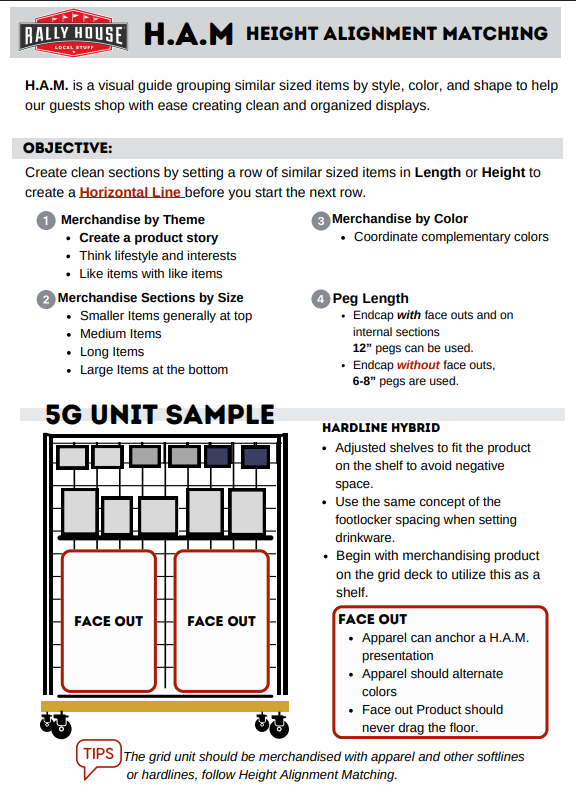
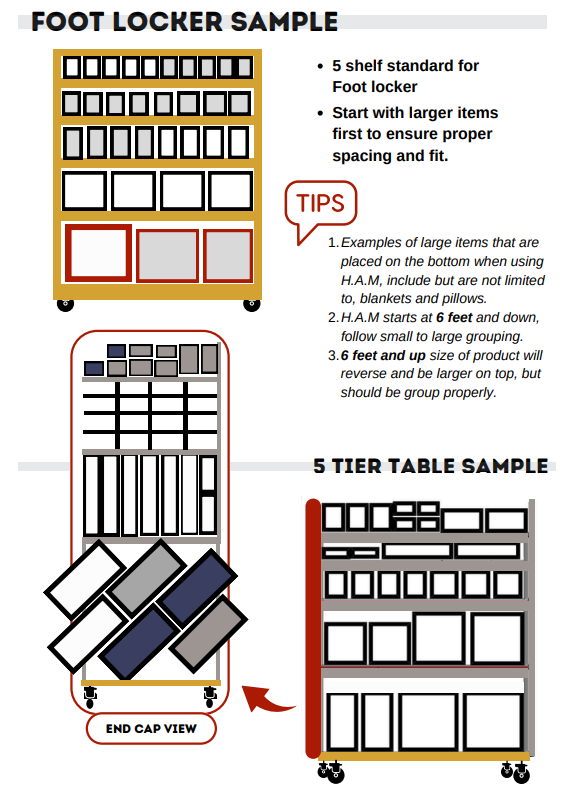
HAM
THE PLAY:
Coming Soon
IMPACT:
Coming Soon
GAME PLAN
Executive Brands
Create a polished Executive Brands presentation that showcases premium product, highlights key vendors, and inspires add-on sales through elevated merchandising and coordinated accessories.
Game Plan
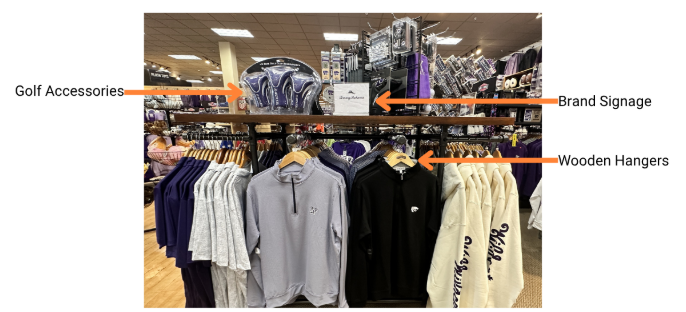
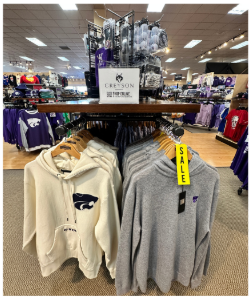
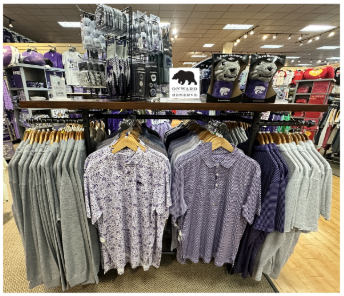
1. Executive Brand styles are merchandised on hangers, using wooden hangers where available, to create an elevated presentation.
- Cashmere items are folded. Do not use size stickers on cashmere items.
2. Merchandise Executive Brand styles by team > gender > vendor > subclass.
- Large Assortment: Allocate a full fixture to vendors with assortment large enough to support.
- Medium Assortment: Combine multiple vendors on one or more fixtures to create an Executive Brands destination within the Team Shop.
- Small Assortment: Merchandise Executive Brands on focal side(s) of shared fixture with product from the same subclass.
- Hardline Examples → elevated drinkware (high ball glasses, wine glasses, rocks glasses, engraved or etched glassware), golf accessories, office décor
- Accessories Examples → premium hats, visors, dress socks, neck ties, bow ties
- Elevated Men’s Accessories → dress socks, neck ties, bow ties
4. Add vendor specific signage to each vendor presentation to help Guests identify their favorite brands.
5. Follow EAS and Sensor Tag guidelines.
Medium Assortment Examples
Jerseys
All jerseys receive a hard sensor tag. Review 🔗EAS Sensor Tag Placement for placement.
1. The preferred location for men’s jerseys to be merchandised is behind the Cashwrap.
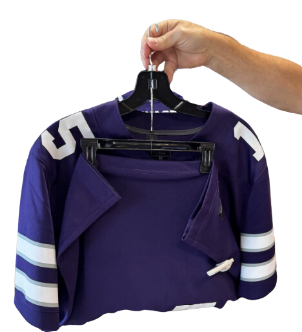
- When needed, use a pant hanger, clip the end of the jersey. This is done to maximize space.
- Place the hook of the pant hanger into the slot on the top hanger to half-fold the jersey. The bottom of the jersey should be on the side that is not displayed to the guest.
- Place style of jerseys on faceout.
- Ensure that jerseys are not dragging on the faceout below the style.
- If needed, fold the tail of the jersey before clipping to prevent dragging.
2. If all jerseys will not fit behind the Cashwrap, jerseys are to be merchandised on the top row of the wall so they are out of reach for the customer.
Jerseys in a team section are typically placed above the hat wall.
Men’s Pants & Shorts
Wall Merchandising
Men’s pants and shorts are placed on the bottom row of the wall.
- Shorts are typically placed two high when merchandised next to pants.
- Pants and shorts are placed as close to the ground as possible without the product dragging on the floor.
- Use 8″ bottom hangers.
- Tuck tags into the pants or pocket.
G Unit Merchandising
When merchandised on a grid unit, pants are placed on on a faceout.
1. The center of a grid unit can hold 4 faceouts and the endcap of a grid unit can hold 3 faceouts.
2. Pants and shorts are placed as close to the grid deck as possible without the product dragging on the floor.
3. Shorts when merchandised on a grid are placed two high.
4. The space above the pants/shorts on the grid unit will need to be filled.
- A shelf with folded shirts can be used.
- Shelves or pegged hardlines can be used.
- Other product to create a product story can be used.
5. Use 8″ bottom hangers.
6. Ensure tags are tucked into the pants or pocket.
Men’s Walls
Men’s Walls and Vertical Merchandising
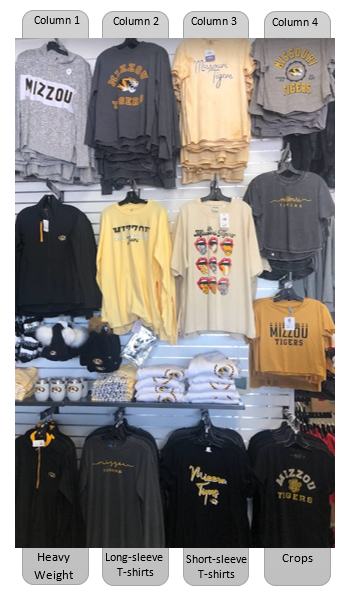
1. Vertical merchandising establishes 4 concepts (vertical rows are illustrated in grey):
- It creates a product flow where like styles and brands can be positioned together.
- Placing like styles in columns allows customers to easily navigate to the area of the wall where they need to shop.
- Merchandising larger brands together like Nike and ‘47 Brand creates a shop destination, which enables our brand- loyal customers to shop within a smaller space.
- Merchandising in columns creates a system where the store can double-expose styles. Double-exposing styles when a shop is sold down allows the store to easily move product back together when new product arrives in store.
2. Guidelines for Vertical Merchandising:
- The same silhouette of product should be placed in a column together.
- When hanging product adjacent to each other in the wall, make sure that each faceout of product has enough room in between the two so that it is possible to place a hand between the styles
Men’s Top, Middle, and Bottom Wall Rows
- Top Row
- In a Team Shop, high priced jerseys should always be placed in the top row.
- Jerseys are always sensored with a hard tag.
- The top row is typically out of reach for the guests and they need an associate to help to get a high priced item down.
- If the team does not have jerseys to be placed on the top row, other high-ticket items should be placed here.
- Middle Row
- Fresh, new, and popular apparel should be positioned on the middle row as it is a prime spot on the wall for merchandise.
- The middle row is positioned at the customer’s eye level and it is the easiest place for the customer to shop.
- The middle row should be merchandised to accommodate apparel and hats.
- Hat walls are how hats are set within a team wall. Hat wall merchandising can be found in the Hats Merchandising section of this manual.
- If needed, product pods can be added to the middle row depending on the teams assortment of product. Product pods can be found in the Men’s Pods section of this manual.
- Bottom Row
- The bottom row can house pants, shorts, tops, outerwear, and the best sellers bar.
- When styles begin to sell down it may be necessary to house two styles of product onto one faceout.
- If this is the case, the bottom row should be used, and the styles should be contrasting colors so that the customer can easily identify that there are two separate items on one faceout.
Men’s I-Walls
- I-Walls are in older stores and this merchandising is for select stores. I-Walls and endcaps can work together to merchandise seasonal product. When the season’s change, product featured on the endcap can be rotated with the product that is merchandised on the wall-side of the I-Wall.
- Guidelines for Merchandising Men’s I-Walls:
- When setting up an I-Wall for men’s product there should be seven faceouts across the top.
- Product merchandised on the bottom row should not touch the floor.
- Big & Tall should not be housed in the I-Wall as the product will drag on the floor.
- I-Wall endcaps should be used to merchandise seasonal product.
- During the Summer months, tank tops, short sleeve t-shirts, and polos are a great option to display.
- During the winter months, crew necks, hoodies, and heavy weight jackets should be moved to the endcap.
- Ensure that the additional product added to the end cap corresponds with the seasonal product featured.
- During summer months ball caps, golf accessories, and flip flops can be added, where during the winter months gloves and knit caps can be displayed.
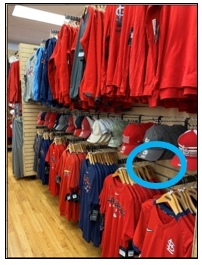
- I-Walls can be a great place to set a hat wall.
- Hats can also be placed in between the bottom row of faceouts when the team has more hats to merchandise. Example below circled in Blue.
Big & Tall
- Men’s product that is true Big & Tall product is what is placed on the Big & Tall fixture(s) within each team.
- True Big & Tall product’s size run begins at 3XL and can go through 6XLT.
- Big: 3XL, 4XL, 5 XL, 6XL
- Tall: XLT, 2XLT, 3XLT, 4XLT, 5XLT, and 6XLT.
- There are style of core men’s product where the size run is from size Small – 3XL.
- These 3XL units are NOT men’s Big & Tall and are merchandised with the men’s core style.
- These 3XL units can be 2″-4″ shorter than a Big & Tall 3XL.
- True Big & Tall product’s size run begins at 3XL and can go through 6XLT.
- Big and Tall product is housed in the team section.
- In select stores, it has been decided that the store will have a Big & Tall Shop that is done within a center shop of the store. These select stores place all teams Big & Tall product into this shop.
- Depending on store size and inventory levels, Big & Tall presentations will differ from store to store.
- It is preferred that Big & Tall is merchandised on a 5G unit when possible.
- When merchandised on a 5G unit the product is merchandised by style. This is done because the product is front facing on the fixture.
- A style is placed on each faceout and shelves can be added and styles folded and placed on the shelf.
- When merchandised on a 5G unit the product is merchandised by style. This is done because the product is front facing on the fixture.
- In team’s where the assortment is larger than a 5G unit, a grid hangrod, ballet bar, or double salesman rack can be used to merchandise Big & Tall.
- When merchandised on these fixtures, the product is merchandised first by size and then by style. This is done because the product is side hung on the fixture.
- Size indicators should be used to show the customer what sizes are available.
- Organize items by style within the size:
- T-shirts
- Polo shirts
- Sweatshirts
- Crewnecks
- Jackets
- If placed on a ballet bar, ensure that the tabletop is used for folded Big & Tall product.
- It is preferred that Big & Tall is merchandised on a 5G unit when possible.
- Big & Tall signage is placed on all Big & Tall fixtures.
Women’s Fashion & Trend
Female fans want style-first, wearable team gear that goes beyond basic logo wear. Trend-driven, fashion-forward presentations encourage outfit-building and add-on purchases while positioning Rally House as a destination for curated fan style. A strong women’s fashion fixture also drives higher margins and attracts new Guests, helping Rally House stand out from mass and online competitors.
- Identify focal fixture(s) in dominant Team Shops for Women’s trend presentations. Trend presentations should sit after women’s New Arrivals fixtures.
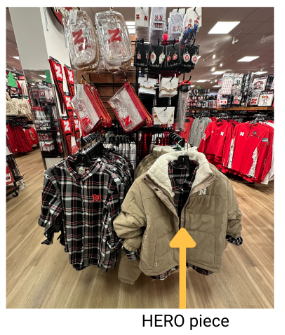
- Anchor the presentation with a HERO piece. Choose a standout, high-impact style that draws the eye & sets the tone for the entire presentation.
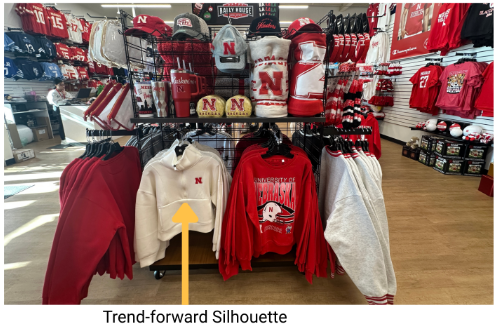
- Choose trend-forward silhouettes, elevated fabrics & fashion-focused team gear to merchandise head-to-toe outfits inclusive of tops, layering pieces & bottoms (where available).
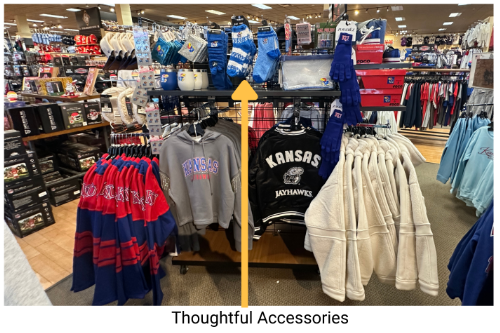
- Cross merchandise with fashion jewelry, hats, bags, and drinkware that complement the apparel, create product stories & elevate her look.
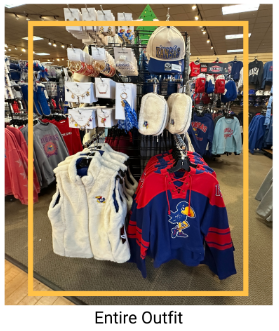
- View it through the Guest’s eyes. Assess the final presentation to ensure it inspires her to build an entire outfit & is easy to shop.
Crop Tops
It’s important to merchandise women’s crop tops in a cute and intentional way because these styles are highly trend-driven and visually appealing. When displayed attractively, they catch the shopper’s eye, create outfit inspiration, and invite customers to engage with the product.
- Correctly merchandising Women’s Crop Tops gives the customer a better presentation of the product and highlights that the product is cropped.
- The ideal fixtures to merchandise crop tops are a 5’ Grid Unit or 8’ Grid Unit. A wall can be used if needed.
- Ochos and 4-Ways should not be used as it can be hard to tell that the items are cropped on this fixture.
- When merchandising crops you can put your long sleeve and short sleeve crops together. Long sleeves likely need to be merchandised over the short sleeve crops to ensure that sleeves do not drag on the ground.
Women’s Pants & Shorts
- When merchandised in the wall, women’s pants and shorts are placed on the bottom row of the wall.
- Shorts are typically placed two high when merchandised next to pants.
- Pants and shorts are placed as close to the ground as possible without the product dragging on the floor.
- Use 8″ bottom hangers.
- Ensure tags are tucked into the pants or pocket.
- When merchandised on a grid unit, pants are placed on on a faceout.
- The center of a grid unit can hold 4 faceouts and the endcap of a grid unit can hold 3 faceouts.
- Pants and shorts are placed as close to the grid deck as possible without the product dragging on the floor.
- Shorts when merchandised on a grid are placed two high.
- The space above the pants/shorts on the grid unit will need to be filled.
- A shelf with folded shirts can be used.
- Shelves or pegged hardlines can be used.
- Other product to create a product story can be used.
- Use 8″ bottom hangers.
- Ensure tags are tucked into the pants or pocket.
Women’s Walls
Women’s Vertical Wall Merchandising
- Vertical merchandising establishes 4 concepts(vertical rows are illustrated in grey):
- It creates a product flow where like styles and brands can be positioned together.
- Placing like styles in columns allows customers to easily navigate to the area of the wall where they need to shop.
- Merchandising larger brands together like Nike and ‘47 Brand creates a shop destination, which enables our brand- loyal customers to shop within a smaller space.
- Merchandising in columns creates a system where the store can double-expose styles. Double-exposing styles when a shop is sold down allows the store to easily move product back together when new product arrives in store.
- Guidelines for Vertical Merchandising:
- The same silhouette of product should be placed in a column together.
- When hanging product adjacent to each other in the wall, make sure that each faceout of product has enough room in between the two so that it is possible to place a hand between the styles.
Women’s Top, Middle, and Bottom Wall Rows
- Top Row
- In a professional team shop, high priced jerseys should always be placed in the top row. Jerseys are always sensored with a hard tag. The top row is typically out of reach for the customer and they need an associate to help to get a high priced item down. If the team does not have jerseys to be placed on the top row, other high-ticket items should be placed here.
- Middle Row
- Fresh, new, and popular apparel should be positioned on the middle row as it is a prime spot on the wall for merchandise. The middle row is positioned at the customer’s eye level and it is the easiest place for the customer to shop.
- The middle row should be merchandised to accommodate the assortment of women’s hats. These are placed next to the “Dad Caps” to finish the hat wall. Hat wall merchandising can be found in the Hats Playbook. Women’s product pods are also placed in the middle row. Product pods can be created using women’s accessories, jewelry, and folded shirts on shelves.
- Bottom Row
- The bottom row can house pants, shorts, tops, outerwear, and the “best sellers” bar. When styles begin to sell down it may be necessary to house two styles of product onto one faceout. If this is the case, the bottom row should be used, and the styles should be contrasting colors so that the customer can easily identify that there are two separate items on one faceout.
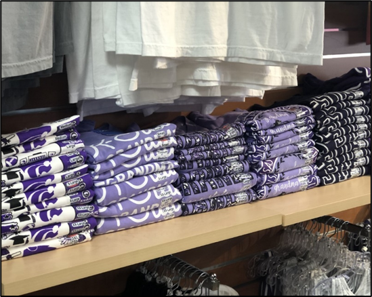
Women’s Folded Shirts in Wall
- When planning the merchandising strategy of a women’s team shop it is important to consider the graphic design of the apparel. Styles of folded t-shirts should be stacked in a way where customers can easily identify each design and should typically be a simple design. Intricate and fashionable designs typically are best hung. In order to make this objective successful, stacks of t-shirts should be limited to the following size run:
- 1 – XS
- 2 – S
- 2 – M
- 2 – L
- 1 – XL
- If there are more t-shirts in one design than the above listed size run (8 units), create a second stack of that design using the sizes that remain. Do not have two stacks of the same design of t-shirts with sizes that run continuously per stack.
- Sizes of t-shirts are stacked smallest to largest from top to bottom. Achieving this will enable two things:
- It will create room on the shelf for additional sizes of a particular design.
- Double exposing the same style on a shelf creates room for a new design to come into the assortment.
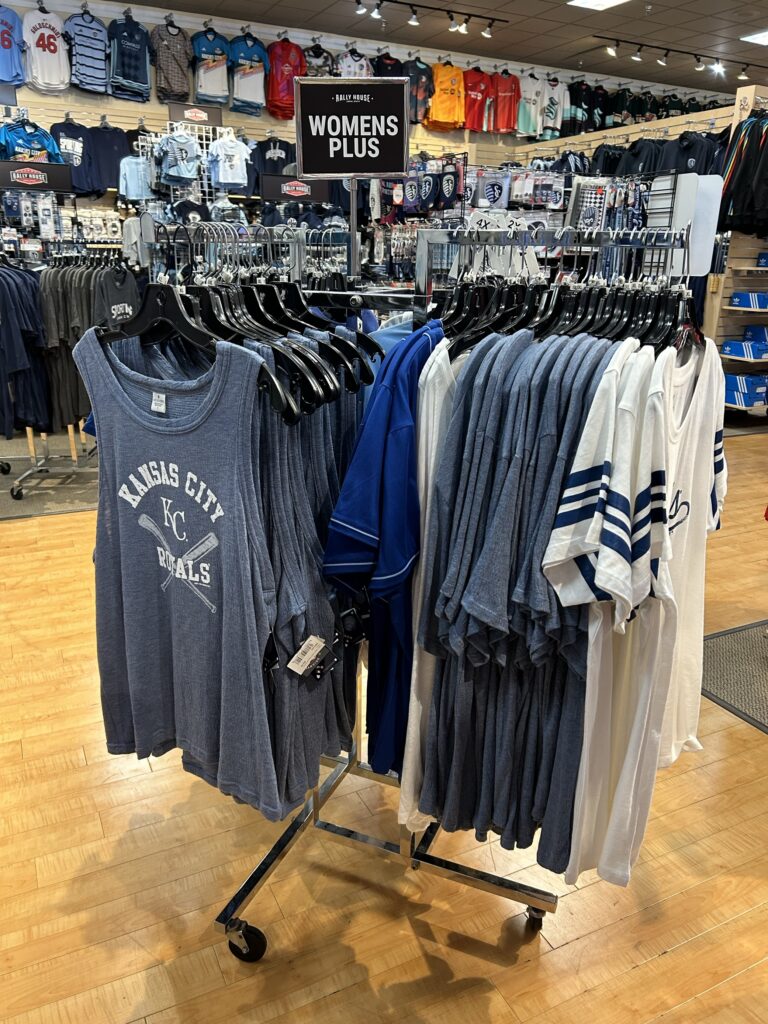
Plus Size
- Women’s plus size product is merchandised together on a fixture in the women’s section of the team.
- Several subclasses may be on the women’s plus fixture together depending on the product assortment (i.e., tanks, short sleeve, long sleeve)
- Apparel on the fixture is set by subclass and then style.
- Example: tank tops are merchandised on a faceout by style.
- Women’s plus size receives a women’s plus size sign.
- Women’s plus size does not receive size indicators.
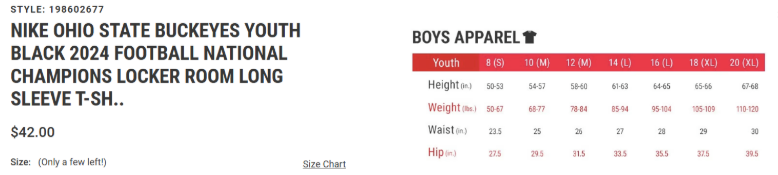
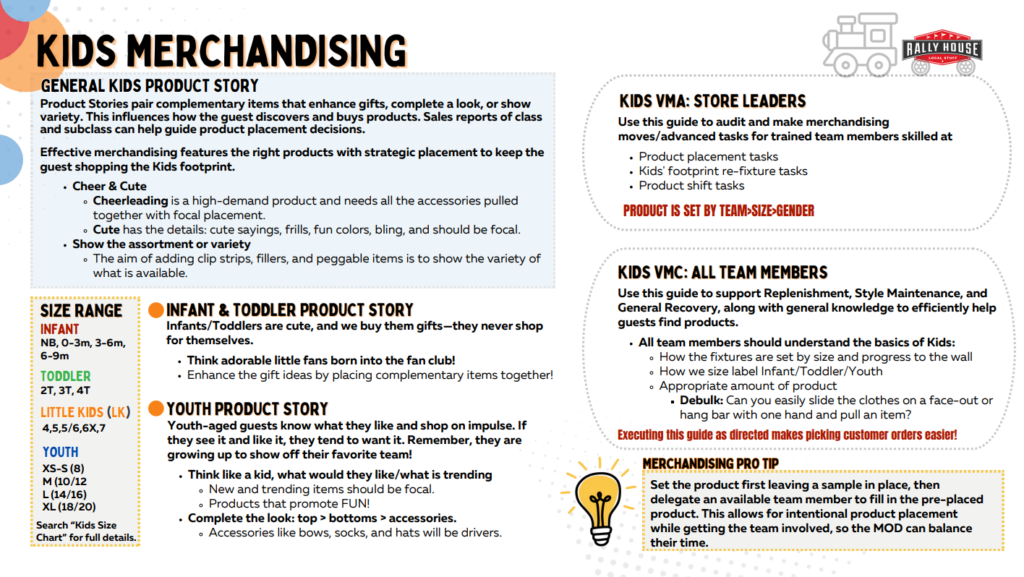
Kids Size Chart
All sizes are dependent upon Vendor and Brand. If you have any issues converting sizes or have a guest asking how something fits, train your team to go to the Rally House website and look up the item to view the “size chart”. No reason to guess, just look it up.
Example shown below
Kids Size Charts General
Infant & Baby (0–24 Months)
- Newborn (NB): Up to 7 lbs, 17–21 inches
- 0–3M: 7–12 lbs, 21–24 inches
- 3–6M: 12–16 lbs, 24–26 inches
- 6–9M: 16–20 lbs, 26–28 inches
- 9–12M: 20–24 lbs, 28–30 inches
- 12–18M: 24–28 lbs, 30–32 inches
- 18–24M: 28–30 lbs, 32–34 inches
Toddler (2T–5T)
- 2T: 30–33 lbs, 33–35 inches
- 3T: 33–36 lbs, 35–38 inches
- 4T: 36–40 lbs, 38–41 inches
- 5T: 40–44 lbs, 41–44 inches
Little Kids (4–6X/7)
- 4: 38–42 lbs, 40–42 inches
- 5: 42–46 lbs, 42–45 inches
- 6: 46–50 lbs, 45–48 inches
- 6X/7: 50–54 lbs, 48–50 inches
Youth (S–XL, 7–16/18)
- XS (6-8): 54–66 lbs, 50–53 inches
- S (8/10): 66–75 lbs, 53–56 inches
- M (10/12): 75–88 lbs, 56–59 inches
- L (14/16): 88–100 lbs, 59–62 inches
- XL (18/20): 100–120 lbs, 62–66 inches
Infant/Toddler/Youth Jersey
- Infant, toddler, and youth jerseys are to be merchandised with the other apparel for the age group.
- This means that often, infant, toddler, and youth jerseys will be merchandised on a 5’ or 8’ grid unit, a pinwheel, or an H-Unit.
- When there is a wall, mainly in youth, a upper row of the wall should be used for jerseys for the age group.
- For example, infant jerseys should not be merchandised on the top row of a youth boy’s wall. Youth jerseys can be placed on the top row of a youth boy’s wall.
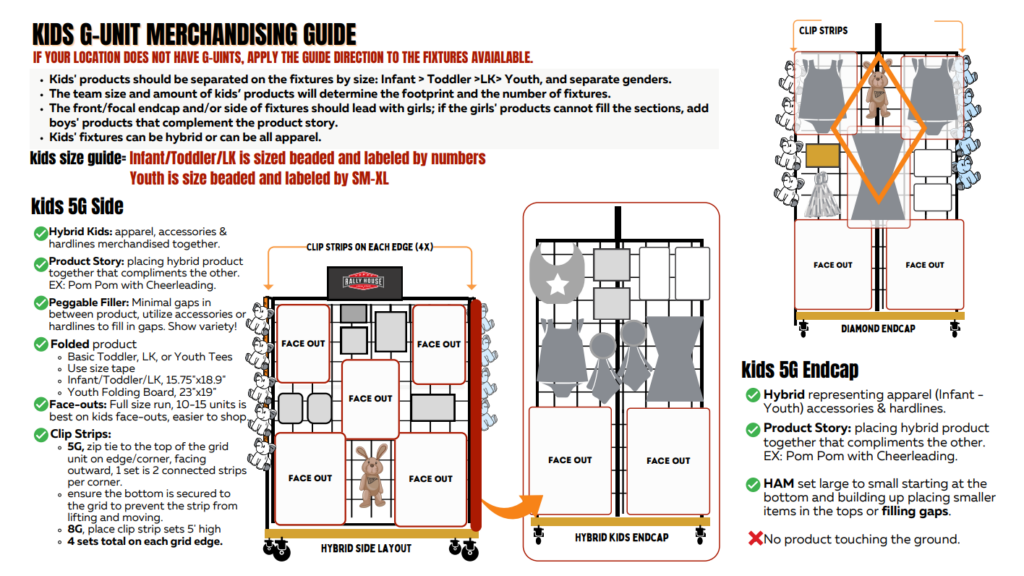
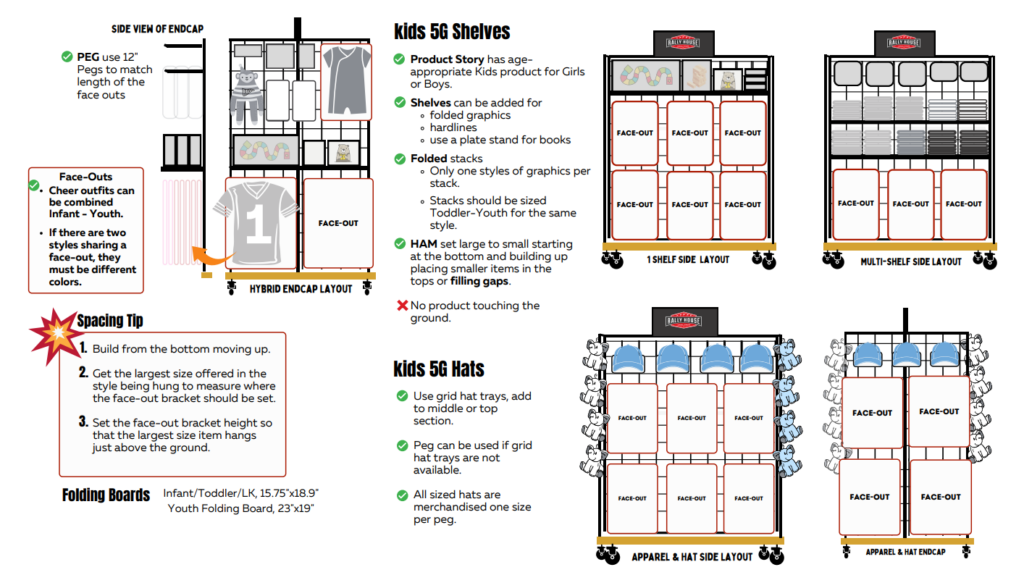
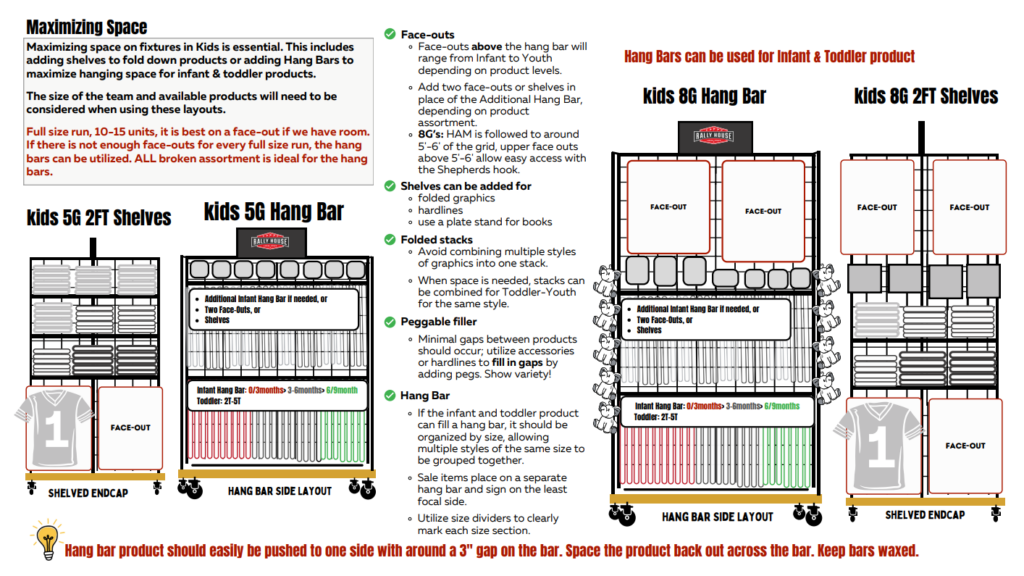
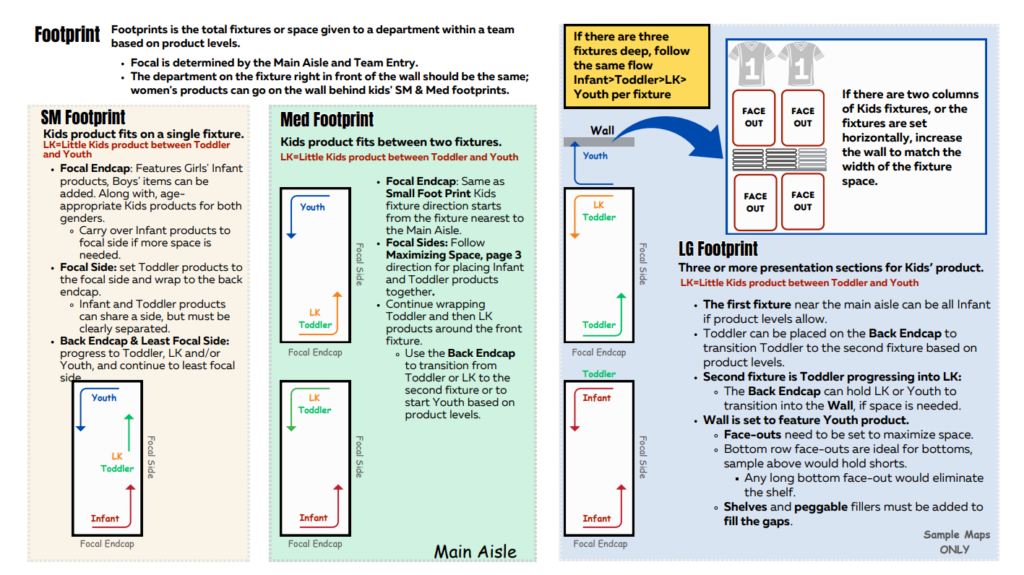
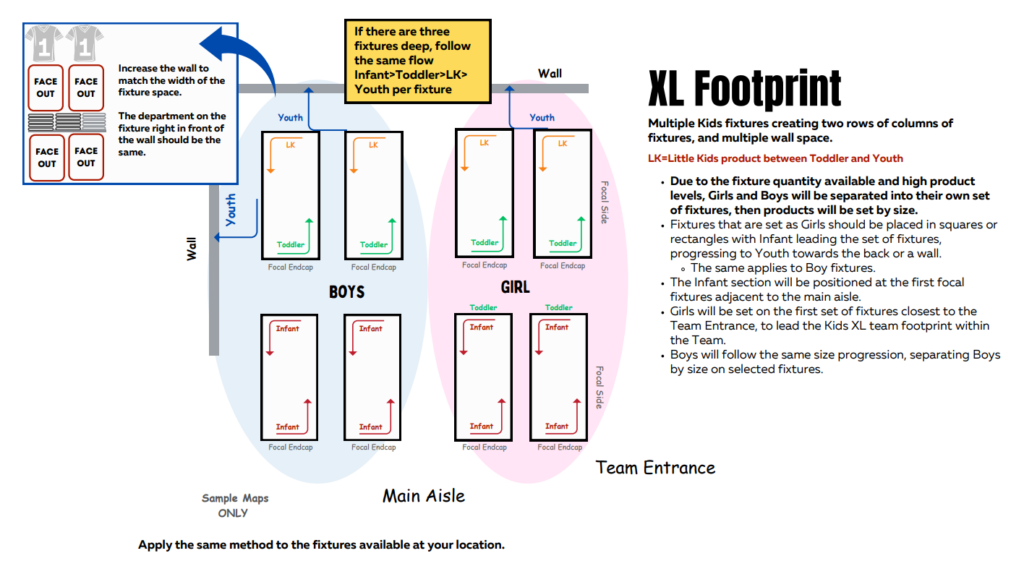
Kids G Unit Merchandising
THE PLAY:
Collection Merchandising brings related products together to create destination shopping experiences centered around a specific Guest need, fan identity, or life event. Whether focused on Alumni, Graduating Class, Family, Women’s Glitz, or other collections, these presentations group apparel, accessories, and hardlines into a single, easy-to-shop location that tells a complete story.
By merchandising products as a collection rather than by subclass alone, stores create stronger visual impact, simplify the shopping journey, and help Guests discover complementary items they may not have otherwise considered. Collection presentations should be maintained with clear focal positioning, layered merchandise, and complete assortments that support outfitting, gifting, and celebration occasions.
IMPACT:
Collection Merchandising helps transform individual products into complete shopping solutions. By grouping related merchandise together, stores create stronger visual destinations that improve product discovery, increase basket size, and support add-on sales across multiple categories.
Well-executed collection presentations simplify shopping for Guests, strengthen storytelling around key fan moments and milestones, and create a more engaging store environment. Consistent collection merchandising also improves presentation standards across stores while maximizing the visibility of specialty products that may otherwise be overlooked.
GAME PLAN
NCAA ALUMNI
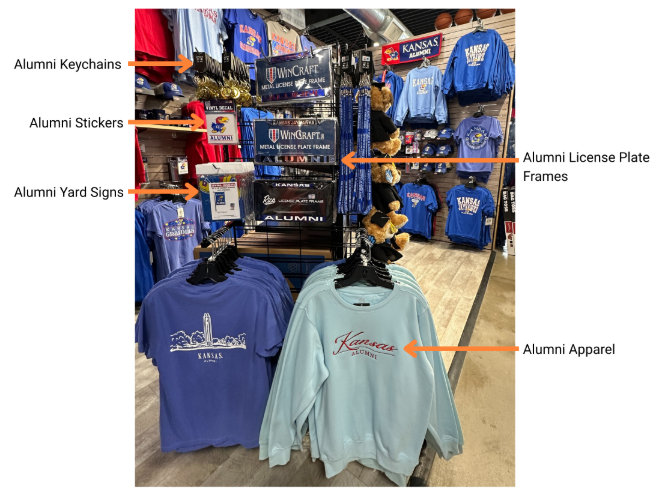
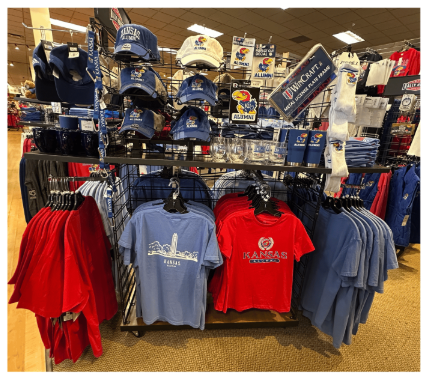
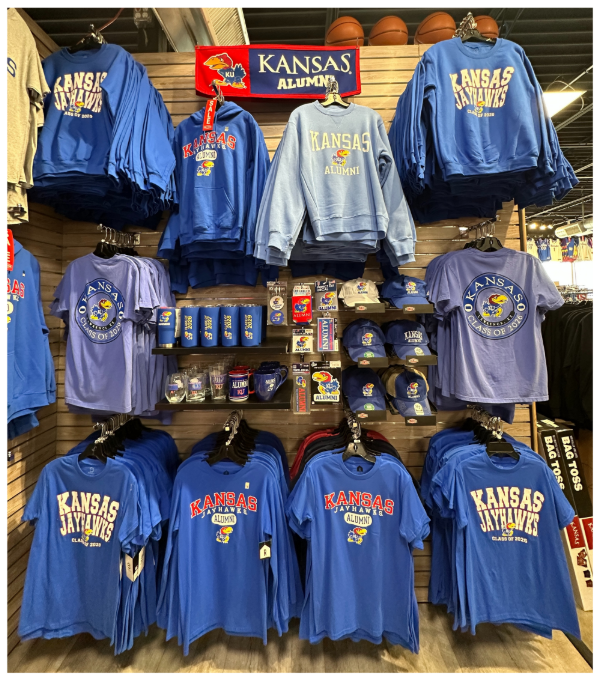
Create an Alumni Pride destination to support gifting, graduation moments, and multi-item sales.
1. Merchandise all alumni product together in each NCAA team shop, regardless of subclass.
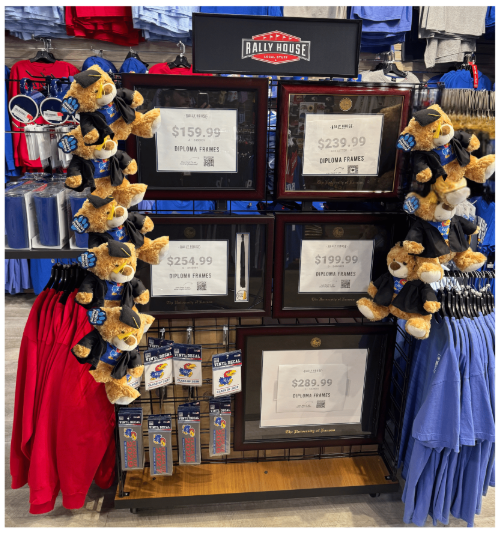
2. Add alumni product to diploma frame fixture to anchor the presentations.
3. Plan a focal placement for this presentation within each NCAA Team Shop.
4. Organize apparel presentations, separating core alumni styles and grouping “Class of” apparel by yer.
5. Layer all available alumni hardlines into the presentation to support gifting + add-on sales. Drinkware, keychains, car accessories, office/home decor are all great options.
Execution Inspiration Photos
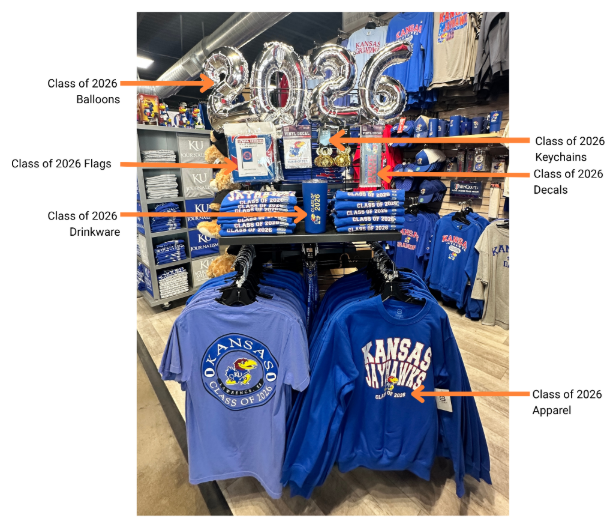
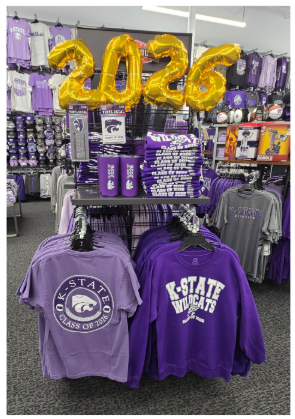
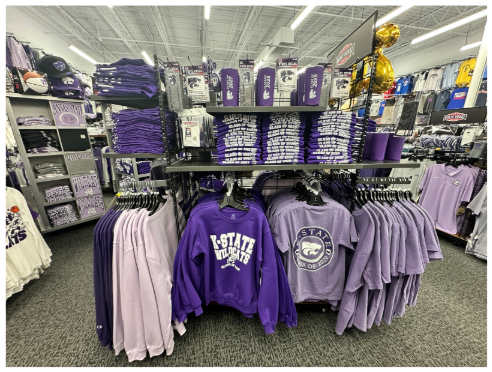
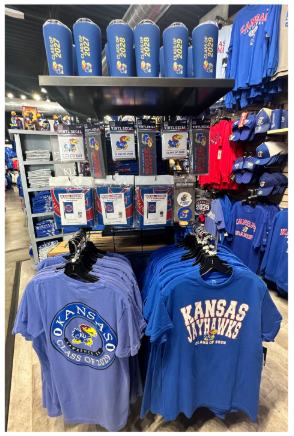
NCAA Class Of
Creat a Graduation Pride destination that celebrates “Class Of” milestones, supports meaningful gifting, and drives multi-item purchases.
1. Merchandise all graduating class product together in each NCAA team sop, regardless of subclass.
2. Highlight current year graduating class on front endcap in Spring.
3. Highlight current year incoming class on front endcap in Fall.
4. Merchandise graduating class styles next to alumni product & diploma frame fixture.
- In low inventory situations, merchandise graduating class product within Alumni presentations and place current year styles in focal positioning.
5. Layer all available graduating class hardlines into the presentation to support gifting and add-on sales. Drinkware, keychains, car accessories, office/home decor are all great options.
6. Double expose hardlines in register lane when there is enough inventory to support two presentations.
Large Assortment Inspiration Photos
Medium Assortment Inspiration Photos
Small Assortment Inspiration Photos
NCAA Family Collection
Create a defined Family Fan destination in each NCAA team shop to simplify outfitting the whole family.
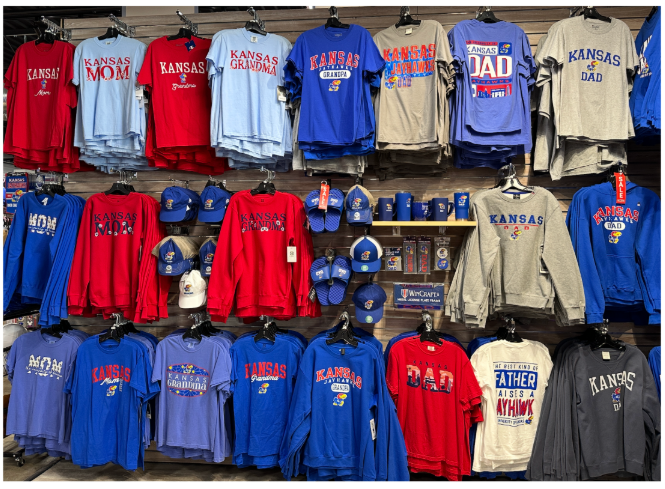
1. Merchandise all family-title product together in each NCAA team shop and organize by family title, not by sub class.
2. Plan a focal placement for this presentation within each NCAA team shop, on the drive aisle whenever possible. Select the best fixture/footprint to fit your assortment.
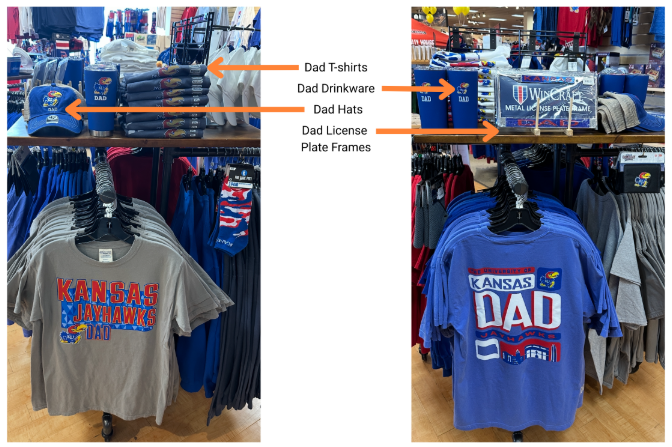
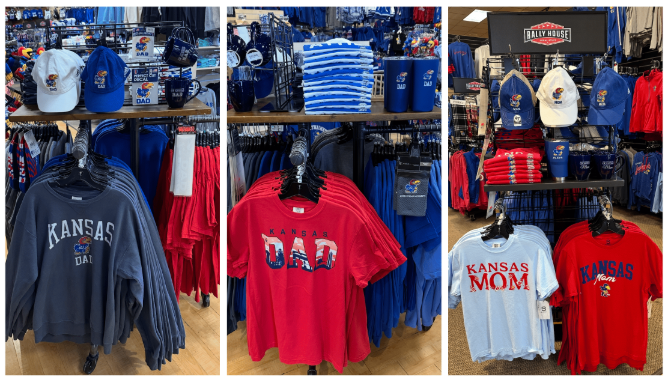
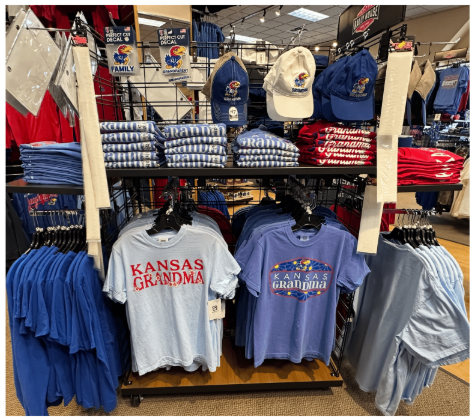
3. Build apparel presentation by family title: parent into grandparent into extended family, creating a natural shopping flow. This is a dual gender presentation with all dad styles together, mom styles together, grandma styles together, grandpa styles together. etc.
4. Layer all available family title accessories and hardlines into the corresponding family title presentation to support gifting add-ons. Drinkware, keychains, car accessories, stickers, buttons, hats, and socks should be included in the presentation.
Execution Inspiration Photos
Women’s Glitz Collection
Group Glitz into a defined sparkle fan gear zone to elevate fashion and increase add-on sales.
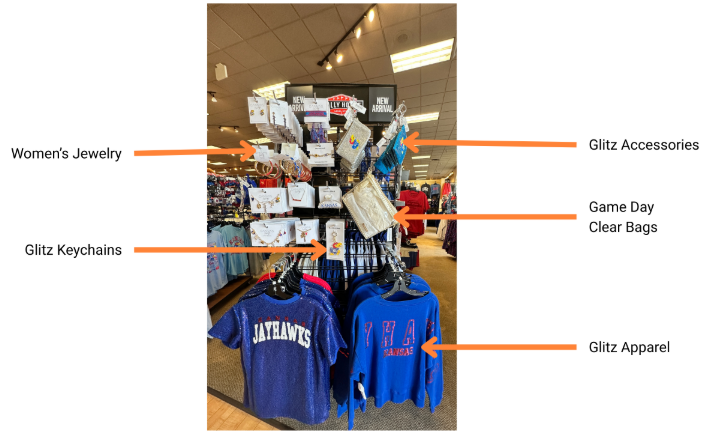
- Merchandise all Women Glitz apparel together in each team shop, regardless of subclass. Prioritize all product featuring rhinestones, foil, metallic inks, sequins, speciality fabrics.
- Identify folcal fixture(s) in dominant team shops for Women’s Glitz presentations, on the drive aisle whenever possible. Select the best fixture/footprint to fit store assortment.
- Layer in embelished caps, beanies, jewelry, hair accessories, face decals, handbags, socks + drinkware with metallic details.
- Check every fixture in each team shop to ensure all Glitz styles are merchandised in this presentation instead of being striped into their subclass.
Execution Inspiration Photos
Local Collection
Use market-specific themes to create meaningful destinations within the local section. Celebrating the unique spirit of each city and inspiring hometown pride among localss while offering visitors memorable moments, by building product stories that capture the culture and character of each community.
1. Use the Visual Line Manager to identify the top local themes for your store.
- Some key collections include:
- City Skyline
- Food + Drink
- Local Flag
- Pop Culture
- Local Icons
- Local Humor + Phrases
- Animals
- Local Festivals/Holidays
- Geography + Nature
- Heritage + Legacy
2. Group apparel by local theme collection, regardless of subclass, and identify placement for each collection based on assortment size and sales volume.
- Small Collections can live on tabletop 4-way, end cap or single side of G Unit and complimentary local themes can share a fixture (example: beer and pizza)
- Medium Collections live on an ocho or 5G fixture.
- Large Collections live in a wall presentation and/or on multiple floor fixtures.
3. Ensure top selling collections are merchandised in focal areas like aisle fixtures and/or feature walls.
4. Add collection themed headwear, accessories, and hardlines to each presentation to complete the product story.
Small Assortment Inspiration Photos
Medium Assortment Inspiration Photos
Large Assortment Inspiration Photo
Decision Day
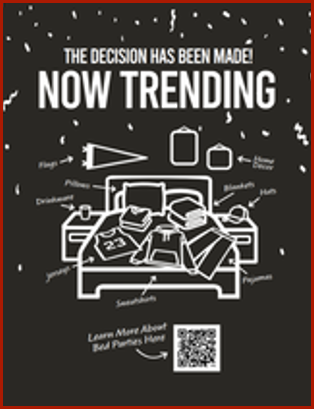
To proactively provide 5-Star experiences, we need to stay current with trends. This trend is where parents throw college decision parties for their kids to celebrate their school of choice, usually centered in their bedroom with the gifts displayed on the bed. These are color-themed college gear and goods parties!
This is a special time for our guests, filled with excitement and celebration that our teams get to be a part of when we help our guests. Our role is to show everything we can offer to build the ultimate college “haul,” aka the goods and gear being gifted at these parties.
Merchandising
1. Focal 5G’s will be used to feature Decision Day Product Stories.
2. Organize by TEAM>popular colors>trending or cute items and unisex.
- Think “dorm room goods, game day gear, school spirit”
- Follow HAM (Height Alignment Matching)
- Assign task in the VMA (Visual Merchandising Audit) to refresh merchandising as needed.
3. Product Story Items:
- Dorm Decor
- Bedding
- Drinkware
- Unisex Apparel
- Accessories
- Car Decals
4. Place Marketing on grid topper.
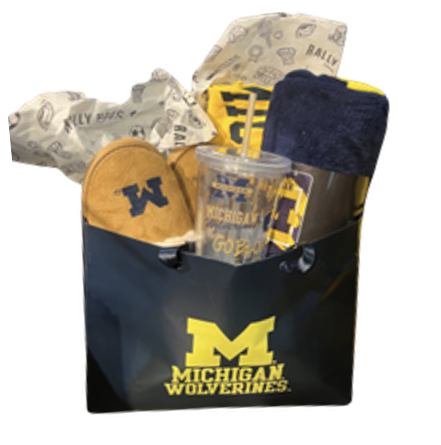
Pro Tip: Campus locations can display a pre-built gift bag, placed on shelves on the focal endcap or Side.
Party Steps:
Ensure the team is aware of the Decision Day and can generate product solutions that meet the guests time-frame.
- Challenge your team with mini product scavenger hunts to help them quickly become well versed with product.
- Endless Aisles should be offered if standard shipping meets their timeframe.
THE PLAY:
Coming Soon
IMPACT:
Coming Soon
GAME PLAN
3″ Buttons
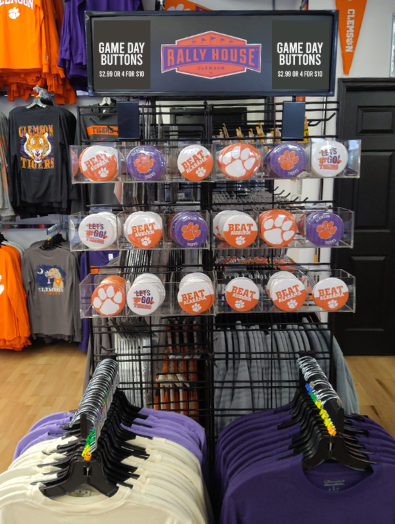
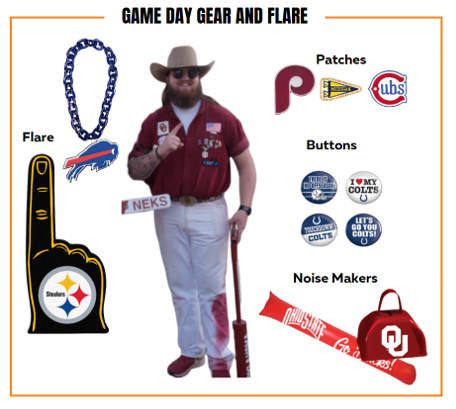
- 3″ buttons are great game day flare items that guests can attach to their apparel and show team pride!
- 3″ buttons are a RALLY deal – 4 for $10!
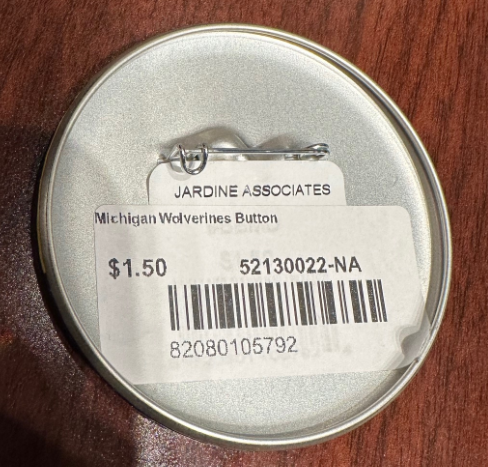
- 3″ buttons are to have a price, barcode, and style number on their label. Stores are to reprint label when the tags from the vendor do not have this information.
- Place the label on the back of the button so it won’t be displayed when worn by the guest.
- Acrylic divided bins are available on Amazon for stores to order to merchandise the buttons on a G unit endcap or G unit center.
- The endcap selected should be with or around other game day flare items (tattoos, poms, clear bags and straps).
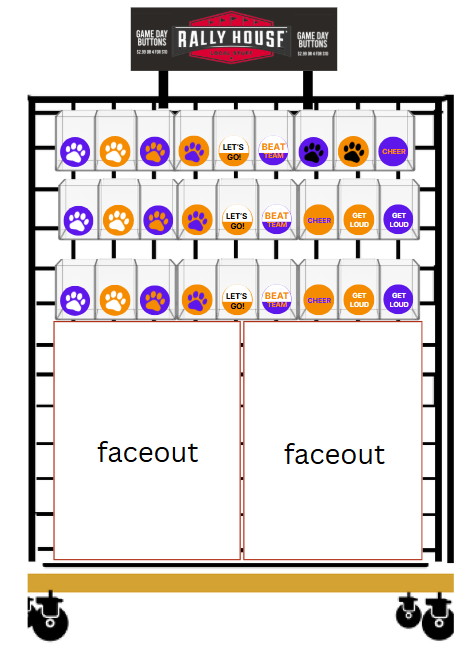
G Unit Endcap
- Place 2 divided bins side by side three rows down.
- Place buttons into each slot. 13 buttons fit into each slot.
- Merchandise styles vertically if you have more buttons than what will fit into a single slot.
- Other game day accessories can be merchandised under the buttons or two apparel faceouts.
- Buttons that have cardboard backing are also placed in the fixture.
- Game day button signage is orderable if additional is needed.
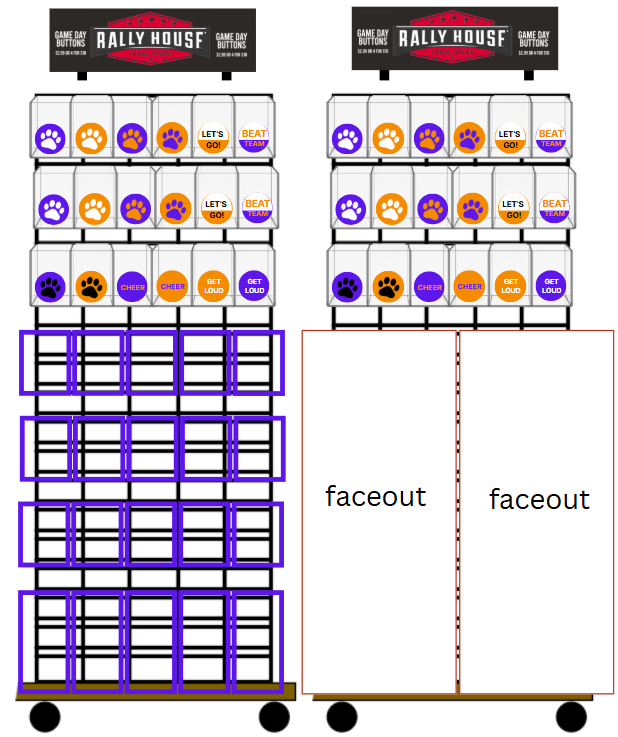
G Unit Center
- Place 3 divided bins side by side three rows down.
- Place buttons into each slot. 13 buttons fit into each slot.
- Merchandise styles vertically if you have more buttons than what will fit into a single slot.
- Other game day accessories can be merchandised under the buttons or two apparel faceouts.
- Buttons that have cardboard backing are also placed in the fixture.
- Game day button signage is orderable if additional is needed.
Auto
- The Auto category consists of the following items:
- License Plates and Frames
- Decals and Static Clings
- Emblems and Magnets
- Car Flags
- Auto Mats
- Interior Accessories
- Keychains
- Guidelines of Merchandising the Automotive Category:
- The type of fixture used will depend on how large of assortment the team has. Automotive can be merchandised on the end of a footlocker, endcap of a 5-Tier table, pinwheel, or endcap/center of grid unit.
- Begin by setting the fixture with accessory pegs.
- Start at the bottom of the fixture and merchandise the largest items at the bottom and continue hanging the smaller product towards the top of the fixture.
- License plates are great to hang at the bottom as they are larger than keychains and decals.
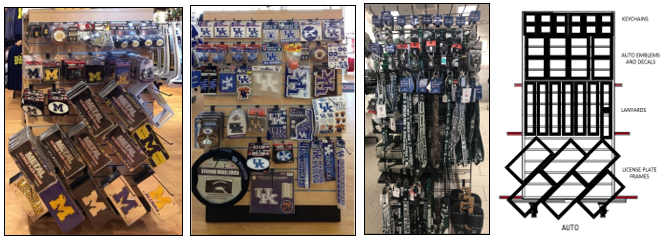
- License plates should hang on a peg from the corner hold and hang diagonally. All license plates should hang in the same direction (see photos below).
- When items begin to sell down, pull the remaining inventory towards to front to make the fixture appear full.
- Pegs should not bulge with product.
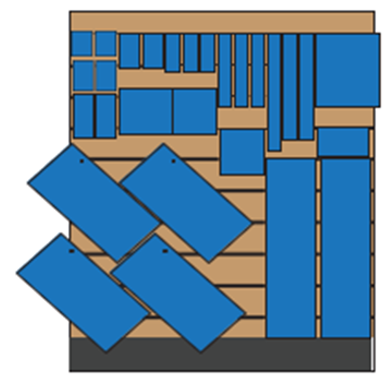
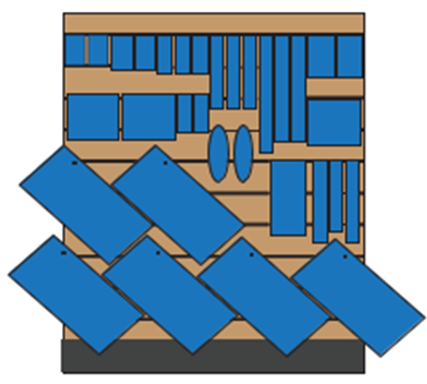
- There are limitless combinations to choose from when merchandising hanging hardlines. Consider the diagrams below as they illustrate these merchandising strategies:
- Start at the top left of the footlocker endcap with the smallest product and work right and then down placing larger items toward the bottom (see diagram 1).
- Create uniformity, as much as possible, by hanging like sizes and styles together, horizontally on the same row (all diagrams).
- Hang items as close together as possible, double exposing styles in order to make room for the next item.
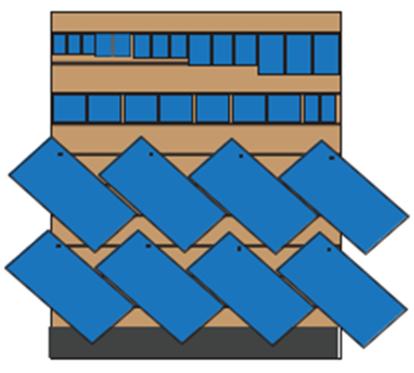
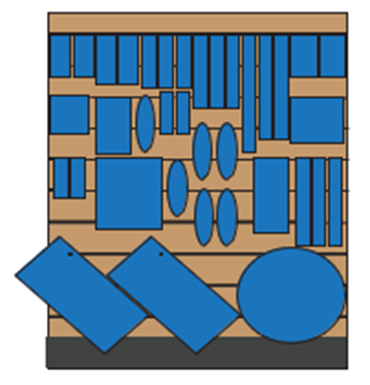
- License plates should hang on a peg from the corner hold and hang diagonally. All license plates should hang in the same direction. If there are larger products (like windshield or steering wheel covers), split the space between the two styles and hang license plates vertically in columns (see diagram 3 and 4).
Ball Bins
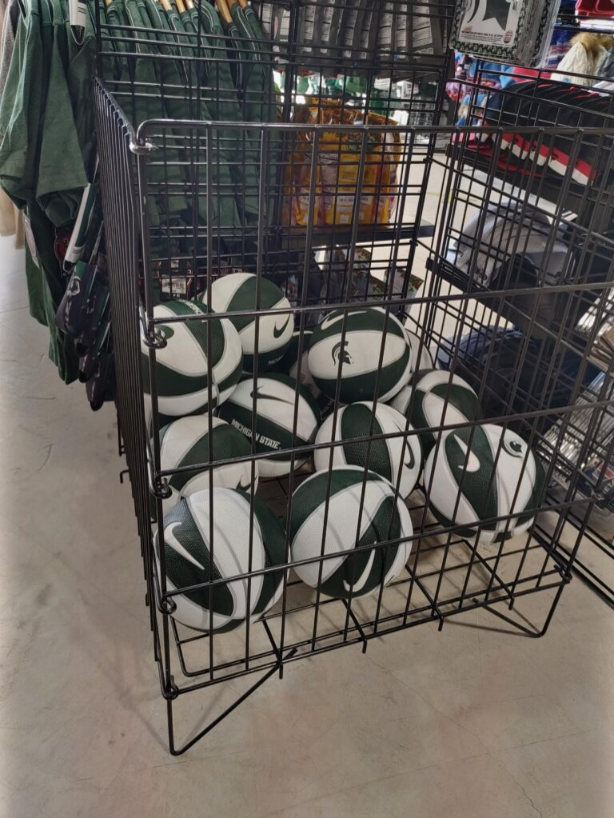
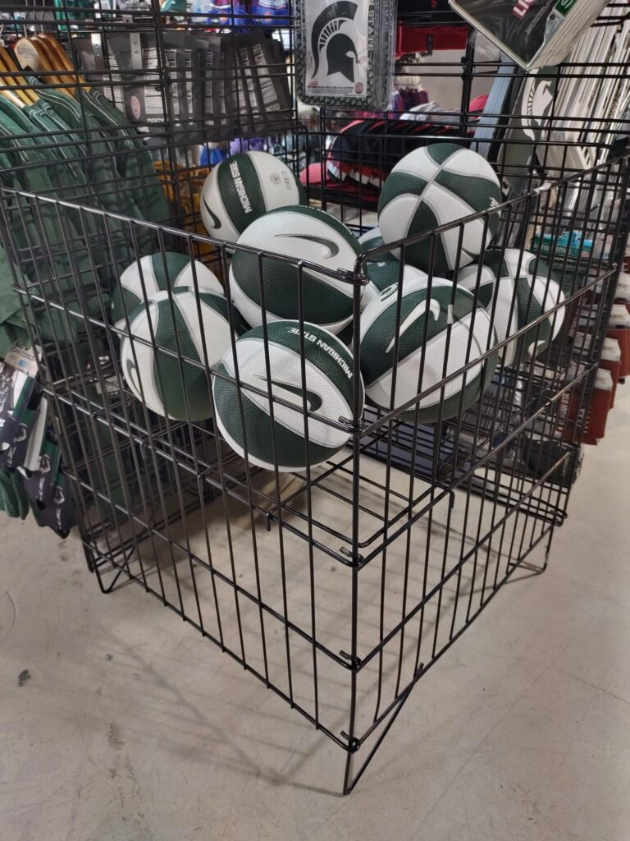
- Store that have ball bins are to utilize bins to hold balls (basketballs, footballs, soccer balls, etc) or if they do not have balls these can be used to hold tailgate chairs.
- When a ball bin is running low on inventory, the bottom of the bin is to be raised to bring the item towards to top of the bin for easy reach for the guest. See the below photo example.
Beads
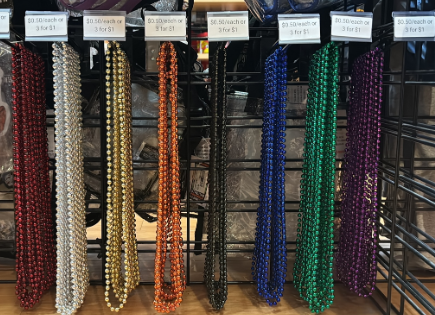
- Single strands of beads are merchandised on a scanner hook.
- A scanner hook allows for a price point to be directly placed into the plastic sleeve on the hook.
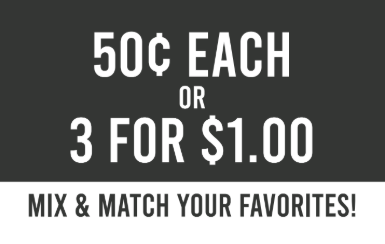
- Single strands of beads are $0.50/each or 3 for $1 for a RALLY Deal.
- Single strands of beads should have a facings where it makes sense in your store.
- This could be in the team section, in the register lane, or in both areas.
- When placed in the register lane there is usually multiple colors.
- When placed in the team section it is just the team color and are great items to place as an add-on for a women’s and kid’s fixture.
- This could be in the team section, in the register lane, or in both areas.
- Single strands of beads should have a facings where it makes sense in your store.
- Here is an example photo of beads in the register lane
Signage
- Signage can be ordered via a case to Marketing.
Blakeway
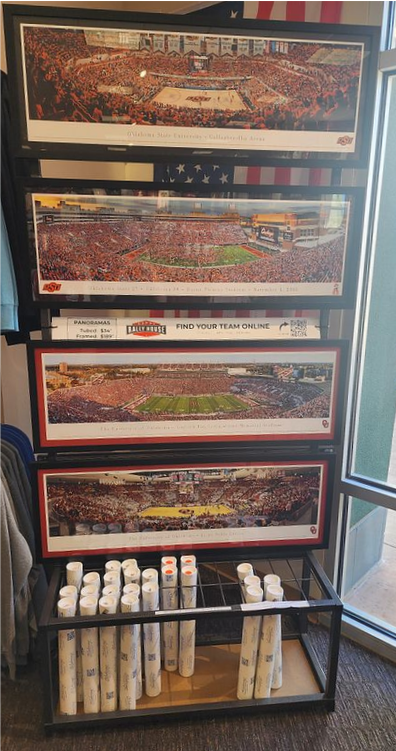
- Blakeway Panorama Pictures provides Rally House with high quality panoramas and tubed photos for our fans to purchase.
- Most Rally House stores are equipped with a Blakeway fixture to showcase these items.
- Guidelines for Merchandising Blakeways:
- From the top of the display you will want the panoramas to hang in this order:
- Deluxe – hang by molding of frame – not wire
- Deluxe – hang by molding of frame – not wire (if space allows)
- Standard – hang by molding of frame – not wire
- From the top of the display you will want the panoramas to hang in this order:
- The Blakeway fixture should be placed near the front of the store.
- This fixture is not typically placed directly in the store front window as it can restrict customer view into the store but it can be placed on the backside of store front banners.
- Use the price marketing that is sent by Blakeway to display prices to guests.
- When the prices of these items change, Blakeway will send the stores updated price signage and sticker strips.
Coasters
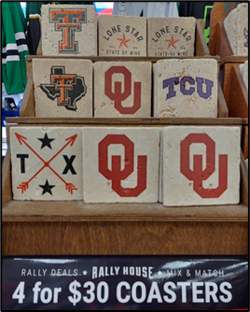
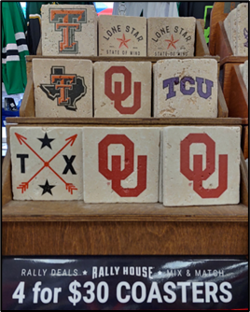
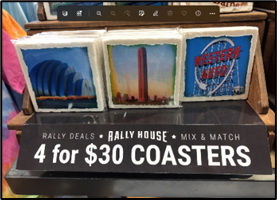
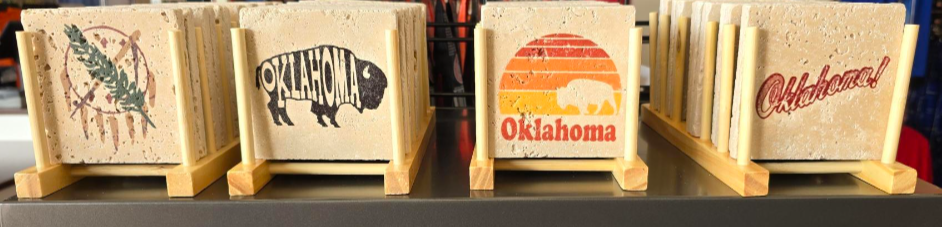
CoasterWorx provides each store with a variety of designs ranging from Local to NCAA. .
- Stores may have a universal display or a team display depending on assortment.
- When coasters are merchandised on the CoasterWorx the black-Marketing signage is to be placed on the bottom level of the fixture.
- If the store receives an abundance of coasters that do not fit in the fixture(s) that the store has received, then the store should open a case to Buying to request an additional fixture.
- Until additional fixtures can be received the supplemental coasters can be merchandised using a hardlines rack.
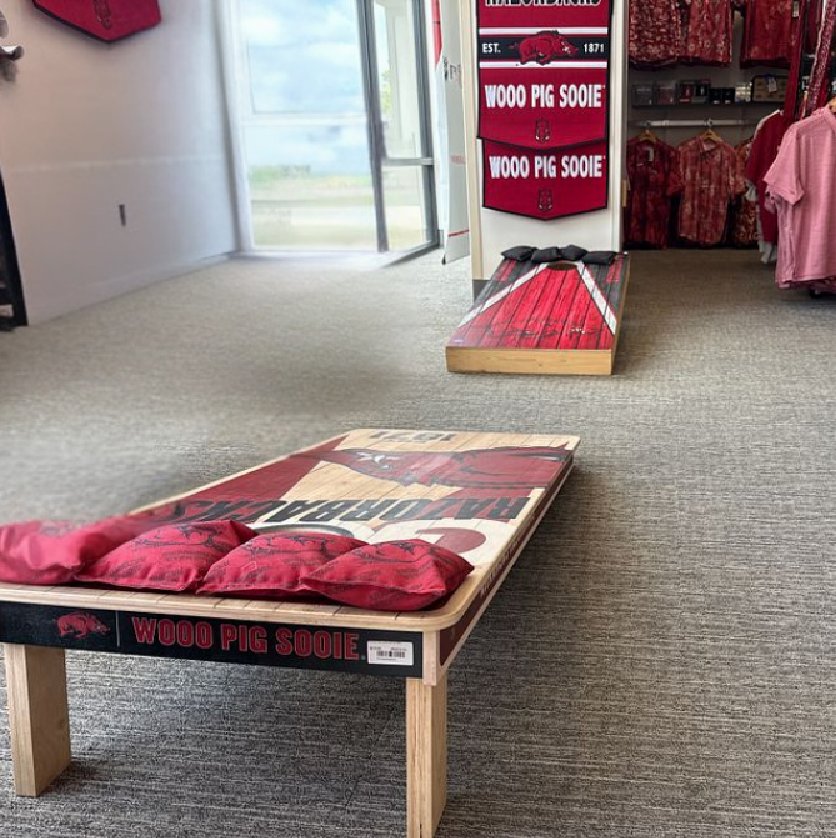
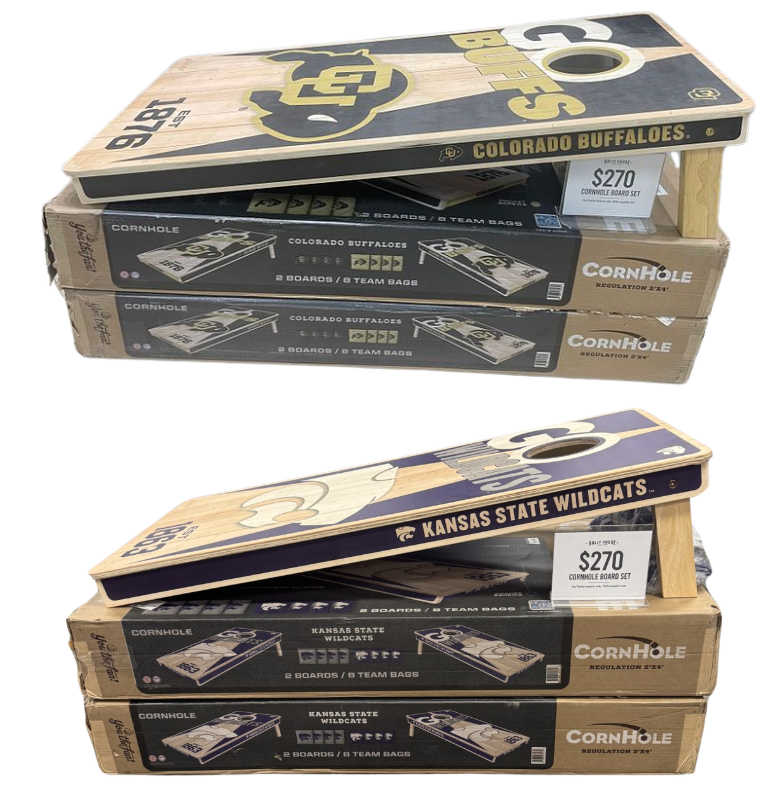
Cornhole Boards
Select game day stores, campus locations, and stores that have large square feet carry cornhole boards in store. It can be hard for a guest to tell how great of an item these are when they are left in their box. To make sure that guests can see the cornhole boards in your store, follow the preferred merchandising options.
- Stores that have the space to allow for a set of boards to be set-up for guest interaction are able to do so.
- Units for sell are to be stacked up vertically.
- One style per stack.
- One cornhole board from the top box is removed from the box and placed on display on top of the box.
- Prop the cornhole board up using the board’s legs.
- Place price point signage in the triangle that is created between the top of the box and the board.
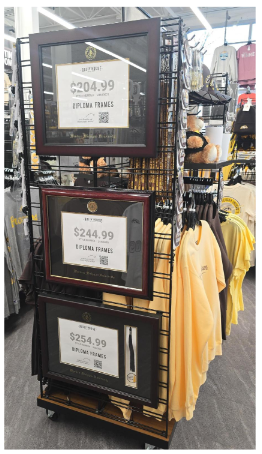
Diploma Frames
Why are Graduation Frames important?
- Selling graduation diploma frames helps us offer a complete shopping experience by providing everything a guest needs to celebrate their achievement in one place.
- It creates an opportunity to connect with customers during a meaningful milestone.
- These frames also encourage pride in school spirit and drive additional sales tied to the occasion.
Timing of Diploma Frame Fixture
This fixture is kept year-round and moves location in the store throughout the year.
Feature diploma fixture & alumni gear at the front of the store/team shop 1 month before commencement.
Keep featured until graduation occurs, then move fixture to team section.
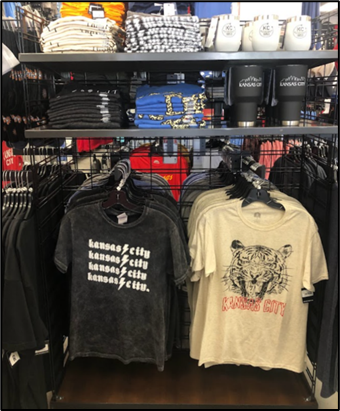
- For any sides of the grid unit that are housing apparel and/or hardlines, the merchandising needs to follow Height Alignment Matching.
Large Assortments (Considered Greater Than 3 Styles)
- Display Frames
- Locate the frame slatwall holders
- Pull a display frame out of the box for each style that the store has.
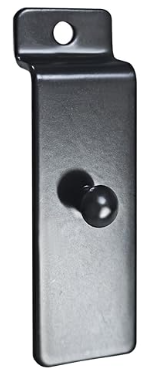
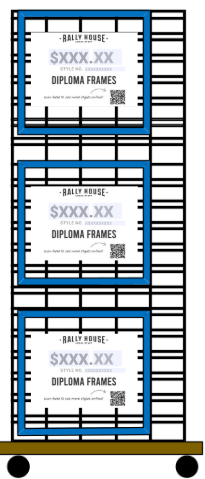
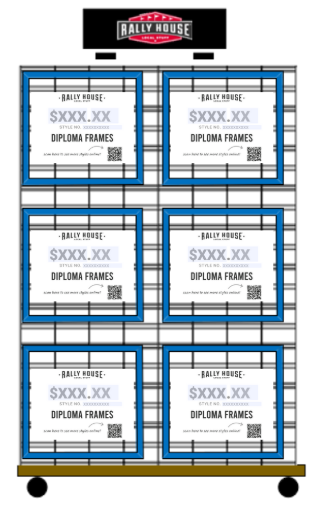
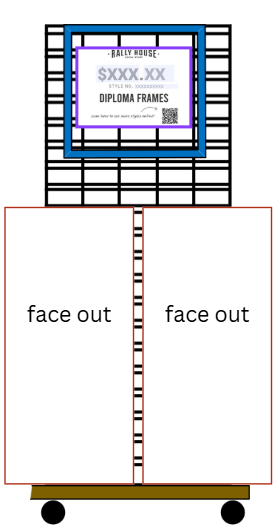
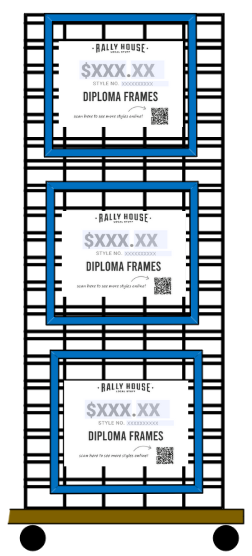
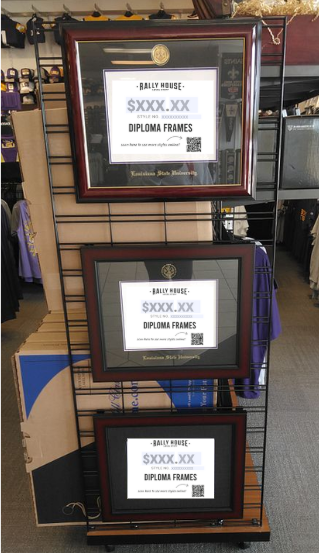
- Using the frame slatwall holders place the display frames on the 3 display sides (2 endcaps and 1 center based on assortment).
- Signage is needed for each display. Scroll down for signage instructions.
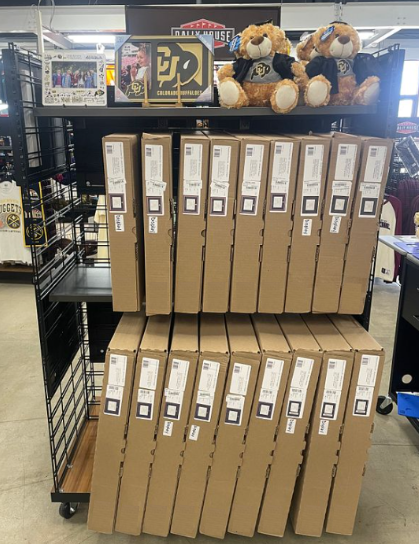
- Stock Frames for Customer Purchase
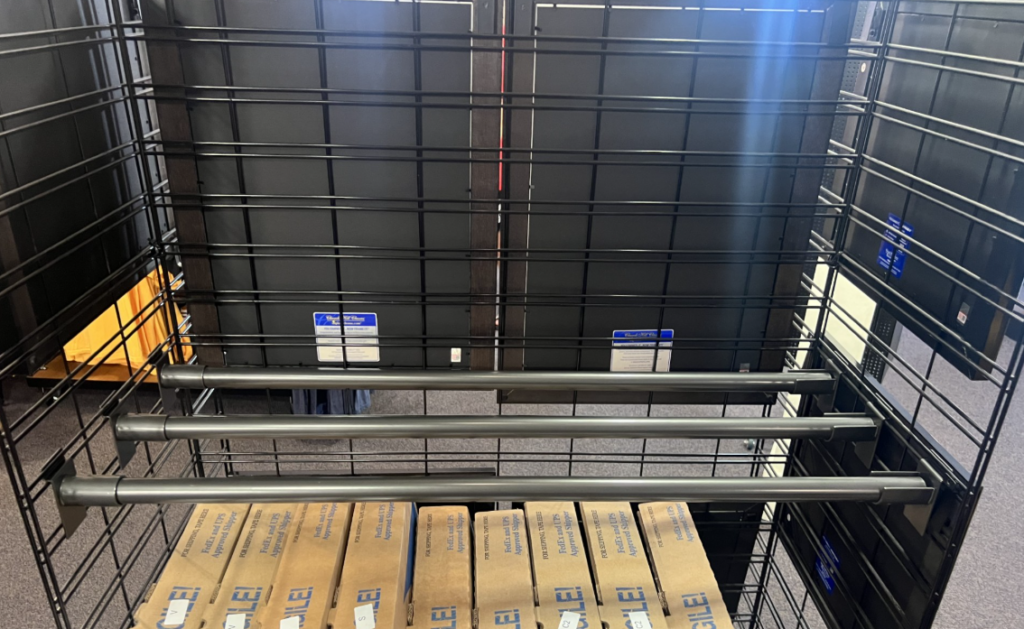
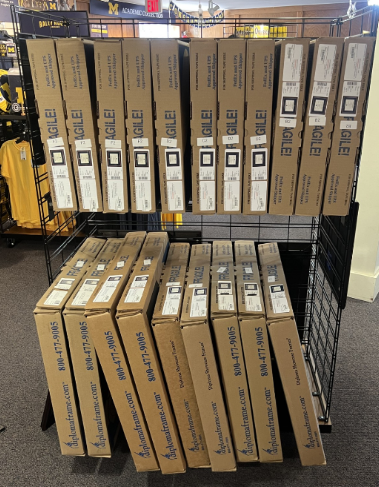
- Use 3 hangrods per row to create stable “shelves.”
- Store may fit 2–3 rows depending on frame/box size.
Small Assortments (Considered 1-3 styles)
- Display Frame(s)
- Locate the frame slatwall holders.
- Pull a display frame out of the box for each style that the store has.
- Using the frame slatwall holders place the display frame(s) on the endcaps.
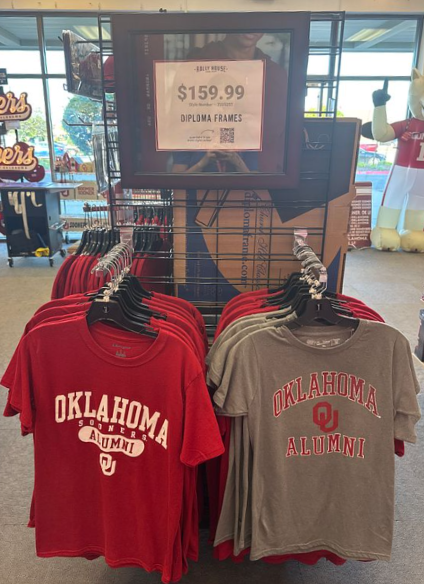
- Depending on the assortment, store may have 1 or 3 frames on display. Faceouts with hanging apparel should be put on the endcap when there is only one style of frame to display.
- Ensure that the apparel creates a product story with the diploma frames.
- Depending on the assortment, store may have 1 or 3 frames on display. Faceouts with hanging apparel should be put on the endcap when there is only one style of frame to display.
- Signage is needed for each display. Scroll down for signage instructions.
- Stock Frames for Customer Purchase
- For the boxed units that are for customer purchase, use a metal grid shelf in the center of the 5G unit to display the boxes.
- Hang the “alumni” apparel and place on the faceouts under the shelf.
- If there is no “alumni” apparel, select other great unisex items to hang and feature.
- Shelved hardlines should be placed next to the boxed diploma frames on the shelf (coffee mugs, tumblers, picture frames, plush that can sit, etc.) that create a product story with the frames and hanging apparel.
Diploma Frame Signage
- Click here to get to the store printable signage for 🔗Diploma Frames
- Click into the folder for the size of diplomas fit into your frame.
- Download the Diploma Signage to the computer for your NCAA team. The QR code on each sign is team specific.
- Open the editable PDF.
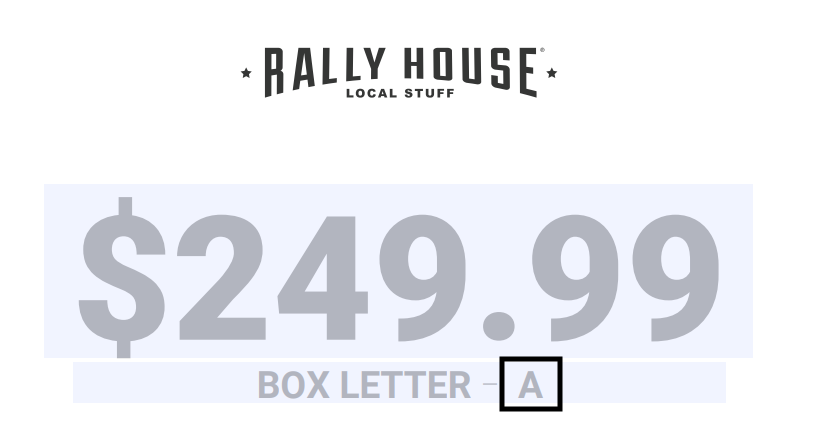
- For each display you will need to create a sign that includes:
- Price
- Box Letter
- Use a separate letter for each display. Letters A-B1 are available.
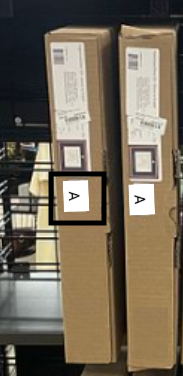
- The box letter on the sign will match printed 2×1 letters that are place on boxed frames.
- Once the editable PDF is filled out print on the store’s computer.
- Stores that have diploma signage that is not 11×8.5 or 8.5×11 will need to create the signage for each style, save the signage for each style, and then are approved to send the files to Office Depot/Staples/FedEx print to get the correct size of paper.
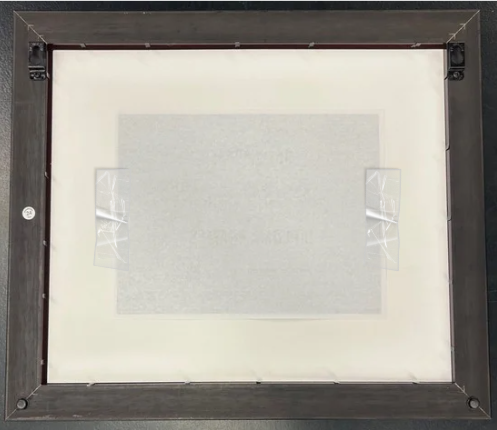
- Open the frame and center the printed sign.
- Tape down the sign onto the matte of the frame so the sign stays in place.
- Put the back back on the frame and display on the fixture.
- Print out the Diploma Frame stickers in the quantities by letter for the remaining boxed frames that customers can purchase on the 2×1 printer.
- The letter that is placed on the boxed frame style needs to correspond to the display unit for the style.
Example Completed Photos
Diploma Frame Building Instructions
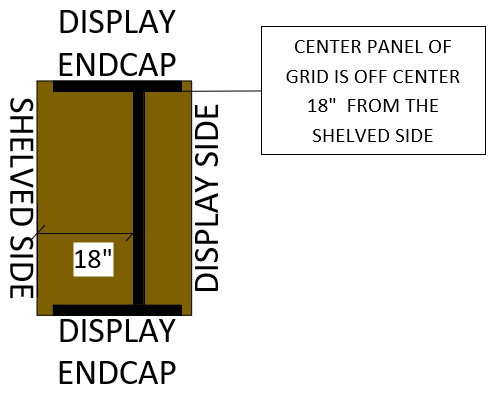
- This fixture is a 5G unit with the center grid panel built off center 18″ from the shelved side edge of the base deck.
- Use Grid Unit instructions otherwise to build the fixture.
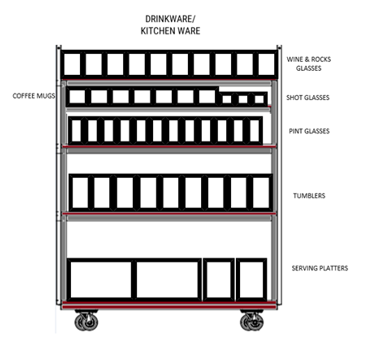
Drinkware
There are many different types of drinking cups, ranging from stainless tumblers, mugs, outdoor drinkware, wine glasses, beer mugs, and shot glasses.
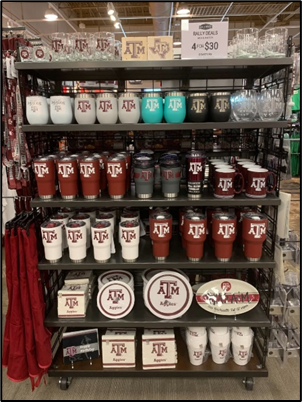
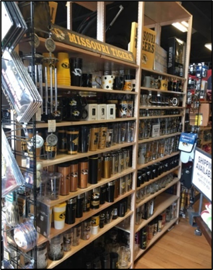
At Rally House all Drinkware is merchandised together as a group and placed on floor fixtures with shelving.
- Footlockers and 5’ grid units make great fixtures for setting a drinkware shop.
- World Market Fixtures can also house drinkware. Footlockers set for drinkware should have at least five selves.
- The spacing of the shelves will depend on the size of the items and will vary based on the selection of products.
Guidelines for Merchandising Drinkware:
- There should be no negative space between the shelves.
- Each item should have visibility to the customer.
- Merchandise the smallest items on the top shelves and then place the larger items on the bottom shelves.
- When product is sold down, inventory should be spread out to make the fixture look full.
- Do not remove shelves as you will need the space when the product is restocked.
- If drinkware is housed on the World Market Fixture, place the smallest pieces at eye level then work the larger items towards the bottom.
- Keep Drinkware grouped together in one area of the World Market Fixture.
Evergreen Holiday
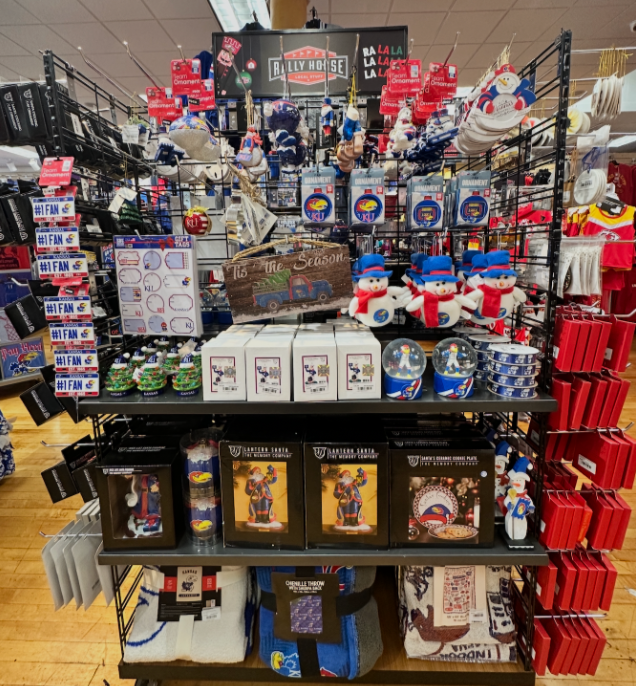
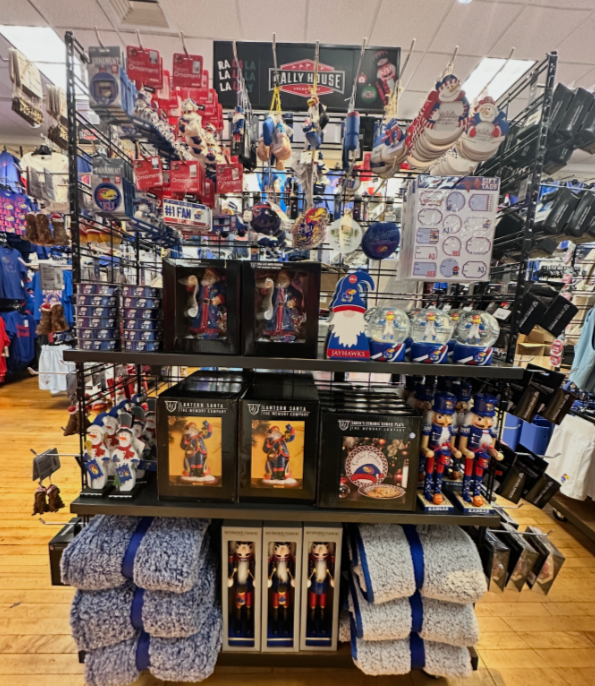
Year-round Holiday Shops ensure we’re always ready for guests who are shopping for team-themed holiday gifts, no matter the season. Whether fans are visiting our stores during move-in, family weekend, game days or graduation, a full and inspiring Holiday Shop helps to capture gifting sales with every visit.
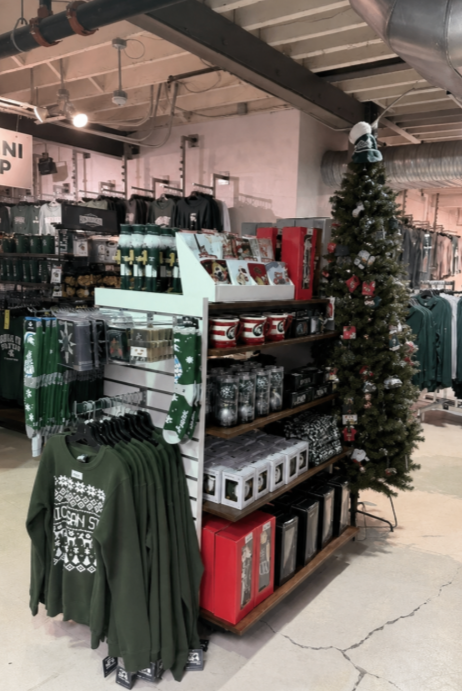
- Position the Evergreen Holiday Shop in its designated high visibility location, closely connected to the dominant team shop.
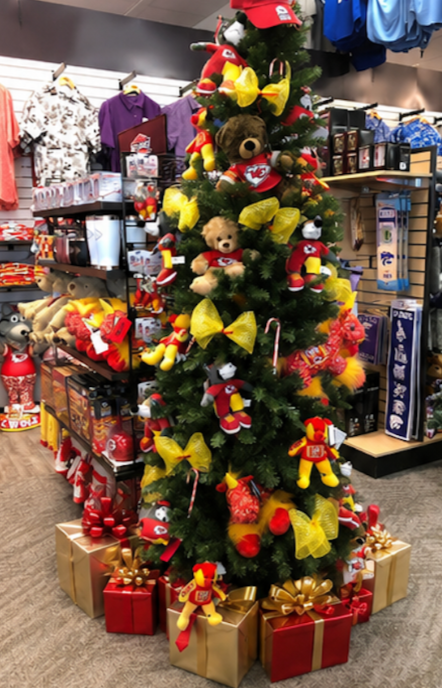
- Allocate one full fixture for this presentation along with a Christmas tree.
- Fill the Holiday Shop fixture with all holiday-themed hardlines in inventory using the HAM method.
- Prioritize dominant team holiday merchandise on the most focal sides of the fixture.
- Place holiday merchandise for all other teams and local merchandise on the less prominent side of the fixture.
- Organize ornaments by vendor, theme and/or color, as assortment allows.
- When holiday merchandise inventory is light, supplement the presentation with dominant team blankets, knit hats, cozy cold weather accessories and/or other giftable seasonal merchandise. The fixture should feel warm and festive.
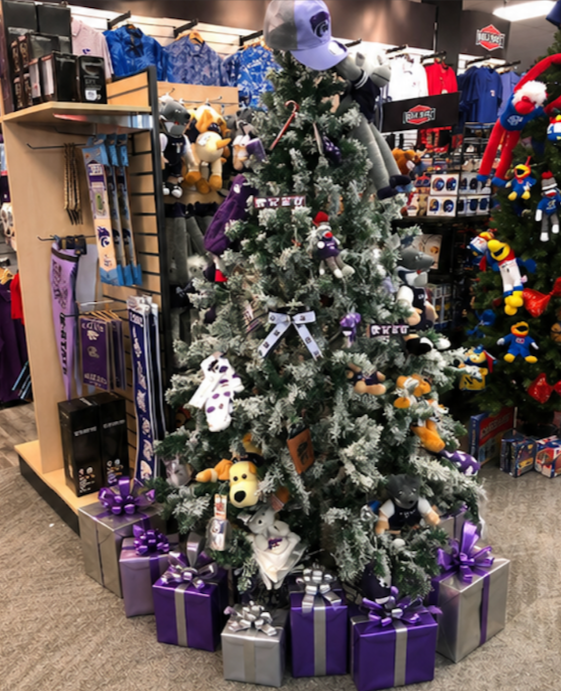
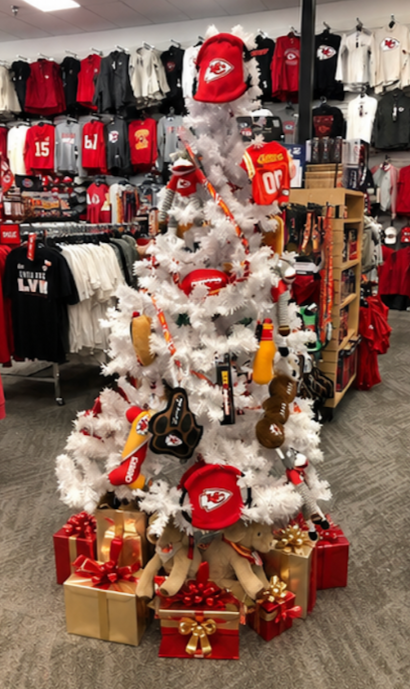
- In low inventory situations, empty the lead end cap and use the Christmas tree as the lead end cap.
- Fill the Christmas tree with dominant team holiday ornaments, plush toys and baby booties.
- Use the Christmas tree to lead guests into the Holiday Shop fixture and draw attention to the entire presentation.
- Place the Christmas tree as close as possible to the Holiday fixture so guests understand they can shop from both presentations.
- Use unboxed ornaments that are not fragile to fill the Christmas tree.
- Place large stuffed toys in between branches to fill in gaps and ensure the tree feels full and festive.
- Use gift wrap, bows and shipping boxes to create wrapped gifts and place them under the tree.
- A tree is not complete without its topper. Use knit hats or mascot foam heads as tree toppers and revisit the presentation daily to ensure it remains complete, topper and all.
Fan Cave
- Team pride is what makes Rally House a unique shopping experience for all sports fans. Rally House customers rely on our wide variety of Fan Cave products in order to take their team spirit to the next level.
- The Fan Cave category consists of, but is not limited to, the following groups:
- Blankets
- Board Games
- Clocks
- Frames
- Pillows
- Street Signs
- Serving Trays
Guidelines for Merchandising Fan Cave:
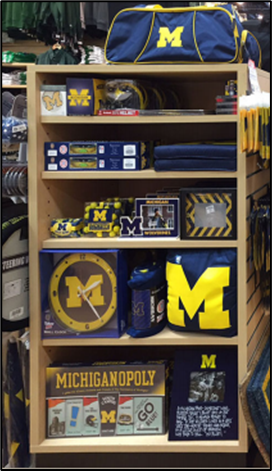
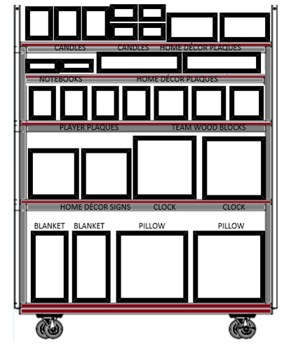
- Use a fixture with shelves to merchandise Fan Cave product since a majority of the product is stackable and looks best when fully displayed to the customer.
- Merchandise smaller product on the top shelves and larger product on the lower shelves.
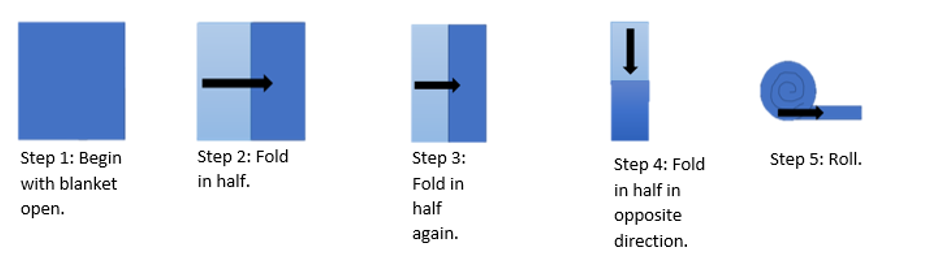
- Blankets that are pre-rolled can be merchandised on a shelf in the Fan Cave section. Blankets that can unrolled can be manually rolled and placed on the top of a 4-Ways with Tabletop or on a shelf.
- This 4-Ways with Tabletop should be close to the Fan Cave fixture to ensure that like product is merchandised together.
How to Roll a Blanket
Floor & Door Mats
Mats are best placed in one of the below locations.
- Mats can be placed on a faceout on a G unit fixture.
- Some vendors send their mats on a hanger. This hanger can be used to hang the mats from a faceout.
- Other vendors do not use a hanger. In this case pant hangers can be used.
- Heavy mats (such as coir mats) will need two pant hangers to ensure they don’t fall off.
- Mats can be placed on the bottom shelf of the Garden Stone fixture.
Fly High Bounce Balls
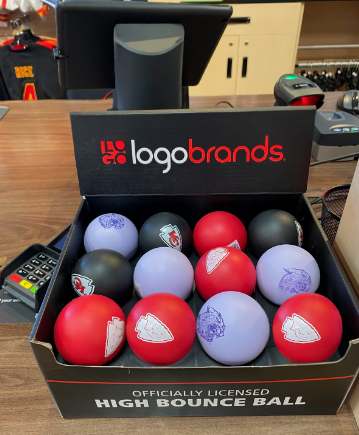
- Fly high bounce balls are merchandised in the vendor display box that they arrive in.
- Stores receive enough vendor display boxes to have a display in the team section holding the one team that it is merchandised in and also have a universal team display box in front of the point of sale on the cashwrap.
- Having the universal display on the cashwrap is a preferred add-on item for the point of sale.
Photo of universal team display in front of point of sale
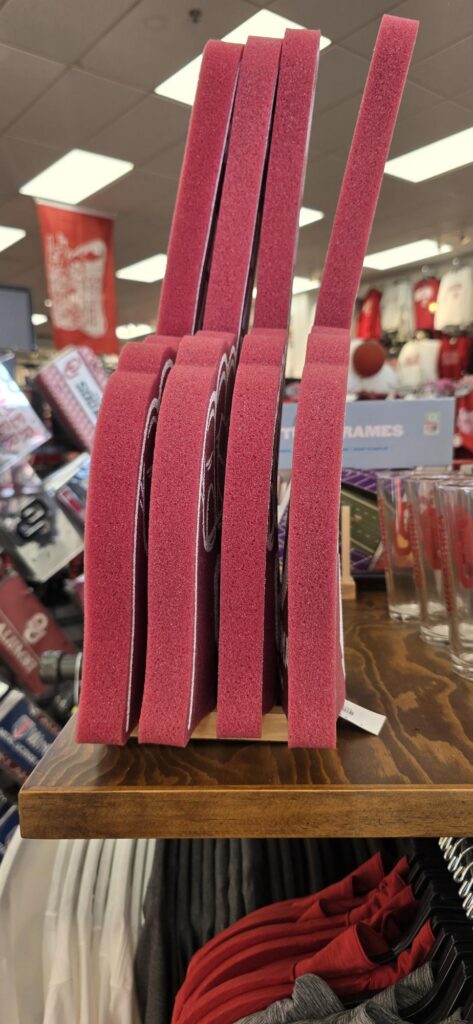
Foam Fingers
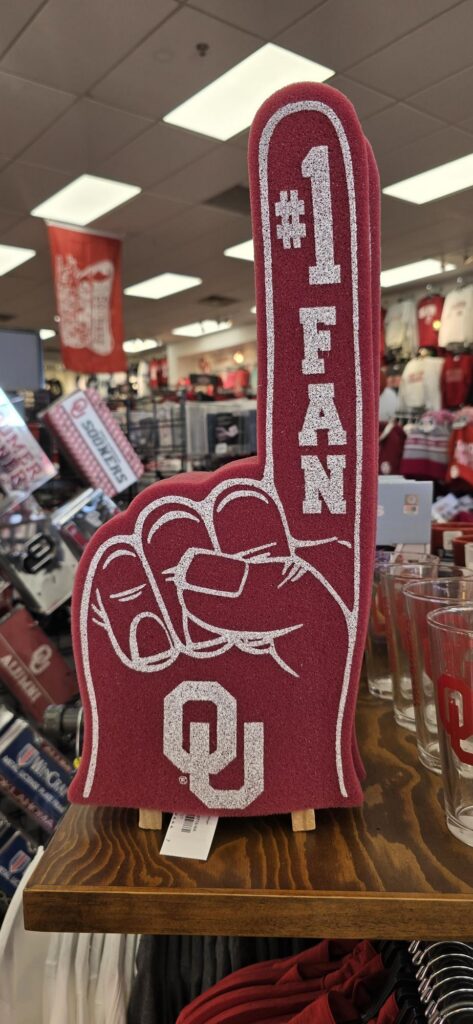
Hardlines racks are a great way to merchandise foam fingers on tabletop fixtures.
Food
Andre’s Chocolates
Our goal with a presentation specific to Andre’s Chocolates is to showcase the brand as a hometown hero, an easy grab-and-go win for gifting, or a quick sweet treat at checkout.
Placing chocolates into a bucket improves visibility, saves shelf space, speeds up restocking, and creates a more consistent, intentional presentation for the stores. For the guest, bucket display makes the chocolates easier to see and grab, encourages impulse purchases, and gives the product a cleaner, more appealing presence. It’s a win win for everyone!
Building Displays
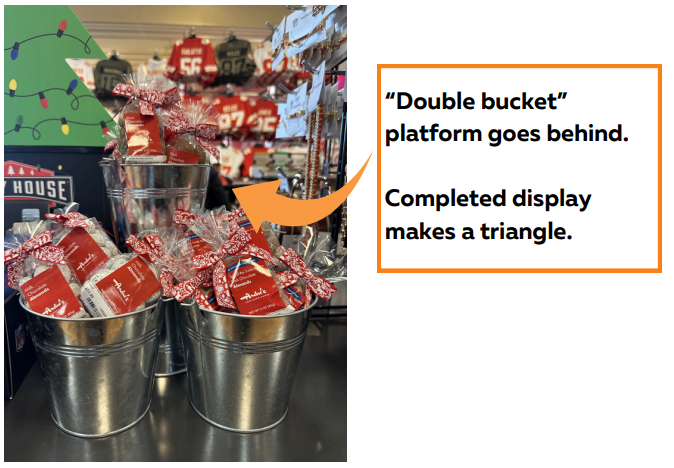
One display takes four buckets to build, but only three buckets will hold product. Complete steps for each display built.
1. Remove handle from ONE metal bucket.
- Bend both handle tabs outward so the bucket can sit
upside down and lay flat on the tabletop.
2. Attach one Velcro strip to the bottom of the inverted bucket and remove the backing.
3.Secure a second metal bucket right-side up onto the Velcro, creating a strong “double bucket“ platform.
4.Position the remaining two metal buckets in front of the double bucket to form a stepped display.
- Position in a triangle.
5. Fill each bucket with one style of Andre’s Chocolate option to keep shopping fast, clean, and easy.
Frisbees
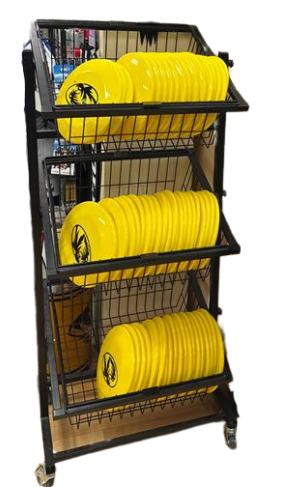
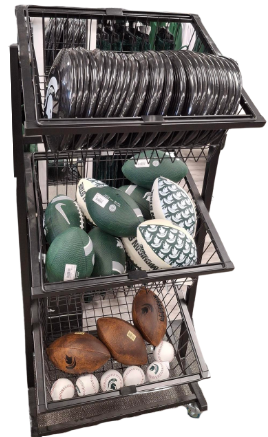
Campus stores will have a frisbee assortment and will have a 3-tier tilted basket fixture to display the frisbees.
1. Tilt the three baskets downward to invite guests to shop the frisbees.
2. Place the frisbees in the basket standing upward on their sides – think like a bookshelf
3. If inventory is low of frisbees, the lower tiers can merchandise plush and balls until the frisbees are restocked.
- Hit Reorder Me in Admin for faster replenishment.
Garden Stones
- Stores that have a large selection of team garden stones, should have a wire rack fixture that the stones are to be placed on. This fixture is durable and sturdy for the weight of the garden stones. Some stores have an older version with three shelves and some have the new version with four shelves.
- The wire rack fixture is great to place behind a window banner in the store front window.
- A vestibule is also a suitable location for garden stones. Discuss with your district manager best placement in your store if you have a vestibule.
- The bottom shelf of the garden stone fixture can be used for team mats.
- The top three shelves are for garden stones.
- Longer, heavier stones are placed lower on the fixture than smaller stones which are placed on the upper shelves.
- Team totems can be placed on the top shelf.
- The wire rack fixture is great to place behind a window banner in the store front window.
Golf
- Rally House offers a large variety of NFL, NHL, MLB, and collegiate licensed golf accessories that are both traditional and innovative products.
- The Golf category consists of the following product:
- Divot Tools
- Golf Bags
- Golf Ball Markers
- Golf Balls
- Golf Gloves
- Golf Tees
- Head Covers
- Putter Covers
- Towels
- Umbrellas
- Guidelines for Merchandising Golf:
- The Golf fixture should be located near the team’s golf apparel section.
- Most of the product for golf is hanging product. Choosing a 5’ grid unit, pinwheel, I-frame, or other fixture that supports pegs is a great choice on where to merchandise this product.
- Begin by setting the fixture with accessory pegs.
- All pegs should be the same size and color.
- All pegs should be placed on the same row on the fixture for a clean presentation.
- Start at the top of the fixture and merchandise the smallest items at the top and continue hanging the larger product towards the bottom.
- Pegs should not bulge with product.
Greeting Cards
Applying Price Decals to Greeting Card Holders
1. Locate the 4 greeting card holders.
2. Windex and dry the front of each greeting card holder.
- This will allow the decal to apply the best.
3. Locate the 4 greeting card pricing decals and a gift card.
4. Start with 1 holder and 1 decal.
5. Peel back approximately 1″ of the backing from the decal from the edge.
6. Line the decal up with the edge of the holder.
7. Once lined up, slowly pull back the remainder of the backing while simultaneously using the gift card to press the decal down and to keep air bubbles at a minimum during application.
8. After the decal is fully placed, if air bubble remain, use the gift card to try to remove.
- There are likely going to be a few air bubbles that remain.
9. The decal should not be fully applied to the holder and aligned with the edges of the holder.
10. Repeat process for remaining three holders.
Merchandising
- Register Lane
- Gift bags in the gifting section will need to be configured as shown in the below diagram.
- 9×13 gift bags are placed vertically on the left and right side of the section that is a center panel of grid.
- If the store has 16×12 gift bags, two styles are placed in the center of the section on the lower two rows.
- If the store does not have 16×12 gift bags, additional 9×13 bags can be used.
- Additional styles of gift bags that do not fit in the Gifting section can be merchandised in the recycle and clear bag section of the register lane if spacing permits.
- Two rows of greeting card holders are placed above the 16×12 gift bags.
- Each row is two greeting card holders wide.
- Rally House designed greeting cards are placed in the greeting card holders.
- These cards are priced at $3.99 and correspond to the price on the decal.
- Stores will need to be double expose their designs vertically until additional designs are sent.
- Some stores from an test of Rally House designed greeting cards may have more styles and those can be placed here. Ensure the price is $3.99.
- Gift bags in the gifting section will need to be configured as shown in the below diagram.
- Without Register Lane
- If your store has a gift bag display on a G unit:
- Gift bags will need to be configured as shown in the below photo.
- 9×13 gift bags are placed vertically on the left and right side of the section that is a center panel of grid.
- If the store has 16×12 gift bags, two styles are placed in the center of the section on the lower two rows.
- If the store does not have 16×12 gift bags, additional 9×13 bags can be used.
- Two rows of greeting card holders are placed above the 16×12 gift bags.
- Each row is two greeting card holders wide.
- Rally House designed greeting cards are placed in the greeting card holders.
- These cards are priced at $3.99 and correspond to the price on the decal.
- Stores will need to be double expose their designs vertically until additional designs are sent.
- Some stores from an test of Rally House designed greeting cards may have more styles and those can be placed here. Ensure the price is $3.99.
- Gift bags will need to be configured as shown in the below photo.
- If your store does not have a gift bag display:
- Greeting cards can be merchandised in the local section of the store on the hardlines fixture.
- This configuration will differ by store and product assortment.
- If your store has a gift bag display on a G unit:
Hand Towels
- Cat Studio hand towels are items with heavy detail that cannot be seen through vendor packaging and will need to be displayed slightly different than other items. These decorative hand towels are available in both local and team designs. Pulling these hand towels out of the vendor packaging and placing on a pant hanger allows the customer to see all the detail and designs on the towel much easier than if they were in their vendor packaging.
- Guidelines for Merchandising
- Stores that have received a vendor display box from Cat Studio and have the tabletop space may use the box to display the towels.
- This fixture is kept in it’s team and is a single team.
- Place a display on the top rod and the remaining units in the box.
- Stores that have received a vendor display box from Cat Studio and have the tabletop space may use the box to display the towels.
- Stores that do not have a vendor box or do not have the tabletop space will need to remove the hand towels from the vendor packaging and hang to display.
- Remove a hand towel from the vendor packaging.
- Place the vendor information card back into the vendor packaging – do not discard the packaging.
- Fold the towel inward on the edges to display most of the details while folded in half to save display space.
- Use a pant hanger to clip the front towel corners.
- Place the vendor packaging on the backside of the towel. Ensure there is a Rally House tag on the packaging that shows the style number and the price.
- Repeat these steps for all units for the style.
- Pre-hanging all hand towels allows for this item to replenished and displayed for our guests.
- Placing the matching Cat Studio glassware with the hand towels creates a strong visual presentation.
Home
- The Home category consists of the following groups:
- Drinkware
- Fan Cave
- Flags and Pennants
- Office
- Guidelines of merchandising Home include:
- Home product can be merchandised on a variety of different fixtures depending on the team assortment size and fixture type of the store. The primary types of hardlines fixturing at Rally House include the following:
- Footlockers
- 5’ Grid Unit
- 5-Tier Table
- Pinwheels
- World Market Fixture
- The type of fixtures that are used for each group is dependent on the amount of space and inventory of the team’s home products.
- Merchandising small hardlines product toward the top of the fixture and larger product at the bottom is a strategy that applies to the majority of Rally House hardline fixture.
- Items that have boxed packaging should be merchandised on the sales floor inside their boxes. A single sample should be shown out of the box for quick and easy recognition for the customer.
- When placing larger items on fixtures, make sure to face the product forward and stack the remainder of the product style behind. Larger hardline items should be placed toward the bottom of the fixture.
- Home product can be merchandised on a variety of different fixtures depending on the team assortment size and fixture type of the store. The primary types of hardlines fixturing at Rally House include the following:
Lit Signs
1. Marquee Lit signs are placed first on a marquee fixture.
- The marquee fixture is a 6′ piece of black slatgrid with a pair of grid legs.
- The marquee fixture has a grid sign holder with grid insert on the top of the panel of slatgrid. On the front and back of the grid sign holder, there are two vertical rack toppers.
- A Fan Cave Must-Have!” is placed to the left of the Rally House bowtie on the grid header that is on top of your marquee fixture(s).
- Both front and back.
- “Don’t See Your Team?” is placed to the right of the Rally House bowtie on the grid header that is on top of your marquee fixture(s).
- Both front and back.
- A Fan Cave Must-Have!” is placed to the left of the Rally House bowtie on the grid header that is on top of your marquee fixture(s).
2. A store receives 3 units of a style of each sign. If more than 3 units of a sign are received, the store can backstock the additional units in the backroom.
- 1 unit goes on front of the fixture.
- 1 unit goes on the back of the fixture.
- 1 unit goes in the team section on a G unit, pegged on a feature wall, or behind the cashwrap. Do not use hardline racks or plastic easels to prop up the sign.
3. On each marquee lit sign on the fixture, a store printed price tag is used to display the price.
- Store must use the marquee lit sign price template to complete this.
Completed Fixture Diagram
Pens & Pencils
- Pens and pencils are merchandised with other office supplies (i.e., mouse pads, note books, sticky notes, calendars, etc.)
- Individual pens and pencils are placed in slatwall cups. These work on G units.
- Pricing hangtags are added to the cup holder and an Editable 2×1 Label printed and placed to display the price.
- If the price is 99 cents type $0.99 on the label to keep formatting the same between all pens and pencils.
- Pricing hangtags are added to the cup holder and an Editable 2×1 Label printed and placed to display the price.
- Pens and pencils that come in a multipack are left in their multipack and pegged on the fixture.
Street Signs
1. Street Signs should be merchandised on the Street Sign Fixture if the store has one.
- This fixture can house all teams and should be placed in a universal area near the front of the store.
2. If the store does not have a Street Sign Fixture the signs should be placed on a Register Lane Endcap or on a grid fixture in the team shop.
- When placed on a grid fixture, no more than 3 street signs should be placed on each hook.
- This is due to the weight of the item.
Sunglasses
Sunglasses, Waterbugs, or Sunnies? Whatever your choice is, whether you’re in the stadium or in the sand, they are a perfect fit and a must have for the raving fan! Check out below for all the different ways we display sunglasses.
Loose Sunglasses
- These items should be hung on a peg and placed with other accessories.
- Keep units of the same style together.
- Sunglasses can be housed in the register lane and within the team section.
- All sunglasses should have a price sticker attached from the vendor.
- If sunglasses do not have one attached, use the white 2×1 price tags.
Vendor Provided Fixture
- This fixture should stay within the team section.
- Keep all units of the style together.
- If these come in boxes, keep the boxes at the register to provide to the customer at purchase.
- All sunglasses should have a price sticker attached from the vendor.
- If sunglasses do not have one attached, use the white 2×1 price tags.
Boxed Sunglasses
- If Sunglasses come in boxes, keep the boxes at the register to provide to the customer at purchase.
- Follow the direction above for Loose Sunglasses.
- All sunglasses should have a price sticker attached from the vendor.
- If sunglasses do not have one attached, use the white 2×1 price tags.
Floor Spinner
- Some stores have larger quantities of sunglasses, in these cases a floor fixture is ordered.
- Sunglass fixtures are typically found in the register lane.
- Merchandise by team then style.
- Keep units of the style together.
- In the below example:
- Chiefs are facing the front of the photo.
- There are 4 styles of Chiefs sunglasses, but the units of each style are kept merchandised together.
- K-State is on the right side.
- There is 1 style of K-State sunglasses merchandised together.
- KU is on the left side.
- There are 2 styles of KU sunglasses, but the units of each style are kept merchandised together.
- Chiefs are facing the front of the photo.
Tailgate
1. Tailgating is an American tradition that surrounds the sports world. Rally House offers fans all of the appropriate product and more to take their tailgate to the next level of fandom.
2. The Tailgating category consists of the following product:
- Aprons
- BBQ Utensils
- Bottle and Can Loozies
- Coasters
- Coolers
- Decals
- Disposable Cups and Silverware
- Paper Plates and Napkins
- Ear Buds
- Face Tattoos
- Flasks
- Foam Fingers and Hats
- Grill Covers and Mats
- Lanyards
- Metal Ice Buckets
- Ping Pong Balls
- Playing Cards
- Stadium Cushions and Chairs
3. Guidelines for Merchandising Tailgate:
- Most of the product for tailgating is hanging product. Choosing a pinwheel, grid, ball bin, or footlocker endcap is a great choice on where to merchandise this product.
- Begin by setting the fixture with accessory pegs.
- All pegs should be the same size and color.
- All pegs should be placed on the same row on the fixture for a clean presentation.
- Start at the top of the fixture and merchandise the smallest items at the top and continue hanging the larger product towards the bottom.
- When items begin to sell down, pull the remaining inventory towards to front to make the fixture appear full.
- Pegs should not bulge with product.
- Create product stories inside of your Tailgating display. To do this merchandise all like product together.
- Putting the kitchen items together creates a barbeque story for your customers. They do not have to search the entire fixture for all the items they need to cook if they are merchandised together.
Team Mascot Inflatables
Merchandising
- Inflatables are inflated to drive traffic and create exceitment about the store. Most mall locations need to display as shown below. (unless you have a notification in writing from the mall that you can not)
- Inflatables are merchandised on a shelf on a hardlines fixture.
- Inflatables come boxed from the vendor.
- Stores are to print signage for their inflatables.
- Choose your correct orientation
- If for some reason the units that you receive says “Find More Teams at Samclub.com” cover this up with a blank 2×1 label.
Display
- Stores that are able to place a display inflatable out front of their store, in a store front window, or in the store are to have their inflatable on display.
- Inflatables can help drive traffic into the store and make store fronts interesting.
Plush & Softee Balls
Drive fan engagement and boost add on sales by merchandising balls and plush toys where they are most likely to be seen and shopped.
- Establish the Home Court:
- Prioritize merchandising plush with Kids fixtures in each team shop, placing items at eye level on clip strips and pegs within easy reach to encourage add-on sales.
- Maximize Small Spaces:
- Use plush baskets in corners, tight spaces, and in the register lane where larger fixtures won’t fit, turning these areas into high-impact impulse “scoring zones.” Plush bins should not replace a fixture point in team shops.
Limit the Lineup:
Stock each plush bin with a maximum of three styles to keep the presentation clean, focused, and easy to shop.
- Clearly divide multiple styles within each basket so every item stands out and customers can quickly find their preferred team or style.
Keep It Game-Ready:
Maintain neat, fully stocked bins at all times to ensure strong visual appeal and prevent missed sales opportunities
Rotate for the Season:
Refresh plush styles regularly based on new receipts, team performance, seasonality, and local demand to keep the assortment relevant and engaging.
Keep Cashwrap Stocked:
Stress and Fly High balls from all teams are merchandised at each register in vendor boxes ensuring that customers have easy access to a full assortment regardless of where they check out. This strategy maximizes visibility, convenience, and encourages impulse purchases.
Where to Merchandise Plush Toys + Small Balls | ||
On clip strips and pegs in Kids fixtures in each team shop | In plush bins in corners & small spaces where apparel fixtures don’t fit. Note: Plush bins should not replace a fixture point. | In register lane plush bins |
Ponchos
Let’s make sure we are ready for rainy day sales and to offer the guest everything they need☔
- Ponchos should have a facing in the team as the home location.
- A single facing in the register lane is also ideal, if space allows.
- Poncho Bin
- It’s OK if ponchos aren’t officially called out on the floorplan. If you have an extra plush basket, the store can create a dedicated poncho bin and place it in a nook, cranny, or even in the back room (as long as it’s easily accessible) when it’s not raining.
- On rainy days, roll the bin out and display it prominently.
- Another option is on rainy days is to backstock some or all plush in a bin, place the ponchos for the day, and then reset the fixture when the rain concludes.
THE PLAY:
Coming Soon
IMPACT:
Coming Soon
GAME PLAN
Product Knowledge
- While Rally House carries many brands the two main vendors are New Era and ’47 Brand.
- New Era offers the following types of hats:
- 59FIFTY- Structured Sized (6 7/8 – 8)
- 39THIRTY- Structured Sized (S – XL)
- 9FIFTY- Structured One Size (Snapback)
- 9FORTY- Structured One Size (Velcro Strap)
- 9TWENTY- Unstructured One Size (Slouch)
- ’47 Brand offers the following types of hats:
- ’47 Clean Up- Unstructured Adjustable (Slouch Fit)
- ’47 Franchise- Unstructured Sized (S – XL)
- ’47 Closer- Unstructured One Size (Flex Fit)
- ’47 MVP- Structured Adjustable (Velcro Strap)
- Product Knowledge for all hats:
- Structured Hats- crown keeps its shape when it is not being worn.
- Unstructured- No crown support and hats lose shape when not being worn.
- True Fit: Sized- True Fitted hats come in 6 7/8 – 8. The size if relative to the circumference of a customer’s head.
- Simple Fitted: Sized- This hat is a closed back hat and comes in size S – XL. Simple fitted hats are designed to fit a standard size head and may not fit snug of some customers.
- Flex Fit or Stretch Fit: Sized- These hats are closed back hats and are designed to stretch or flex. They usually come in an OSFM (one size fits most) or S/M, M/L, L/XL.
- Adjustable or Snapback: Not Sized- Adjustable hats have an open back and adjustable closure which allows them to fit a wide range of head sizes.
Flat Bill – Sized and Adjustable
- Guidelines for Merchandising Flat Bills Sized and Adjustable Hats:
- Merchandise in hat trays.
- Utilize slatwall or u-cup hat trays for men’s hat walls, depending on your store’s wall system, placed 6 high on the wall.
- 6 High is the standard, but depending on the wall high in your store this may need to be adjusted.
- Flat bill sized hats start the hat wall. Flat bill adjustable are then merchandised after the flat bill sized hats.
- Flat bill sized hats should be placed with 2-3 sizes per tray to create a column of the same style.
- This allows for a guest to locate their size quickly.
- Flat bill adjustable hats are merchandised with one style per tray.
- Merchandise within the profile section by similarities such as backing, logo, and color/pattern.
Need Hat Trays?? Open a Support Case to Operations to request more trays.
Structured Sized
- Guidelines for Merchandising Structured Sized Hats:
- Merchandise in the wall using hat trays.
- Hat trays should be placed 6 trays high.
- This is a standard, but depending on the wall high in your store this may need to be adjusted.
- Structured sized hats should be merchandised 1 size per tray.
- The goal is to have a column of the same styles so that guests can locate their size quickly.
- Merchandise within the profile section by similarities such as backing, logo, and color/pattern.
- If there are any 1’s or 2’s of a style that do not need to take up a full tray or peg, these hats may be moved to 1’s and 2’s hat tray in the bottom right at the end of silhouette.
Unstructured Sized
- Guidelines for Merchandising Unstructured Sized Hats:
- Merchandise in the wall using hat trays.
- Hat trays should be placed 6 trays high.
- This is a standard, but depending on the wall high in your store this may need to be adjusted.
- Merchandise within the profile section by similarities such as backing, logo, and color/pattern.
- If there are any 1’s or 2’s of a style that do not need to take up a full tray or peg, these hats may be moved to 1’s and 2’s hat tray or peg in the bottom right at the end of silhouette.
Structured Adjustable/OFSA
- Guidelines for Merchandising Structured Adjustable/OSFA Hats:
- Since these hats are not sized, only one style should be placed per tray and/or peg.
- Merchandise in the wall using hat trays.
- Hat trays should be placed 6 trays high.
- This is a standard, but depending on the wall high in your store this may need to be adjusted.
- Merchandise within the profile section by similarities such as backing, logo, and color/pattern.
- If there are any 1’s or 2’s of a style that do not need to take up a full tray or peg, these hats may be moved to 1’s and 2’s hat tray or peg in the bottom right at the end of silhouette.
Unstructured Adjustable/OSFA
- Guidelines for Merchandising Unstructured Adjustable/OSFA:
- Since these hats are not sized, only one style should be placed per tray and/or peg.
- Merchandise in the wall using hat trays.
- Hat trays should be placed 6 trays high.
- This is a standard, but depending on the wall high in your store this may need to be adjusted.
- Unstructured adjustable/OSFA are placed near the women’s section, but still in the men’s section, as they are considered “unisex”.
- Merchandise within the profile section by similarities such as backing, logo, and color/pattern.
- If there are any 1’s or 2’s of a style that do not need to take up a full tray or peg, these hats may be moved to 1’s and 2’s hat tray or peg in the bottom right at the end of silhouette.
Bucket Hats
Bucket hats bring a relaxed yet stylish touch to fan gear. Perfect for summer, they’re playful, practical, and make a great statement on game day, giving fans a fun alternative to more traditional hat styles.
Merchandising
1. Place a clear hang tab on the inside of the vendor tag.
- Keep the string of the bucket hat inside the hat.
2. These should be hung using a 12″ hook.
3. Bucket hats can be grouped with visors and other seasonal accessories to highlight warm weather essentials.
- Bucket hats should be featured at the front of the section during warmer seasons. As winter approaches, transition them toward the back of the section alongside other summer-focused styles.
Cowboy Hats
Let’s put cowboy hats in the spotlight as a winning mix of fashion trend, local culture, and team spirit. The goal is to create a true head-to-toe game day destination wher fans can show off their team pride in standout style.
Product Placement
Product Story: Life Style Theme Ideas
Knit Hats
Knit hats are a winter staple in game day style, combining warmth, comfort, and team spirit for cold weather events.
Merchandising
1. Using a tag gun, insert a hang tag at the top of the hat so that the hat hangs vertically.
- Hang tags should be placed without causing damage to the hat.
- Hang tags should not be placed into the weaving of the hat.
2. Knit hats should be placed on 12” pegs.
3. Knit hats can be grouped with gloves, scarves, and other seasonal accessories to showcase cold weather essentials.
- Knit hats should be displayed at the front of the section during winter months. As warmer seasons approach, transition them towards the back of the section alongside other winter-focused styles.
Visors
Warm-weather essential! Visors provide sun protection, a sporty/stylish look, and an easy way for fans to complete their game day or casual outfit.
Merchandising
- Using a tag gun, insert a hang tag on the side of the hat so that the hat hangs diagonally.
- Hang tags should be placed without causing damage to the hat.
- Do not insert the hang tag directly into the fabric. Find a seam to cause the least amount of damage.
2. Visors should be placed on 12” pegs.
3. Visors can be placed alongside golf polos and other warm-weather items according to the season.
- Visors should be displayed at the front of the section during warmer seasons. As winter approaches, transition them towards the back of the section alongside other summer-focused styles.
Merchandising Guide
Hat Wall Presentations
Hat Walls are the Main event and can be built in multiple sizes depending on the heights and gaps in the wall and the level of Hat stock available.
- Hat Walls are the featured product in team sections creating focal points that should be visible from the aisle as you enter the store or team section.
- Hat Walls size will be determined based off your wall height and wall type, which varies by store.
- Different wall types will have specific spacing between the Hat trays.
- Review this Quick Guide for Men’s Hat walls to better understand spacing and product placement.
1. The flow of hats begins in the men’s section and ends in the unisex section of the team.
2. Flatbills should begin in the men’s section and “dad caps” be close to the unisex/women’s section.
- Men’s Hats should not flow directly into the womens section.
3. Within the profile of the hat, hats are then merchandised by similarities.
- Similarities include backing, logo, and color/pattern.
- For example, if a team has three camo flat bill sized hats, these should be placed next to each other. If the team has several mesh back (trucker) unstructured sized hats, these should be placed next to each other.
4. Hat trays are spaced with one slat between each hat tray (6 inches).
- If your store has 1” on 2” center slotted standards, this is two slots.
- If your store has ½” on 1” center slotted standards, this is five slots.
Hat Tray Tips
- If you have slatwall hat trays in your grid units, you should replace them with grid hat trays.
- Grid hat trays are a great way to merchandise youth and kids hats that are on grid units.
- Where you have a small team that is only merchandised on a grid unit, grid hat trays can be used to merchandise your hats.
Reminder, men’s hats are to be in the hat wall for your team section with either slatwall or u-cup hat trays, depending on your store’s wall system.
Hat Tray Clips
- Place hat tray clips to the respective tray.
- Sale ➡ Sale Tray; Best Sellers ➡ Best Sellers Tray, etc.
- Clips should be placed on the right side of the hat tray; the Rally House Logo should not be covered.
- Hat Tray Clips can also be placed in the center of a grid hat tray.
THE PLAY:
Coming Soon
IMPACT:
Coming Soon
GAME PLAN
Clear (Gameday) Bags and Bag Straps
Clear game day bags are transparent, team-approved bags that meet stadium entry requirements. Merchandise them so fans can quickly find and choose the right option for game day. While some bags include a strap and others do not, Rally House also carries stylish, interchangeable bag straps—making clear bags both functional and fashionable for game day.
Merchandising Clear Bags and Straps
- Clear bags and straps should be merchandised on a 5G unit endcap or 5G unit center depending on the size of the assortment
- Bag straps should be placed starting along one side of the G Unit.
- Bag straps that arrive in vendor packaging that are sold individually (not with a bag) should be removed from the vendor packaging to show the style fully hanging and unfolded.
- This is only for sellable straps. If a clear bag comes with a detachable strap, leave the strap inside the bag.
- Bag straps that arrive in vendor packaging that are sold individually (not with a bag) should be removed from the vendor packaging to show the style fully hanging and unfolded.
- Once the straps have been placed, fill the space with clear bags.
Headbands
Headbands are one of the many hair accessories that Rally House offers to complete the game day look. These are best placed next to other hair accessories and game day apparel so guests can visualize a complete look when purchasing.
Merchandising Headbands
- Headbands that do not have a cardboard backing or are a high price point (such as Brianna Cannon) are placed on a headband fixture.
- Some stores are sent vendor headband fixtures.
- Campus stores are able to order non-vendor headband fixtures on Amazon.
- Other stores can put in a support case to receive a non-vendor headband fixture.
- Headband fixtures can be placed on a shelf on a 5G endcap/center or tabletop fixture.
- Headbands should be merchandised together by style and brand to display all available options.
- If available, Brianna Cannon headbands should be featured on the brand-specific fixture.
- Place the fixture near other accessories and game day apparel for a cohesive presentation.
Women’s Accessories Campus Stores
Campus stores are provided a few additional fixtures to assist with merchandising women’s accessories. This is due to the campus stores receiving a wider assortment and more units per style. The supplemental fixtures also create some uniqueness in the store’s fixture package.
Women’s Jewelry
Women’s jewelry should be merchandised along side other accessories and game day apparel, making it easy for fans to complete their game day look.
Merchandising a Jewelry Spinner
- Campus stores should receive 2 peg board jewelry spinners.
- The jewelry spinner can be placed on a 5G unit endcap, 5G unit center, or tabletop fixture.
- This fixture is orderable through amazon by stores.
- The spinner should be merchandised according to HAM guidelines. Begin at the bottom, placing the largest items there, and work upward, hanging smaller products toward the top for a balanced and visually appealing display.
- Adjust the pegs as necessary to utilize and fill the most space.
- If there is a large enough selection, keep the same brand together and feature as a collection especially for higher end brands (Brianna Cannon, BaubleBar, Canvas Style)
- Place a mirror next to the spinner.
Merchandising a Bracelet Bar
- Bracelet bars hold bracelets of higher price points (such as Canvas Style) that look better on a bar than pegged.
- This gives the women’s accessory area a more boutique feel.
- Bracelet bars should be displayed on a 5G unit endcap, 5G unit center, or tabletop fixture.
Hair Ties and Claw Clips
Merchandise hair accessories near other accessories and game day apparel. Hair accessories include headbands, hair ties, and claw clips. Display the items in a way that makes it easy for fans to find and style them for game day.
Merchandising Hair Ties and Claw Clips
- A set of acrylic bins in various sizes is available for stores to order through Amazon for merchandising hair ties and claw clips.
- Hair Ties and Claw Clips should be displayed on a 5G unit endcap, 5G unit center, or tabletop fixture.
- Use the appropriate sized bin for each assortment. All items in the bin should be the same style.
- Claw clip sets that come in hangable packaging should be hung.
- Organize similar styles and brands together to create a clear and visually appealing display.
Montana West Purses
Bag Preparation for Merchandising
During shipment processing place inside each purse:
Fabric protective bag
All bags should be inside a protective bag when they arrive.
We want this available for the customer to have.
Detachable strap, if applicable.
Merchandising
This should be a hybrid fixture (hardlines and apparel).
Merchandise most Montana West bags using shelves.
For coin sling purses, peg by the metal hardware (where the strap attaches) to ensure we are not damaging the bag.
Use faceouts below, for apparel that completes the look.
Choose apparel that matches the style and lifestyle of the Montana West bag shopper.
Outfits should be cute, relevant, and complement the bag’s aesthetic.
Ensure bags are facing forward.
If you are placing the product on the end of a G unit, we want it to be out front where guests can see it.
We do not want this product facing the wall or placed where they are hidden.
Tennis Shoes
Hard Sensor of Tennis Shoes or Closed Toe Shoes
- Each pair of shoes will need one shoe with a hard sensor tag.
- The sensor is to be placed in the top hole on the right side of the shoe.
- Ensure that the pin is on the inside of the shoe so that the guest can still try on the shoe if needed.
Presentation Options
- Depending on how many styles of tennis or closed toe shoes there are for a team will help determine where the shoes should be merchandised.
- Men’s shoes should be merchandised within the men’s section of the team.
- Women’s shoes should be merchandised within the women’s section of the team.
Wall Merchandising
1. Shelves within the wall can be used to create a pod to display tennis or closed toe shoes.
2. Remove the faceout from the second row of apparel where the shelves are going to be placed.
3. Place the first shelf on the wall above the bottom row faceout.
- Add the shoe boxes. The first shelf should include the smaller sizes of shoes such as 6.5-7.5.
4. Place the second shelf on the wall above the shoe boxes of the first shelf, leaving room for guests to easily get shoes off the shelf below.
- Add the shoe boxes. The first shelf should include the smaller sizes of shoes such as 8-10.
- On the second shelf, slightly pull out a shoe box for each style of shoes in the display. Place a display show on the box.
5. Place the third shelf on the wall above the shoe boxes of the second shelf, leaving room for guests to easily get shoes off the shelf below.
- Add the shoe boxes. The first shelf should include the smaller sizes of shoes such as 10.5-12.
Grid Unit Merchandising
1. Grid units can be used to merchandise one style or multiple styles of tennis or closed toe shoes.
2. One Style
- Begin by placing two faceouts for apparel to be hung.
- The apparel that is on the faceouts should correspond to the shoes.
- I.e., polos are not typically worn with running shoes, but athletic shirts and hoods are.
- The apparel that is on the faceouts should correspond to the shoes.
- Place the first shelf on the grid fixture above the faceouts, leaving space for hangers to be removed from the faceout below.
- Add the shoe boxes.
- If a second shelf is being used, place the second shelf above the shoes boxes on the first shelf, leaving room for the guest to easily get shoes off the shelf below.
- When there is one style of tennis or closed toe shoes and a grid unit is used to merchandise the shoes, there should be two faceouts of apparel below the shelves used for the shoes.
- If two shelves are used:
- Smaller sizes such as 6.5-8.5 are placed on the first shelf.
- Larger sizes such as 9-12 are placed on the second shelf.
- Ensure that a display shoe is taken out of the box and placed for customers to view.
Multiple Styles
3. Depending on how many styles, the quantity of shoes per style, and the size of the shoe boxes will slightly differ this merchandising presentation.
- Smaller sizes are placed on the bottom of the fixture and larger sizes are placed on the top of the fixture.
- Begin with placing the first style on the grid deck. Then place the second and, if needed, third style on the grid deck in separate columns than the first style.
- Add a shelf above the shoe boxes on the grid deck but leaving space so that the shoe boxes can be easily removed under the shelf.
- Add in additional shoe boxes above the style on the grid deck to begin to create a column of each style.
- Complete this process of adding shelves and adding additional shoe boxes in the style’s column until the merchandising is completed.
- Ensure that a display shoe is taken out of a box for each style and placed for customers to view in the style’s column.
Flip Flops & Slides
1. Flip flops and slides should be merchandised by the hangtag on the pair of shoes.
- On Nike Slides that come in a box, there is a cardboard hangtag for hanging the slides.
- Price labels will need to be reprinted and placed on the cardboard hangtag on the backside.
- The Nike box can be discarded once hung.
2. Flip flops and slides are first merchandised within the Team Shops.
- When placed on the center of a grid unit or on a pinwheel 12″ pegs are used.
- When placed on the end of a footlocker or the endcap of a grid unit that does not have faceouts, 8″ pegs are used.
3. If the store receives enough for a secondary placement, the register lane can be used to merchandise the Flip Flops and Slides.
- This is often directed in the Spring as they arrive in store.
Product Launch
There are instances where shoes come in that have a hard sell date. When this occurs, follow this process on launch day to display these items.
Hard Sensor of Tennis Shoes or Closed Toe Shoes
- Each pair of shoes will need one shoe sensored with a hard sensor tag.
- The sensor is to be placed in the top hole on the right side of the shoe.
- Ensure that the pin is on the inside of the shoe so that the guest can still try on the shoe if needed.
Merchandising
- For tennis shoe launches, the merchandise is to be placed on a baker’s rack.
- The baker’s rack will need 6 shelves.
- See the below guide on which sizes are to be placed on which shelf.
- If the store does not receive all sizes, adjustments to this guide can be made as needed to create a clean presentation.
- Shoeboxes should not be stacked more than two high.
- To create a display on the baker’s rack, use the sensored shoe of one of the extended sizes.
- Place two short pegs in the wiring of the fourth shelf.
- Place the shoe on top of the pegs.
- To create a display on the baker’s rack, use the sensored shoe of one of the extended sizes.
- Inventory should remain on the baker’s rack until it must be moved due to inventory reasons or space. When this is needed, partner with the store’s District Manager on where the best location is to move this product.
BEST SELLERS
THE PLAY:
Coming Soon
IMPACT:
Coming Soon
GAME PLAN
Best Sellers (1’s and 2’s)
Best Sellers are apparel styles with extremely broken size runs (2-3 pieces remaining) and are often referred to as “1’s and 2’s”.
- Merchandising is dependent on the assortment of the team’s best sellers.
- Team = Chiefs, Eagles, etc.
- Department = Mens, Womens, Headwear, etc.
- Class = Short Sleeve, Long Sleeve, Outerwear, etc.
- When merchandising, product should not bulge or touch the floor.
Hanging Apparel
- If you have enough product for a hang bar, the first choice is to place the Best Sellers on a Grid Unit (G Unit) hang bar. The second choice is to place on a Ocho Hangbar.
- There are instances in a large team and gender where you would have multiple hang bars and/or a double salesman rack.
- Separate by class.
- Best Sellers are placed in size order with size indicators.
- Use 🔗Best Sellers signage.
- There are instances in a large team and gender where you would have multiple hang bars and/or a double salesman rack.
- If there is not enough product to fill the hang bar, than a back faceout of a grid unit or ocho is used.
- Best Sellers are merchandised by style. No size indicators.
- If possible, use 🔗Best Sellers signage.
Hats
1’s or 2’s of a style that do not need to take up a full tray, move to a hat tray in the bottom right at the end of the silhouette.
CLEARANCE
THE PLAY:
Coming Soon
IMPACT:
Coming Soon
GAME PLAN
Men’s & Women’s
FINAL WHISTLE: END-OF-SEASON CLEARANCE
Let’s clear the bench! Our goal is to liquidate excess inventory to make room for fresh, new styles hitting the field.
EQUIPMENT CHECK
- Zebra for Cycle Count Application
- Pricing Gun & Orange Pricing Stickers
- Grid Unit SALE Signage (confirm dimensions)
- Faceout SALE Signage (confirm dimensions)
- SALE Hangtags
OPENING DRIVE STRATEGY: WHEN FULL SIZE RUNS ARE AVAILABLE
- While completing Clearance Cycle Counts, use a pricing gun to place an orange markdown sticker next to the original price on every clearance unit. Take care to keep the original price visible.
- Designate drive-aisle fixtures for Clearance in each affected Team Shop and shift all clearance apparel to these fixtures for maximum visibility.
- Merchandise full size runs front and center using faceouts, prioritizing styles with the most depth. Styles with broken size runs play from the back of the fixture.
- Add SALE hangtags to the first four units of each clearance apparel style when placed on a faceout.
- Round out each fixture by adding clearance accessories and hardlines, prioritizing items that pair well with the apparel.
- Top it off with the correct SALE signage on every fixture and faceout.
SECOND HALF SELL-DOWN: SECOND MARKDOWNS + BROKEN SIZE RUNS
- When applicable, add a secondary markdown sticker next to the first markdown. Take care to keep the first markdown and original price stickers visible.
- Move broken styles to secondary fixtures within the appropriate Team Shop, Women’s Section, Men’s Section, or Kid’s Section. Best plays: ballet bar, double salesman, or grid unit hang bars.
- Merchandise by size and add size indicator rings so Guests can quickly find their fit and head to checkout.
Hardlines
When a hardline item is marked down on SALE it receives marketing to alert the guest to this great deal!
Guidelines for merchandising SALE hardlines:
- Keep the hardline item merchandised within its class and silhouette.
- Front of the hardline receives a hardline SALE sticker on the upper right side of the item.
- Back of the hardline receives an orange one-line label with the new price placed next to the original price.