
FIELD LEADER
Standard Operating Procedure & FAQ
Flags and Click Home buttons are clickable to make it easy to navigate the page


INTRODUCTION
THE PLAY:
Field Leaders are responsible for creating the conditions that allow stores to operate successfully. This includes developing store leaders, supporting operational execution, removing obstacles, providing accountability, and ensuring stores have the tools and resources needed to deliver results. While stores execute the day-to-day business, Field Leaders provide the direction, support, and follow-up that help keep teams aligned and focused on what matters most.
The Field Leader Playbook serves as a reference guide for many of the operational and administrative responsibilities that support store success. From reviewing schedules and approving requests to recognizing top performers, managing expenses, monitoring operational compliance, and supporting store communications, these processes help Field Leaders maintain visibility into the business and provide effective support to their stores.
Consistent execution of these responsibilities creates stronger communication, faster issue resolution, and clearer expectations across the organization. By utilizing the tools, systems, and processes outlined throughout this playbook, Field Leaders can spend less time searching for answers and more time coaching leaders, developing talent, and improving store performance.
IMPACT:
The actions Field Leaders take each day have a direct impact on store execution, Team Member engagement, and overall business results. Timely approvals, consistent follow-up, operational oversight, and effective communication help stores remain focused on serving Guests while ensuring company standards and expectations are being met.
Strong Field Leaders create consistency across their district or region. They help identify issues before they become larger problems, provide support when stores need assistance, and ensure leaders have the knowledge and resources required to be successful. Whether reviewing schedules, recognizing outstanding performance, responding to operational concerns, or supporting administrative processes, Field Leaders play an important role in helping stores operate efficiently and effectively.
When these responsibilities are executed consistently, stores benefit from stronger leadership support, improved operational execution, and faster resolution of challenges. This allows store teams to focus their energy on delivering a great Guest experience while building a culture of accountability, development, and continuous improvement.
ON FIELD TERMINOLOGY
- Field Leader: District Managers and Regional Directors responsible for supporting stores, developing leaders, and driving business results.
- District Manager (DM): Leader responsible for overseeing a group of stores within a district.
- Regional Director (RD): Leader responsible for overseeing multiple districts within a region.
- Head Coach: Store Manager responsible for leading daily store operations.
- Assistant Coach: Assistant Store Manager responsible for supporting store operations and leadership execution.
- Team Captain: Store leadership position responsible for supporting operational execution and Team Member development.
- Team Member: Store associate responsible for delivering the Guest experience and supporting store operations.
- Guest: A customer shopping with Rally House.
- Corporate Partner: Corporate Team Member who provides support, resources, and expertise to stores and Field Leaders.
- NetSuite: Rally House’s primary operational and business management system used for reporting, approvals, support cases, and operational processes.
- Legion: Rally House’s scheduling and labor management platform.
- Office 365: Rally House’s communication and productivity platform, including Outlook email and calendar.
- Total Connect: Alarm management platform used to remotely arm and disarm store alarm systems.
- Verkada: Security and alarm platform used to monitor and manage store alarm systems.
- Spend Dynamics: Expense coding, approval, and corporate card management platform.
- Support Case: A request submitted through NetSuite to obtain assistance, report an issue, or request operational support.
NETSUITE


THE PLAY:
NetSuite serves as the primary operational system for Field Leaders to monitor store performance, review operational compliance, approve requests, manage expenses, and support store execution. Through NetSuite, Field Leaders gain visibility into critical business processes including deposits, over/short investigations, supply and fixture approvals, camera observations, expense management, store hours requests, and other operational activities requiring leadership oversight.
Field Leaders are responsible for regularly reviewing NetSuite dashboards, reminders, reports, and approval queues to ensure operational processes are completed accurately and on time. Timely review and follow-up help stores remain compliant with company expectations while allowing operational concerns to be identified and addressed quickly.
NetSuite also serves as an important communication and accountability tool between stores, Field Leaders, and Corporate Partners. Whether approving requests, reviewing exceptions, coaching store leaders, or managing expenses, consistent utilization of NetSuite helps maintain operational standards across the organization.
IMPACT:
Effective use of NetSuite helps ensure operational consistency, financial accuracy, and timely decision-making throughout the business. By actively reviewing reports, approvals, and exceptions, Field Leaders can identify issues early, provide coaching and support, and help stores maintain compliance with established processes.
Many of the workflows within NetSuite directly impact store operations, financial reporting, inventory accuracy, payroll expenses, and guest experience. Prompt review of deposits, over/shorts, supply requests, camera observations, expense reports, and store hours requests helps prevent delays, improve accountability, and ensure stores have the resources needed to operate successfully.
Consistent execution of NetSuite responsibilities also strengthens communication between stores, Field Leaders, and Corporate Partners. When approvals, reviews, and follow-up actions are completed in a timely manner, stores can focus on serving Guests while leadership maintains visibility into key operational processes and business performance.
GAME PLAN
Pending Deposits
The Pending Deposits Reminder provides Field Leaders with visibility into stores that may be behind on entering bank deposits in NetSuite. Regular review of this reminder helps ensure deposits are being taken to the bank according to the store’s established deposit schedule and that deposit entries are completed accurately and timely.
This process should be utilized by District Managers and Regional Directors to monitor deposit activity, follow up with stores as needed, and identify potential operational concerns before they become larger issues.
Stores – Pending Daily Deposit Receipt Needs Completed
- This reminder helps Field Leaders:
- Increase visibility into stores with outstanding deposit entries.
- Follow up with stores that may be behind on deposit processing.
- Confirm deposits are being taken to the bank according to the store’s drop cadence.
- Improve accountability and awareness around store deposit procedures.
Review Frequency
- Field Leaders should review this reminder:
- Monday
- Wednesday
- Friday
Follow-Up Guidelines
- Daily Deposit Stores
- District Managers should follow up with any store listed on the report that completes daily deposits and has three or more missing deposit entries.
- Weekly Deposit Stores
- District Managers should follow up with any store listed on the report that has not completed deposit entries by Wednesday for deposits from the prior week.
- Example: If reviewing the reminder on Wednesday, January 7, and a store has deposit entries missing from December 29 through January 4, follow up with the store.
- Weekly deposit stores may not take deposits to the bank until Monday, which is why Wednesday is the recommended follow-up day.
Store Follow-Up Conversation
- Conversations should focus on understanding the root cause of why the deposit process or NetSuite deposit entry process was not completed.
- Field Leaders should approach these conversations as operational discussions and avoid language that may imply a Loss Prevention investigation during the initial outreach.
- Recommended questions include:
- When was the last deposit taken to the bank?
- What is the current amount waiting to be deposited?
- What prevented the deposit from being made as scheduled?
- Are deposits prepared and ready for drop-off?
These questions help confirm deposit timing, understand operational challenges, identify outstanding funds, and verify readiness for bank processing.
Missing Deposits or Funds
- If a deposit or funds are confirmed missing, District Managers should immediately escalate the concern to Loss Prevention by contacting:

Over & Shorts
When a deposit does not match the expected deposit amount, or there is an overage or shortage from the registers less than -$10.00 or greater than $10.00, an over/short is created. These discrepancies require research and explanation or resolution on a daily basis. The Stores-Over/Short report on the dashboard serves as a communication tool to clarify and resolve these differences.
1. Click on the “DM-Over/Short” link in the Reminders portlet on the dashboard.
- The report will be highlighted in red if there are over/shorts that require attention.
- This will open the DM-Over/Short report.
2. Click Edit for each over/short.
- This will open the Deposit Entry page.
3. Review the information provided by the store concerning the over/short.
4. Confirm that the store has supplied sufficient information in the Over/Short Follow Up section of the form.
5. Confirm that the store has supplied the cashier information in the Cashier Information section of the form.
6. If there are follow-up comments or questions for the store, enter those in the DM/Corporate Notes box in the DM/Corporate Information section of the form.
7. Change the Assigned To field in the DM/Corporate Information section of the form.
- If there is additional follow-up required from the store, assign to Store Manager.
- If no further information is needed and the discrepancy was not discovered, assign to Unresolved Shortage.
- If the over/short was resolved, assign to Finance Department.
- This will remove the over/short from the report on the dashboard.
8. Check the DM Reviewed checkbox once all research and questions have been completed for the over/short.
9. If the shortage was found, check the Found Money checkbox.
10. Click Save.
Supply & Fixture Request
Supply, equipment, and certain fixture orders require District Manager and/or Regional approval in NetSuite before the order can move forward. Approvals may be triggered based on the cost or requested quantity of the item(s) and help ensure orders align with business needs before they are finalized.
What’s the play? Review and approve or reject orders in NetSuite as quickly as possible to keep orders moving through the procurement process and ensure timely delivery to stores.
1. Login to NetSuite
2. Check MUL-Supply Approvals or RD-Supply Approvals for any pending orders that need action.
3. Select Edit on the Supply Order to open and view the order.
4. Review Order Details:
- Confirm Item and Description
- Review Quantity requested and Cost of item.
- Review “Supplies Order L90” to view what the store has ordered in the past 90 days for additional context.
5. Determine Action and select the appropriate Approval or Rejection Reason.
6. Once all items in the order have been approved/rejected click SAVE.
Fixtures and Equipment Not Available for Order on Sitoo
Select items are not available to order through Sitoo Supply Ordering, and instead be requested through an Operations support case. When submitting a request, include a detailed explanation of why the item is needed, what it is replacing (if applicable), and where it will be used within the store to help support the approval and ordering process.
Fixtures Not Available on Sitoo Supply Ordering | Equipment Not Available on Sitoo Supply Ordering |
|
|
Store Hours Request
Permanent Store Operating Hours
- Adjustments to the store’s operating hours need to be approved by the District Manager.
- Operating hours = the hours the store is open daily
- Once approved, open an Immediate NetSuite support case to Operations to have the store’s operating hours adjusted in Legion, with alarm company, and on rallyhouse.com and all social media platforms.
Single Day Adjustment
- There are instances that a store will need to adjust their hours for a single day. The most common instance of this is for a game day where the store needs to open early or close late to accommodate traffic and the game time.
Single day entries are to be entered by the store team two weeks in advance of the date that it is occurring in NetSuite.
Any store hours changes completed 5 days or less prior to the date in NetSuite, may not be processed in time for social to be updated.
- Entering a Single Day Adjustment will not change your daily operating hours and will only change the hours for the date inputted on the form.
- On the NetSuite dashboard, navigate to Shortcuts.
- Select “Store Hours Change Request Form”.
![]()
- Enter the following information:
- Store
- Date
- Opening Hour
- Closing Hours
- Brief Reason for Open/Close Change
Mileage Expense Report
1. In NetSuite, hover over your name in the top right corner.
2. Click on Rally House Employee Center.
3. In the Expense Reports portlet, click on the blue button Enter Expense Report.
4. The date under Primary Information will default to the current date. This will not be changed.
5. Under the Expenses tab, enter each trip (to and back) as its own line.
- Click on the Date field on line 1 and change it to the date the trip occurred.
- Click in the Category field and select Mileage (DM).
- In a separate tab, use Google Maps directions to determine the miles driven between locations.
- If it was a round trip, add a third destination and enter your final location.
- Any beginning or ending destinations listed as Home must include a deduction for your Regular Daily Commute.
- Example: If your home store is Store 013 and you live 10 miles away, then 10 miles is your Regular Daily Commute (one way). If you go help at Store 007 and drive 15 miles from your home to Store 007 and then back home, your reimbursable mileage is 10 miles (15+15=30-10 (from home)-20-10 (to home) = 10 miles).
- On the expense report in the Quantity column, enter the number of miles for the trip.
- The Rate will default and will not need to be changed.
- The Amount will be calculated after the quantity is added.
- In the Memo column, list the starting and ending locations and indicate if the trip was one way or round trip.
- The Location will default and will not need to be changed.
6. Click the blue Add button once the line is complete.
7. Repeat to add additional mileage if necessary.
8. Click the blue Submit button.
- If there will be more lines added at a later time, click Complete Later.
Spend Dynamics
Ensure all expenses are accurately coded, documented, and approved in a timely manner to maintain financial accuracy, compliance, and uninterrupted card access.
Key Expectations
- Expense coding must be completed weekly.
- All charges must be coded and approved by the 5th business day of the following month.
- Missing the deadline may result in card deactivation.
- Charges may take 1-2 days to appear in BMO Spend Dynamics.
- You can save receipts images on your account to reference later when coding.
- BMO SD mobile app is available for convience, follow the same basic instructions below.
- Non-travel expenses over $600 annually with a vendor:
- Vendor must exist in NetSuite. Submit a New Vendor Request if needed.
- You may need a Purchase order written, see “Charges that require a PO” section below and create a PO if needed.
Card Holder Process
1. Log in or use the mobile app: https://www.bmospenddynamics.com/Site/#/home
2. Navigate to: Card Transactions → Items requiring your attention.
3.Click on your name to open items that require coding attention.
- Information required items are items that approvers have sent back and need more information in order to be approved.
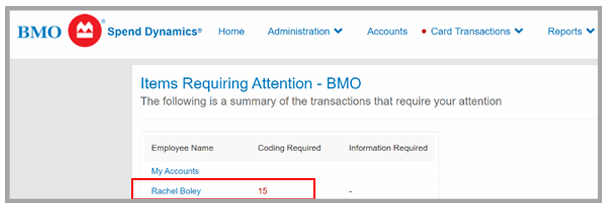
4. Identify transactions: X = needs coding and ! = needs approval.

5. Select a transaction to begin.
6. Complete GL Code.
- Search GL code by doing a %search. Ex: %meals.
- Use “All” to search the full list of GL codes available to you.
- To add a code to your transaction select the Up Arrow.
- Use the Right Arrow to save that code to your favorites.
Note: If a GL code that best fits your transaction is missing, contact Treasury@rallyhouse.com

7. Complete Location field.
- If traveling to or purchasing items for a specific location, use that location when coding.
- New Store Opening travel: Use 92040 – NSO Travel.
- If traveling to multiple locations, you can use the Corporate Location.
- Regional Directors should only use the Corporate Location.
8. Complete Department field.
9. Complete Purchase Order field if applicable.
10. Amount will automatically populate.
- If amount is split, use the “+” button to the left of the GL code on that line.
- Amount can also be split by percentage by using the blue icon button to the right.
11. Complete Business Justification field with a description of what the transaction was for.
- Description should include a clear reason for the expense.
- Description should include if the expense was for Hot Market, NSO, or a Company Event.
- Include additional details when applicable:
- Hotel or vehicle rentals: List the number of days (nights or rental days).
- Meals: Specify meal type (breakfast, lunch, dinner).
12. Upload a receipt by clicking the paperclip above the supplier details box.
- Upload from your device or computer.
- Upload via email and Spend Dynamics will provide an email address in a pop-up window for you to email the receipts to.
- Select the picture and link it to the coded transaction.
- There will be a green dot on the bottom right of the linked receipt and on the paper icon when you exit the pop-up.
13. Save once all required fields are completed.
Approver Process
1. Log in or use the mobile app: https://www.bmospenddynamics.com/Site/#/home
2. Navigate to:
Approvals → Items requiring your attention.
3. Select the transaction for review.
4. Review the following:
- Merchant Details
- Coding
- Receipts
5. Take the needed action to approve, edit, or send back to the cardholder.
- If information is correct, select Approve, then Save.
- If more information is required, select Information Required, then Save.
- This will send it back to the cardholder.
- You may edit or add missing information instead of sending it back to the cardholder.
- Each transaction must be reviewed before approving.
- You may approve transactions individually or in bulk after review.

Charges That Require a Purchase Order
The following purchases require a Purchase Order (PO):
- Goods or services over $600 (non-recurring)
- Any single item over $250
- These items may require capitalization.
- Consumables over $800
Process Requirements
- Create the Purchase Order at the time of purchase unless vendor setup is pending.
- Use other payment methods before using the credit card whenever possible.
- Save the receipt and invoice.
- Attach documentation in Spend Dynamics whenever possible.
- Email the invoice with the PO reference to: NonInventoryAP@Rallyhouse.com
- Do not approve charges requiring a Purchase Order until the Purchase Order has been created.
BMO One Card Insurance Benefits
BMO offers insurance coverage on select charges and travel-related situations when using your BMO One Card. These benefits are available in specific circumstances and may help offset unexpected issues.
The most commonly applicable coverages include:
- Flight delays
- Baggage delays or loss
- Car rentals
- Travel assistance services
Please review the benefit listing and coverage details provided by BMO for full information. If you experience a situation where a claim may be applicable, contact: Chris Morris at cmorris@rallyhouse.com
| Insurance Benefit | Coverage |
|---|---|
| Common Carrier Accidental Death & Dismemberment | Up to $500,000 coverage for accidental death and dismemberment on common carrier travel. |
| 24-Hour Business Travel Accident | Up to $300,000 / insured |
| Travel Assistance Services | Trip, Medical, Legal, RoadAssist, VAT Reclaim |
| Lost/Stolen Baggage | $1,250 per incident |
| Baggage Delay | Up to $500 / insured. Applies if delay exceeds 6 hours. |
| Unexpected Return Home | $10,000 / insured |
| Car Rental Collision Damage Waiver | Up to 45 days with coverage up to $100,000 MSRP |
| Car Rental Personal Effects Insurance | Up to $1,000 / insured ($2,000 / account) |
| Hotel/Motel Burglary | Up to $1,000 / occurrence |
| Purchase Assurance | Up to $10,000 per loss within 90 days (up to $50,000 per Cardmember account within a 12-month period) |
| Extended Warranty | $10,000 maximum. Doubles the original manufacturer warranty up to a maximum of twelve (12) months on most items. |
| Liability Protection | Up to $25,000 per card (2-4 cards); Up to $100,000 per card (5+ cards) |
Capital Projects
In an effort to better serve the Break/Fix needs of stores, and to make sure that we are only using EcoTrak for that purpose; we have created a new category of work within Rally House: Capital Projects.
A Capital Project is something between a Break/Fix and an NSO build-out. Examples would include moving a Cashwrap, adding OPTO, upgrading lighting in a store to LED, etc. Starting 9/25/24, we will be moving items like these out of the Maintenance NetSuite queue and out of EcoTrak.
Once the item is in the Capital Projects form, Ownership will review for next steps on a bi-weekly basis. If the decision is made to move forward with a quote, one will be presented to Ownership for final approval before work begins. Keep in mind; there might be projects that do not get done.
Going forward, please still have your store teams (or yourselves) enter items like this into EcoTrak. The Facilities team will review if the work qualifies as a Capital Project, cancel the Work Order, and create a Capital Project.
Create New Capital Project:
- Open the store page in NetSuite.
- On the dark blue ribbon click “Construction”
- Click the button “New Capital Project”
- This will take you to the form.
- Fill out the needed information for the form
- Click Save
Capital Project Statuses:
- Proposed: Capital Project has been created but not reviewed by Ownership yet
- Conceptual Budget: Ownership has requested a ballpark price
- Bidding: Ownership has requested bids on the work
- Pending Approval: Bids have been sent to Ownership for review
- Approved to Proceed: Ownership has approved the work to be completed


OFFICE 365


THE PLAY:
Office 365 provides Field Leaders with the tools needed to communicate, collaborate, and stay organized while supporting stores and managing business priorities. Effective use of Outlook email, calendar management, automatic replies, email rules, and standardized email signatures helps ensure communication remains professional, organized, and efficient across the organization.
Field Leaders should utilize Outlook tools to manage email volume, organize important communications, maintain visibility into schedules and store visits, and communicate availability when out of the office. Calendar management is especially important to provide leadership visibility into store visits, meetings, interviews, PTO, and other business activities while helping teams coordinate effectively.
Consistent use of approved email signatures and communication standards helps present a professional and unified Rally House brand. By leveraging Office 365 tools effectively, Field Leaders can improve organization, reduce administrative burden, and maintain clear communication with Team Members, stores, vendors, and Corporate Partners.
IMPACT:
Strong communication and organization are essential to effective leadership. Proper use of Office 365 tools helps Field Leaders manage competing priorities, respond more efficiently, and maintain visibility across their district or region. Organized inboxes, accurate calendars, and clear out-of-office communications help reduce confusion and ensure important information is not missed.
Maintaining an up-to-date calendar and professional email practices also improves collaboration between Field Leaders, stores, and Corporate Partners. Visibility into schedules, meetings, store visits, and availability helps teams coordinate resources, align priorities, and make informed business decisions.
Consistent communication standards strengthen the Rally House brand and create a professional experience for everyone interacting with the organization. By utilizing Office 365 effectively, Field Leaders can improve productivity, enhance communication, and spend more time focused on supporting stores, developing leaders, and driving business results.
GAME PLAN
Creating Outlook Rules
Inboxes can quickly become cluttered without proper organization. Outlook Rules allow you to automatically move, flag, categorize, or respond to emails based on criteria you define, helping you stay organized and manage your inbox more efficiently.
Create an Outlook Rule
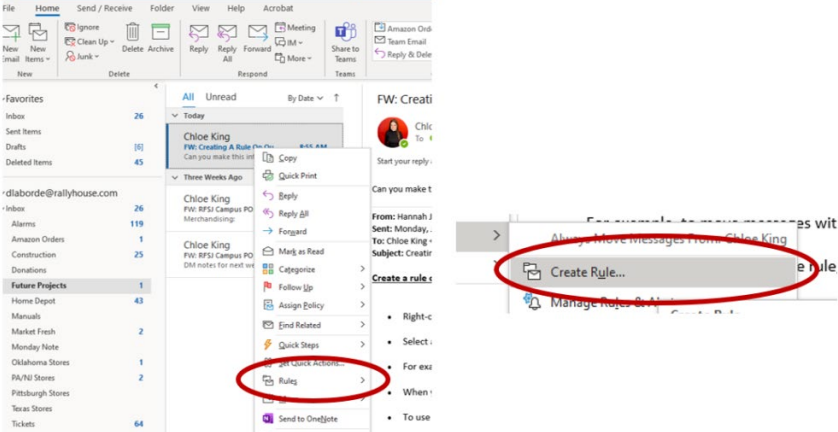
1. Right-click an existing email and select Rules > Create Rule.
2. Select the condition(s) you want Outlook to monitor and choose the action you want Outlook to take when those conditions are met.

3. Configure the rule based on your needs.
- Example: To move emails with a specific subject line to a folder:
- Select Subject contains.
- Enter the desired subject text.
- Select Move the item to folder.
- Choose an existing folder or create a new folder.
- Click OK.
4. When you have finished creating the rule, click OK.
5. To apply the rule to existing emails in the current folder, select Run this rule now on messages already in the current folder and click OK.
6. The emails matching the rule criteria will now be processed according to the rule settings.
OOO Email Response
There may be times when you need to be away from work and unavailable to respond to emails. Setting up an Out of Office response helps ensure Team Members, Field Leaders, and Corporate Partners know when you will return and who to contact while you are away.
Create an Out of Office Response
1. Log in to your mailbox by navigating to outlook.office365.com.
2. Select the Settings icon in the upper-right corner and choose Automatic Replies.
- Depending on your browser and internet connection, the Automatic Replies window may appear differently.
3. Turn on Automatic Replies.
- Enter the message you would like to send automatically.
- If desired, select Send replies only during this time period and enter the start and end dates for your absence.
- Include the name and contact information of the person covering your responsibilities while you are away so stores and partners know who to contact.
4. If you would like the message sent to people outside of Rally House, enable Send automatic replies to senders outside my organization and enter the response you would like external contacts to receive.
5. Click OK or Save to activate your Out of Office response.
Example Out of Office Message
Hello,
I am currently out of the office and will return on [Date].
If you need assistance before my return, please contact [Name] at [Email Address].
Thank you.
Outlook Schedule
Outlook Calendar is used to communicate your schedule, store visits, meetings, interviews, and PTO. Maintaining an accurate calendar provides visibility to your leadership team and helps coordinate business activities across the organization.
Scheduling Store Visits and Work Activities
1. Share your Outlook Calendar with the COO and Peg.
2. To create a calendar appointment, open Outlook Calendar and select New Appointment.
3. Create appointments for store visits, audits, interviews, training, and other business activities.
4. Include the following information:
- Title the appointment based on the purpose of the visit or activity.
- Examples: TAG (Training and Audit), Store Visit, Expedited Visit, Interview, etc.
- Include the date of the visit.
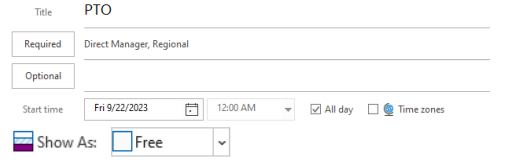
5. Select All Day Event and ensure Show As is set to Free.
6. Enter the location of the visit or work activity.
- List the store name(s) or store number(s) in the order they will be visited.
- Example: 2 / 7 / 10 or 49 / 50.
7. In the body of the appointment, include details regarding the visit, objectives, or planned activities.
Scheduling PTO
- When scheduling PTO, create an All Day Event and set Show As to Free.
- This prevents the event from unnecessarily blocking calendars shared with others.
- The event should be shared with your direct manager and Regional Director.
Accepting Calendar Invitations
- When receiving meeting, interview, or event invitations, select Accept so your calendar accurately reflects your availability.
- Accepted invitations will display as Busy instead of Tentative.
Email Signature
Your email signature is a reflection of both you and Rally House. All Field Leaders should utilize the approved Rally House email signature format to ensure consistent branding and professional communication when working with stores, Team Members, vendors, and Corporate Partners.
Email Signature Standards
All Field Leaders should maintain a professional and consistent email signature when communicating with stores, Team Members, vendors, and Corporate Partners.
Approved signature standards include:
- Use the approved Rally House email signature template.
- Display your name in ALL CAPITAL LETTERS.
- Display your title in ALL CAPITAL LETTERS.
- Ensure your phone number and email address are current and accurate.
- Utilize the approved Rally House logo and branding elements.
- Utilize the approved Rally House social media icons and hyperlinks.
- Do not modify the Rally House logo, colors, social media links, or overall signature layout.
- Update your signature whenever your title or contact information changes.
Email Signature Template
Download the Email Signature Template using the link below.
The template contains the approved Rally House email signature format, branding, and social media links. Update the placeholder contact information with your own information before adding the signature to Outlook.
Using the Template
- Download and open the Email Signature Template.
- Replace the placeholder name, title, phone number, and email address with your information.
- The visible table gridlines are provided to assist with editing and alignment. These gridlines will not appear in Outlook emails.
- Click the table handle in the upper-left corner of the table to select the entire signature.
- Copy the entire table using Ctrl + C.
Add the Signature in Outlook – Classic
- Open Outlook.
- Navigate to File > Options > Mail > Signatures.
- Click New to create a signature.
- Paste the copied signature into the signature editor.
- Set the signature as the default for New Messages and Replies/Forwards.
- Click OK to save.
Add the Signature in Outlook – New Outlook or Outlook Web
- Open Outlook.
- Select Settings (gear icon) in the upper-right corner.
- Navigate to Accounts > Signatures.
- Click New Signature.
- Paste the copied signature into the signature editor.
- Set the signature as the default for New Messages and Replies/Forwards.
- Click Save.
Important Notes
- Verify the logo, contact information, and social media icons display correctly after pasting.
- Verify all hyperlinks are functioning properly.
- Do not delete or regroup the social media icons, as each icon contains an individual hyperlink.
- Only update your personal contact information.

Signature Standards
- Use the approved Rally House logo.
- Display your name and title in all capital letters.
- Ensure your phone number and email address are current.
- Include the approved Rally House social media icons and links.
- Update your signature whenever your title or contact information changes.
Social Media Links
Facebook: https://www.facebook.com/RallyHouse
Instagram: https://www.instagram.com/rally_house
Pinterest: https://www.pinterest.com/rallyhouse
X (twitter): https://x.com/RallyHouse
ALARM
THE PLAY:
Field Leaders are responsible for maintaining access to store alarm systems and supporting stores when alarm-related issues arise. The Alarms section provides guidance for remotely arming and disarming stores through both Total Connect and Verkada, ensuring Field Leaders can quickly respond to operational needs, emergency situations, and store support requests.
Understanding how to navigate each platform, verify alarm status, troubleshoot common issues, and utilize available bypass functions allows Field Leaders to provide timely support while minimizing disruption to store operations. When alarm or sensor issues occur, Field Leaders should also ensure the appropriate support cases are submitted so long-term resolutions can be identified and completed.
Both Total Connect and Verkada serve as important tools for maintaining store security and operational continuity. Familiarity with these systems enables Field Leaders to confidently assist stores while ensuring alarm procedures are followed consistently across the district and region.
IMPACT:
Proper alarm management helps protect Team Members, Guests, merchandise, and company assets while ensuring stores remain secure during both business and non-business hours. The ability to remotely arm or disarm a store provides Field Leaders with flexibility to support unexpected situations, operational challenges, and emergency needs without requiring immediate on-site assistance.
Quick identification and resolution of alarm issues helps reduce unnecessary alarm events, prevent store disruptions, and improve communication between stores and support teams. By understanding how to effectively utilize Total Connect and Verkada, Field Leaders can respond faster to issues and help stores maintain a safe and secure environment.
Consistent execution of alarm procedures also improves operational reliability and reduces risk. When alarm concerns are properly addressed and escalated through the appropriate channels, stores can remain focused on delivering a great Guest experience while maintaining security standards across the organization.
GAME PLAN
Remote Arming & Disarming in Total Connect
Process
1. Log In
- Log into Total Connectusing your username and four-digit alarm code.
- Your username will be emailed to you by an Operations team member once access is granted.
- You may use the Total Connect app — all images referenced are from the app version.
2. Select Store Location
- Tap “Locations” on the bottom menu.

- Choose the store you want to arm or disarm.
- If a store is missing from the list, open a support case with Operations.
3. Check Store Alarm Status
- The current alarm status will be displayed.
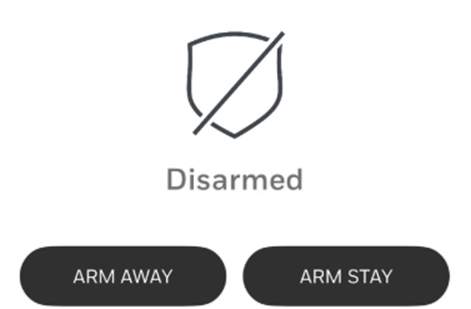
4. To Arm the Store
- Tap “Arm Away.”
- It may take up to 2 minutes to communicate with the store’s alarm panel.
- If there’s a sensor issue:
- Tap “Clear Sensor” to attempt arming.
- If that works, submit a support case to Maintenance to resolve the sensor issue.
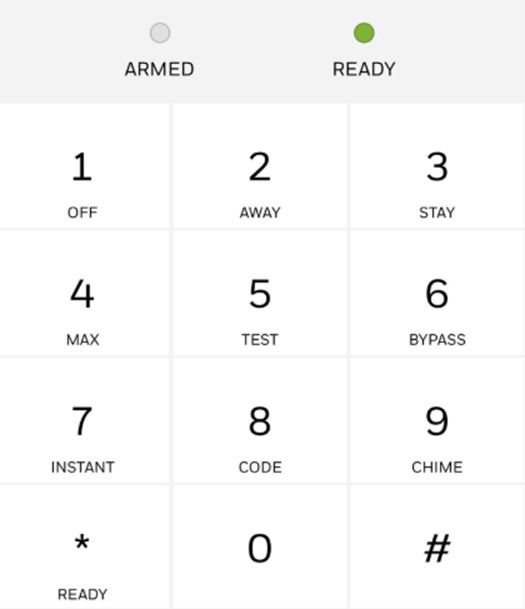
- If “Clear Sensor” fails, use the Remote Bypass Panel:
- Tap the alarm panel icon on the top right.
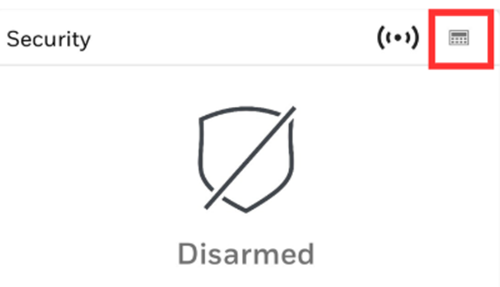
- Enter your code, then press 6 to bypass.
- Once armed, the status will show “Armed Away” and the Atronic logo will appear red.
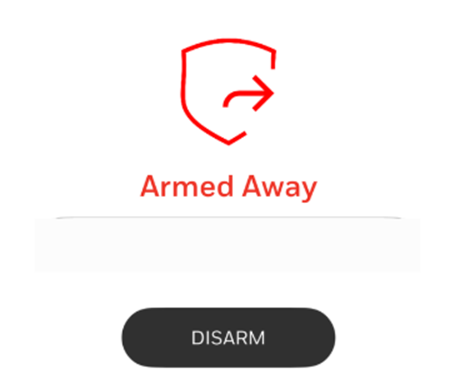
5. To Disarm the Store
- Tap “Disarm.”
- It may take up to 2 minutes to communicate with the alarm panel.
- If there’s a sensor issue:
- Tap “Clear Sensor” to attempt disarming.
- Submit a support case to Maintenance even if successful.
- If that doesn’t work, use the Remote Bypass Panel:
- Tap the alarm panel icon in the top right.
- Enter your code, then press 6 to bypass.
- Once disarmed, the status will show “Disarmed” and the Atronic logo will appear grey.
Remote Arming & Disarming in Verkada
Process
1. Log In
- Log into Verkada using your username and password.
- You may use the Verkada app — all images referenced are from the app version.
2. Select Store Location
- Tap the store from your store list.
- If a store is missing from the list, open a support case with Operations.
3. Check Store Alarm Status
- The current alarm status will be displayed.
4. To Arm the Store
- Tap the “Disarmed” Button.
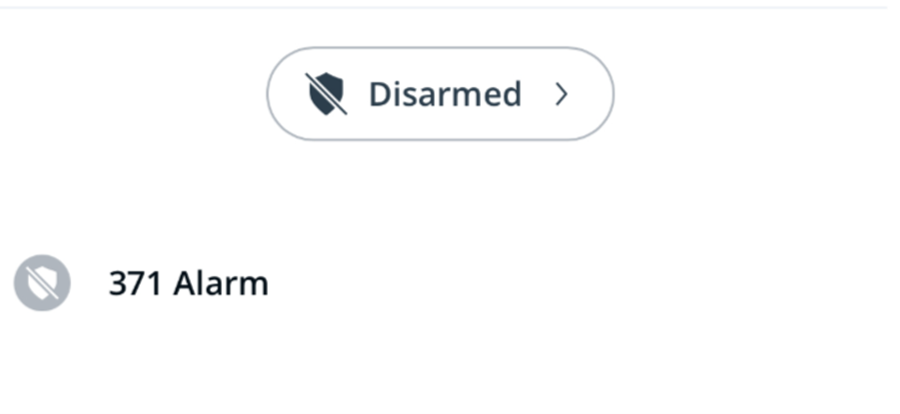
- This will prompt a pop-up that shows the “Arm” option.
- Click “Arm”
5. To Disarm the Store
- Tap “Armed.”
- This will prompt a pop-up that shows the “Disarm” option.
- Click “Disarm”
SCHEDULING


THE PLAY:
Scheduling is one of the most important responsibilities of a Field Leader and plays a direct role in store performance, Team Member engagement, and payroll management. Field Leaders are responsible for ensuring stores build schedules that align with business demand, staffing needs, operating standards, and company scheduling guidelines while maintaining compliance and controlling labor costs.
Through regular schedule reviews, supplemental hour approvals, Legion Insights monitoring, and market-level labor analysis, Field Leaders provide oversight and direction that help stores effectively allocate resources and support the needs of the business. This includes reviewing schedule quality, validating labor decisions, identifying opportunities for improvement, and coaching store leadership teams on effective workforce planning.
Field Leaders are also responsible for ensuring schedules are completed and published on time, monitoring compliance metrics, and supporting stores during unique staffing situations such as Hot Markets, New Store Openings, and temporary staffing needs. Consistent scheduling execution helps create a strong foundation for operational success across the district and region.
IMPACT:
Effective scheduling ensures stores have the right Team Members in the right place at the right time to support the Guest experience and drive business results. When schedules are built around sales demand, peak traffic periods, and operational needs, stores are better positioned to execute company initiatives, deliver service, and achieve performance goals.
Consistent labor oversight also helps control payroll expenses, reduce overtime concerns, improve compliance, and ensure staffing resources are used efficiently. By leveraging Legion Insights and regularly reviewing scheduling practices, Field Leaders can identify trends, address opportunities proactively, and support store leaders in making informed staffing decisions.
Strong scheduling practices create a better experience for both Team Members and Guests. Team Members benefit from predictable schedules, proper coverage, and balanced workloads, while Guests benefit from improved service, faster assistance, and a well-staffed store environment. Through effective workforce planning and labor management, Field Leaders help drive operational excellence and long-term business success.
GAME PLAN
Supplemental Hours
When the stores request supplemental hours the District Manager will need to approve those requests before they can be added to the approved hours for that time.
1. Log into the NetSuite ERP.
- Ensure that the District Manager role is being used.
2. Click on the “DM-Approve Supplemental Hours” link in the “Reminders” portlet.
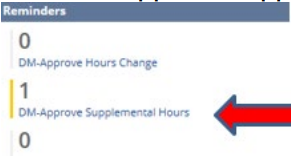
3. This will open the “DM-Approve Supplemental Hours” report. o This will show all “Pending” request from the District Manager’s stores.
4. Ensure the green “Edit” button is on.

5. Review each request. o Contact the store directly if there are questions regarding any of the requests. o This may be needed to determine if the request is approved or not.
6. Click on the word “Pending” in the column titled “Approved”.
- It is the last column.
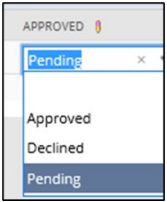
7. Select the decision for the request.
8. This will notify the store of the District Manager’s decision.
9. Complete all requests.
Schedule Review
Store Managers create their schedules in the approved scheduling program for the company. The schedule is to be written to follow the scheduling guidelines. District Managers are in charge of reviewing their store’s schedules.
Review Process
- Field Leaders review store schedules on Tuesday two weeks prior to the beginning date of the schedule.
- Example: For a schedule that begins on September 11, 2023, this is reviewed by the Field Leader on August 29, 2023.
- Log into Legion.
- Click “Schedule” in the left menu options and begin with your first schedule.
- If you have multiple markets, you will need to select the market you want to begin with from the drop-down menus at the top.
- When you are in the store’s schedule look at the widgets to begin.
- ACTION REQUIRED = an action needs to be taken for this store
- COMPLIANCE = there are shifts that need reviewed
- Click view shifts on the compliance widget.
- Detemine if the shifts that are flagged need to be adjusted or are OK to review.
- Minor shift compliance issues are strictly enforced and will not allow the store to publish the schedule until they are resolved.
- Once reviewed, click clear filter on the compliance widget.
- Switch the view of the schedule to Day View.
- Review each day by looking for the following:
- Operating Hours are correct for the store.
- Store over/under scheduled.
- Stores is scheduled to sales projection demand.
- Overtime issues.
- Breaks are being taken at different times (not stacked at the same time)
- Appropriate coverage for open, close, and breaks.
- Appropriate coverage for peak hours.
- Full-time leaders working overlapping shifts but not the same shift.
- All Full Time leaders are scheduled within the Scheduling Policy
- Any adjustments that need to be made to the store’s schedule need to be sent via Zipline to the store with a task for the store to make the adjustments.
Publish Process
- Field Leaders confirm that all store schedules have been posted on Thursday two weeks prior to the beginning date of the schedule. Example: For a schedule that begins on September 11, 2023, this is reviewed by the Field Leader on August 31, 2023.
- Philadelphia stores need to have
- Log into Legion.
- Click “Schedule” in the left menu options and begin with your first schedule.
- If you have multiple markets, you will need to select the market you want to begin with from the drop-down menus at the top.
- Ensure that each store says “Published”.
- If it does not say “Published” the Field Leader has until noon to get the schedule published with any changes that need to be made.
Insights
1. Log into Legion
2. Select Insights and the MUL Dashboard as shown below
3. Continue to follow the images below to review your Market metrics.
Schedule Review Process
- Select Dashboard

- Schedule Reviews
- Timeframe Legion shows week start date, not week ending date.
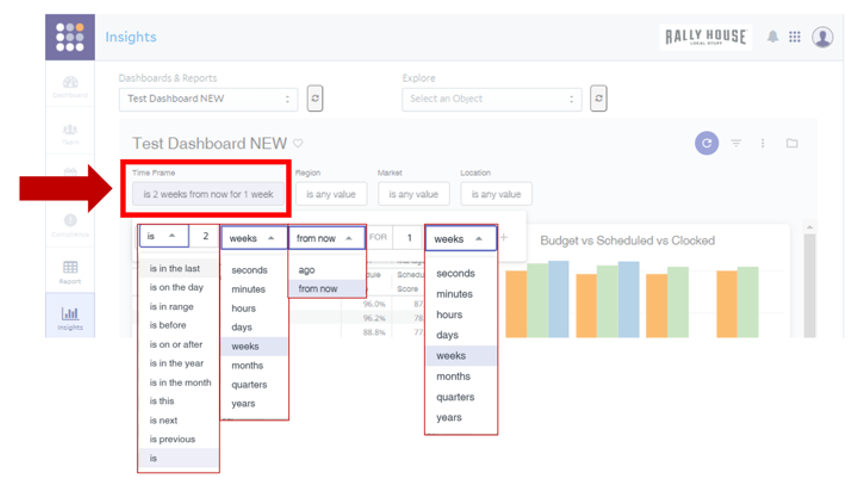
- Specify Location
- Select Region
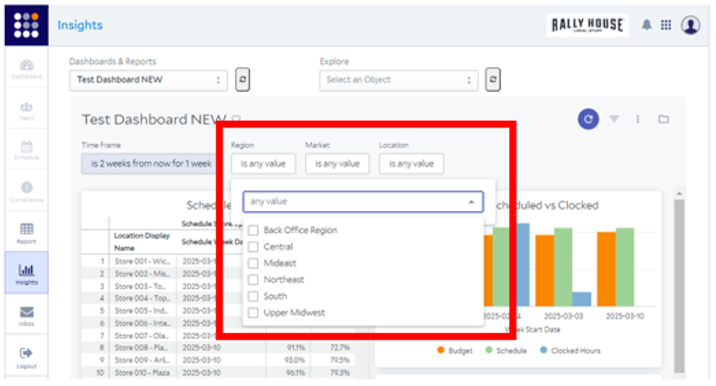
- Select Market

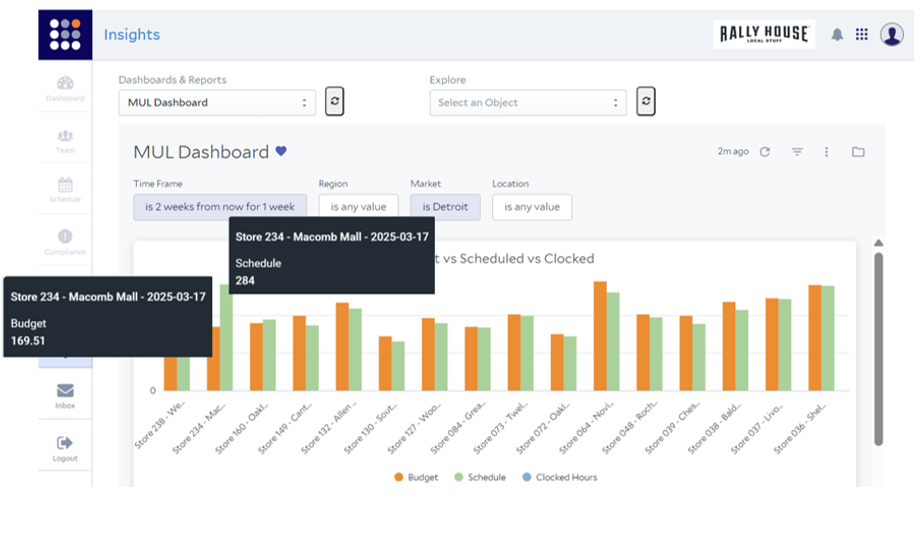
- Budget vs. Scheduled vs. Clocked
- Hover over each bar for quick insights, if you see a discrepancy in Schedule or spike dig deeper.
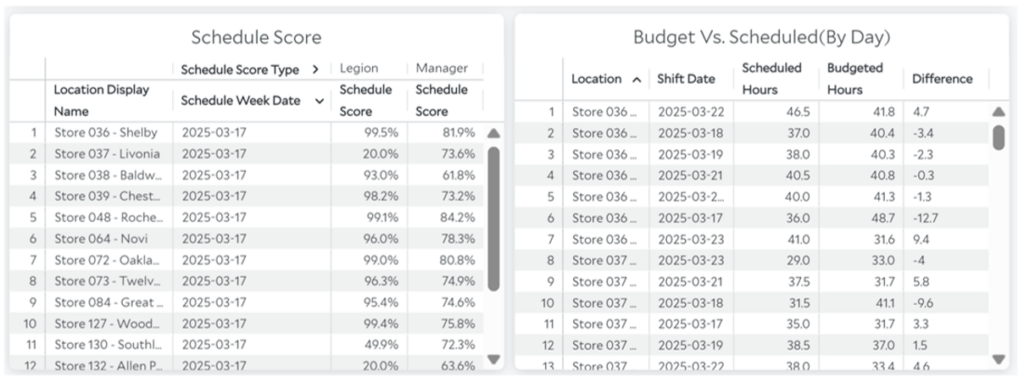
- Schedule Score Compare Legion vs. Manager
- Budget vs. Scheduled (by day)
- Weekend Coverage
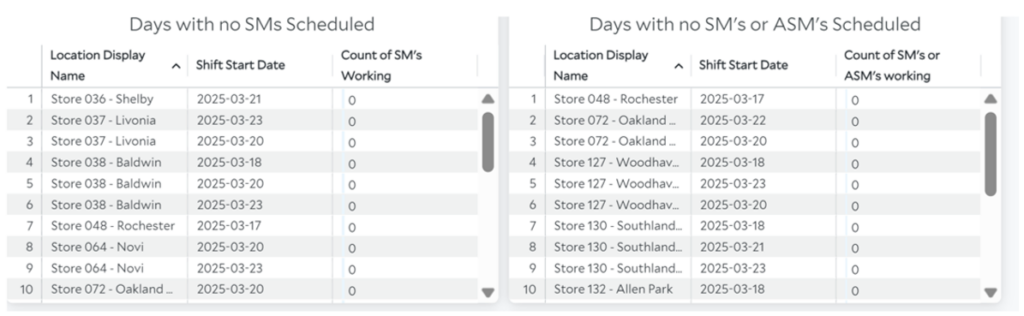
- Flag no Head Coach or No Assistant Coach
- Open Shift and Top 10 Locations Schedule Warning

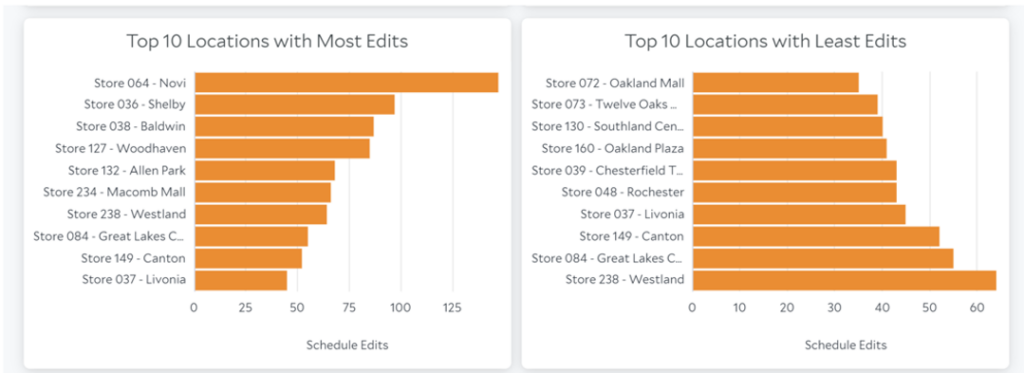
- Edits
Review of the Stores in the Market
1. Log into Legion
2. Click “Schedule” in the left menu options and begin with your first schedule. Note: If you have multiple markets, you will need to select the market you want to begin with from the drop-down menus at the top.
3. When you are in the store’s schedule look at the widgets to begin.
- ACTION REQUIRED = action needs to be taken for this store
- COMPLIANCE = there are shifts that need reviewed
- Click view shifts on the compliance widget.
- Determine if the shifts that are flagged need to be adjusted or are OK to review.
- Minor shift compliance issues are strictly enforced and will not allow the store to publish the schedule until they are resolved.
- Once reviewed, click clear filter on the compliance widget.
- Switch the view of the schedule toDay View.
4. Review each day by looking for the following:
- Operating Hours are correct for the store.
- Store over/under scheduled.
- Stores are scheduled to sales projection demand.
- Overtime issues.
- Breaks are being taken at different times (not stacked at the same time)
- Appropriate coverage for open, close, and breaks.
- Appropriate coverage for peak hours.
- Full-time leaders work overlapping shifts but not the same shift.
- All Full-Time leaders are scheduled within the Scheduling Policy
- Any adjustments that need to be made to the store’s schedule need to be sent via Zipline to the store with a task for the store to make the adjustments.
Gig Smart
Gig Smart is the temp agency that can be used for Hot Market, New Store Opening, or other situational events. All District Managers should have access to Gig Smart using market log-in(s) provided by Gig Smart.
- When a Field Leader is needing a temp worker, the Field Leader is to email COO prior to entering the shift into Gig Smart.
- Supplemental Hours Requests are entered into NetSuite for the temp worker(s).
- When a store has Gig Smart workers in store, the Gig Smart worker must sign in and out using the Recorded Hours Worked Form.
- This is submitted daily to Finance by emailing “Finance Department” finance@rallyhouse.com.
- This allows the team to provide evidence if a shift is disputed.
- Finance will send the District Manager a recap for validation.
- The Field Leader MUST approve these shifts daily.
- This is submitted daily to Finance by emailing “Finance Department” finance@rallyhouse.com.
- Specific shifts for Hot Market – prefer 5-hour shifts and no lunch break. If needed, 8-hour shifts can be used.
- 8-1 / 8-5
- 10-2 / 10-7
- 2-7
- 5-10 / 1-10
STORE SUPPORT & RECOGNITION
THE PLAY:
Field Leaders are responsible for creating an environment where stores feel supported, leaders feel developed, and successes are recognized. Store Support & Recognition provides the framework for engaging with stores through meaningful recognition and purposeful business partnership.
Recognition should be used to celebrate the behaviors and results that drive Rally House forward. Programs such as the 5-Star and Epic Party Pins provide Field Leaders with opportunities to acknowledge Team Members and store leadership teams who demonstrate exceptional service, execution, leadership, and commitment to the Guest experience. Recognition should be visible, timely, and meaningful to reinforce winning behaviors across the district and region.
Store Walkthroughs provide a structured opportunity to evaluate business performance, identify opportunities, remove obstacles, and align on next steps. Through preparation, observation, and collaboration with Head Coaches, Regional Directors, and Corporate Partners, Field Leaders can ensure each walkthrough results in clear actions that support sales growth, operational excellence, merchandising execution, and leadership development.
IMPACT:
Strong store support begins with strong relationships. When Field Leaders regularly engage with stores, provide coaching, and recognize accomplishments, they create an environment where Team Members and leaders feel valued, supported, and connected to the business.
Recognition programs help reinforce Rally House standards by highlighting examples of outstanding performance and celebrating the individuals and teams who consistently deliver results. Recognizing success not only boosts engagement and morale, but also encourages other stores and Team Members to model those same behaviors.
Effective Store Walkthroughs create alignment between stores, Field Leaders, and Corporate Partners by ensuring opportunities, challenges, and support needs are clearly identified and addressed. When recognition and store support are combined, Field Leaders strengthen leadership capability, improve execution, enhance the Guest experience, and drive long-term business performance across their district and region.
GAME PLAN
Field Recognition Pins
Receiving an Epic Party rating is a significant achievement and represents the highest level of store execution and Guest experience. A 5-Star Pin is intended for Team Members who consistently stand out during store visits and exemplify Rally House values, service, and performance.
Celebrate these accomplishments through District Calls, store visits, team meetings, and in-store recognition. Make recognition visible, meaningful, and fun to reinforce winning behaviors and recognize the individuals and teams driving results.
- Five Star Pin: Awarded to Team Members who demonstrate exceptional performance, service, leadership, or Rally House values during store visits. These individuals consistently stand out and represent what great execution looks like.
- Epic Party Pin: Awarded to store leadership teams who achieve an Epic Party rating. This recognition celebrates outstanding store execution, Guest experience, and team performance, making it one of the highest accomplishments a store can earn.
If additional Pins are needed, please submit a NetSuite Support Case to Operations.

Walkthrough Process
The Store Walkthrough is a collaborative opportunity for the District Manager, Head Coach, Regional Director and Corporate Partners to review store performance, identify opportunities, remove barriers, and align on actions that support sales growth, merchandising execution, and operational excellence.
Preparation prior to the walkthrough ensures the team can maximize the value of the discussion and focus on solutions, opportunities, and next steps.
- Pre-Walkthrough Preparation
- Begin preparation as soon as the store is notified of an upcoming walkthrough.
- The District Manager will lead the walkthrough discussion and should be prepared to provide business context, facilitate conversation with Corporate Partners, and capture follow-up actions.
- The Head Coach should be on-site and available throughout the walkthrough to provide store-specific context, answer questions, and support discussion as needed.
- Prior to the walkthrough:
- Ensure merchandising, signing, and presentation standards are executed throughout the store.
- Ensure the backroom and cash wrap are organized and maintained to standard.
- Review Visual Line Manager to identify top and bottom-performing styles.
- Review key business metrics and identify opportunities, challenges, and trends.
- Confirm a strong and reliable Wi-Fi connection is available.
- Gather any reports, case numbers, or supporting documentation needed for discussion.
- If the District Manager is new to walkthroughs:
- Review recordings of previous walkthroughs.
- Conduct a practice walkthrough with the Regional Director or another District Manager.
Walkthrough Structure
- The Regional Director will begin by outlining the purpose and focus of the walkthrough. This may include:
- NSOs and relocations
- Opportunity stores
- Inventory and assortment opportunities
- Marketing, visual, or facility opportunities
- Other strategic business priorities
- The District Manager will then:
- Provide a high-level overview of store performance.
- Review sales and scorecard results.
- Highlight key opportunities and challenges.
- Facilitate discussion with Corporate Partners.
- Be prepared to discuss:
- Local market conditions.
- Nearby competitors and anchor retailers.
- Occupancy changes or market developments impacting traffic.
- Store-specific opportunities and challenges.
- Have the following available during the walkthrough:
- Sales by Team reports.
- Visual Line Manager reporting.
- Store Scorecard results.
- Open case numbers and request details.
- Community event information.
- Competitive shopping insights.
Marketing Review
- Prior to the walkthrough:
- Submit marketing requests whenever possible.
- Review store windows and identify opportunities for improvement.
- Review exterior signage, including Rally House signage and pylon signage.
- Confirm rack-top signage is sufficient and supports key initiatives.
- Verify Ironworks signage and window inflatables are present and in good condition.
- Review wayfinding signage for visibility and effectiveness.
- Be prepared to discuss:
- Open marketing requests and associated case numbers.
- Tent usage and sidewalk sale opportunities.
- Upcoming local events and promotional opportunities.
- Additional support needed from the Marketing team.
Community Outreach
- Prior to the walkthrough:
- Review upcoming community events and engagement opportunities.
- Confirm participation plans for local events and game days.
- Ensure sponsorship, marketing, and event requests have been submitted through NetSuite.
- Be prepared to discuss:
- Upcoming opportunities to drive traffic and awareness.
- Community partnerships.
- Support needed from Corporate Partners.
Facility / Construction
- Prior to the walkthrough:
- Review all open maintenance and facility requests.
- Confirm issues have been submitted through the appropriate process.
- Gather associated case numbers and status updates and add them to the call chat.
- Be prepared to discuss:
- Open facilities concern.
- Lighting opportunities.
- Fixture needs.
- Fitting room repairs.
- Capital project opportunities.
- Additional support needed from Facilities or Construction teams.
Buying & Inventory
- Prior to the walkthrough:
- Complete competitive shopping within the previous two weeks.
- Review assortment by team and subclass.
- Identify assortment gaps and opportunities.
- Review clearance inventory levels using reporting data, customer feedback, and any space constraints.
- Capture customer requests and recurring feedback.
- Submit product requests whenever possible prior to the walkthrough.
- Be prepared to discuss:
- Type of shopper for this location.
- Assortment opportunities.
- Customer requests and trends.
- Open product requests.
- Excess inventory opportunities.
- Clearance opportunities.
- Inventory balancing opportunities.
- When reviewing assortment opportunities, be prepared to discuss:
- Styles
- Colors
- Players
- Logos
- Wordmarks
- Sayings and graphics
- Brands
Key Discussion Questions
- What are the biggest opportunities to grow sales at this location?
- What obstacles are limiting performance?
- What support is needed from Corporate Partners?
- What assortment opportunities exist?
- What local marketing opportunities should be considered?
- Are there facilities or operational issues impacting the guest experience?
- Are all identified opportunities documented through the appropriate process?
Key Outcome
- At the conclusion of the walkthrough, the team should have:
- Identified opportunities for sales growth.
- Reviewed assortment, marketing, facility, and operational opportunities.
- Provided visibility to open requests and case statuses.
- Identified support needed from Corporate Partners.
- Assigned ownership for follow-up actions and next steps.