
IT
TROUBLESHOOTING
Standard Operating Procedure & FAQ
Flags and Click Home buttons are clickable to make it easy to navigate the page


INTRODUCTION
THE PLAY:
Technology plays a critical role in daily store operations and helps support everything from completing transactions and processing operational tasks to communication across the sales floor. When devices are not functioning properly, it can slow execution, interrupt workflows, and impact the overall store experience.
The IT Troubleshooting Playbook is designed to provide Team Members with quick-reference support for common store technology issues. This playbook includes troubleshooting guidance for Sitoo devices, printers, Zebra handhelds, music players, and Yealink phones to help stores identify issues, follow basic troubleshooting steps, and know when escalation to IT Support may be needed.
IMPACT:
Having consistent troubleshooting processes helps stores respond to technology issues quickly and confidently while minimizing operational disruption. Clear troubleshooting guidance can help reduce downtime, improve communication when escalation is needed, and keep stores focused on supporting Guests and operational execution.
When done well:
- Team Members can quickly identify and troubleshoot common technology issues
- Operational disruptions are minimized
- Devices are restored and back in use faster
- Escalations to IT Support include clearer information
- Stores can maintain stronger operational execution during technology interruptions
ON FIELD TERMINOLOGY
- Sitoo: Point of Sale system used in stores.
- Socket Scanner: Bluetooth barcode scanner paired to store devices.
- Zebra Scanner: Barcode scanner used with Sitoo POS.
- Handheld: Operational handheld device used for store processes.
- Yealink: Store communication phone system.
- PORT: Purchase Order Receiving Tool.
- TOE: Transfer Order Engine.
- TAT: Task Assignment Tool.
- LISP: Customer Order Check In/Out tool.
- TNT: Tracking Number Tester.
TROUBLESHOOTING
GAME PLAN
IT Overview
- IT Support Expectations
- IT operates during standard business hours.
- The IT Case form should be used for most IT issues.
- Internet outage or all registers down:
- Open IT Case.
- Then call 1-888-397-0150.
- Other immediate IT needs:
- Open IT Case.
- Then open Chat.
- IT Priority Levels
- P1: Emergency/Immediate Priority
- Anything affecting customer orders, instore transactions, or internet connectivity.
- Resolution Time: Less than 5 minutes – next business day.
- Shipping Speed: Saturday Shipping or Next Day Shipping based on store availability.
- P2: High Priority
- Issues impacting some store operations but not fully preventing operations.
- Example: One register not functioning during normal operations.
- Resolution Time: Less than 2 days.
- Shipping Speed: UPS 2nd Day Air or UPS 3 Day Select.
- P3: Medium Priority
- Issues causing operational inconvenience without disrupting overall store operations.
- Example: One Zebra not printing to the 2×1 printer while others function properly.
- Resolution Time: Less than 1 week.
- Shipping Speed: UPS Ground.
- P4: Low Priority
- Minor nuisance issues or intermittent non-emergency system interruptions.
- Resolution Time: Less than 10 days.
- Shipping Speed: UPS Ground.
- P1: Emergency/Immediate Priority
- How Stores Can Support Faster Resolution
- Provide detailed issue descriptions when submitting requests.
- Include photos whenever possible or relevant.
- Update existing cases with additional information if troubleshooting changes.
- Close requests when the issue has been resolved.
- Include as much operational impact information as possible when escalating issues.

Zebra Handhelds
- Zebra Operations
- The home page of the Zebra allows the store to access the following applications:
- Teams (Instant Messaging and Market Call Video App)
- Square (backup POS)
- Time Punch (Clock In/Out)
- Tracking Number Tester (TNT)
- Item Matrix
- SPOC Customer Orders
- TOE (Transfer Order Engine)
- PORT (Purchase Order Receiving Tool)
- LISP (Order Check In/Out)
- TAT (Task Assignment Tool)
- The home page of the Zebra allows the store to access the following applications:
- Buttons on Zebra Handheld
- The Power Button is located on the top right side of the Zebra.
- This button can be used to “lock” the screen or power down the device.
- The yellow buttons on either side of the Zebra will trigger the barcode scanner.
- This is used when picking customer orders, receiving shipment, or using Item Matrix.
- The volume button is located on the right-hand side of the Zebra.
- Press the upper button to increase volume and the lower button to decrease volume.
- Holding the power button and the lower volume button will allow you to screenshot the device screen.
- The Power Button is located on the top right side of the Zebra.
- Troubleshooting – Not Connected to WiFi
- Zebra not connecting to Wi-Fi
- Go to “Settings”.
- Tap “WiFi Settings.”
- Find the network for the store.
- Type in the password for the store’s network.
- Zebra not connecting to Wi-Fi
- Troubleshooting – Multiple Tabs Open
- Zebra not connecting to Wi-Fi
- When scanning on the zebra, another page or application opens.
- This means that there are multiple tabs open on the device.
- In the upper right hand corner, see how many tabs are open.
- The box should have a 1 in it for 1 tab.
- Close all the tabs if it shows greater than 1 by clicking the grey “x” on the tab.
- When scanning on the zebra, another page or application opens.
- Zebra not connecting to Wi-Fi
- Troubleshooting – App Slow or Won’t Load
- NOSE, TAT, TOE, PORT, or Item Matrix may run slow or won’t load if the browsing history needs cleared.
- Go to Google Chrome on the Zebra.
- Click the three dots in the upper right-hand corner.
- Select “History”
- Clear browsing data.
- Make sure all checkboxes are checked.
- Select “Clear Data”.
- Troubleshooting – Screen Frozen
- A restart of the device is needed when the screen freezes.
- Press and hold the power and volume increase buttons until the device restarts.
Zebra Scanner for Sitoo
Reset Barcodes
1. Scan the barcode below to reset the scanner:

2. Scan the barcode below to Turn on pairing:

3. Open Sitoo POS > Menu > Settings > Hardware Devices.
4. Tap the plus icon in the upper right corner and choose Zebra scanner.
5. Enter the number 2 in the IP-Address-field.
6. Then tap the magnifying glass in the upper right corner.
7. Please repeat the previous steps a couple of times if you’re not receiving a result right away.
- You can also hit the blue reset button (below the IP field) to help get the device to pair.
8. When your scanner appears in the search results, tap on the row.
9. A Bluetooth dialogue should appear in Sitoo POS asking you to confirm the Bluetooth pair.
10. Go to the sale screen and test the scanning functions.
Resetting the Device
- To reset the device you will need to remove it from the Sitoo device page and from the iPad Bluetooth settings page.
- Then you can follow the above steps to re-add.
Socket Scanner
Socket Scanner for Sitoo – Reset Barcodes
1. Remove any existing Socket Mobile reader from the iPad Bluetooth settings.
- Tap the blue I button and hit forget this device.
2. Turn the reader on and scan the factory reset barcode below.
- The reader will play a tune and shut down.

3. Power the reader back on and scan the iOS Application Mode barcode below.

4. Open Bluetooth settings in the host device.
- After a few seconds, when the Socket Mobile reader is discovered, tap it on the screen to start the pairing process.
5. After a successful pairing:
- The connection status will change to “Connected”
- The blue light will turn solid
- The reader will emit a single beep
6. To test:
- Close Sitoo and reopen the application
- Position the cursor as required
- Scan a barcode
Socket Scanner Troubleshooting
- Wait for the Bluetooth light (blue light) on scanner to become solid blue.
- Wait 2 minutes after that and then scan.
- If the Bluetooth light is not solid:
- Make sure the scanner is charged
- Charging light green if fully charged
- Yellow if medium charge
- Red if almost out of charge
- Make sure the scanner is charged
- Power Cycle
- Turn Off
- Press and hold down the small power button until the scanner beeps twice (high-low) and all lights turn off.
- The scanner will power off automatically if device is not connected within 5 minutes.
- Scanner connected to a device will power off within 2 hours if idle/inactive.
- Turn On
- Press and hold down the small power button until the Battery light turns on and the scanner beeps twice (low-high).
- Wait for the Bluetooth light (blue light) on scanner to become solid blue.
- Wait 2 minutes after that and then scan.
- Turn Off
- Bluetooth Connection
- Make sure the scanner is connected in the iPad settings under Bluetooth.
- Device name: Socket Scan
- Make sure the scanner is connected in the iPad settings under Bluetooth.
- IT Support
- For chip reader or receipt printer issues please call IT.
- Press 3 on your store phone, then press dial.
- For chip reader or receipt printer issues please call IT.
Music Player
- Music Player Troubleshooting
- If your store is hearing Christmas music try restarting your music player by following the below directions 🎄🎁
- You will have one of two devices:
- Profusion iH
- On the Profusion iH unplug the power cable and wait for one minute.
- Plug the power cable back in and wait to see 3 green lights on the front of the device.
- Check and see if Christmas music is still playing.
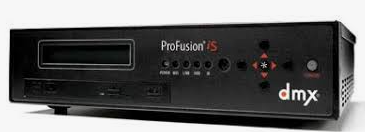
- Profusion iS
- On the Profusion iS there is a button on the back left of the device.
- Press the button to turn off the device.
- Wait one minute and press the button again to turn the device back on.
- Once the device is powered back up you should see a song displayed on the screen.
- Check and see if that song is playing in the store.
- IT Support
- If you have tried these steps and are still hearing Christmas music please call the IT hotline at (888) 397-0150

2×1 Printer
ZD410/411
- Printing out the Barcode and then Blank Labels
- Hold the Pause and X Button at the same time until the paper starts to move.
- Once it is done press the feed button (middle button) once and one blank label should print.
- Try printing another label to see if the issue is resolved.
- Incorrect Sizing
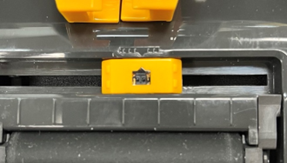
- If the labels are coming out but the sizing is off check to make sure the slide inside the printer is aligned properly.
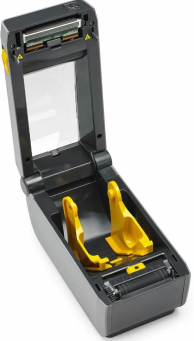
- If the sizing is still off, you can manually set the size of the labels.
- Hold the pause button until you see all lights go orange.
- Press the feed button (middle button) once and the pause light should be orange.
- Press the pause button again and the printer should start printing off labels with a square that grows in size.
- Stop it by pressing the feed button (middle button) once it has printed 7 labels.
- The label should say 1.89in 48mm.
- If the sizing is still off, you can manually set the size of the labels.
Labels Missing Part of Barcode or Text
- If your labels are printing but missing part of the label check to make sure the roller is clean and there is nothing stuck to the roller.
Labels Print Off Too Light
- You can adjust the darkness settings for the printer in two ways.
- On the manager station:
- Go to Settings > Printers and Scanners and find the 2×1 printer.
- Click on the 2×1 printer and then choose Printing Preferences.
- Increase the Darkness setting and then click Apply and OK.
- Printer adjustment method:
- Hold the pause button until you see all lights go orange.
- Press the feed button (middle button) twice and the middle light should be orange.
- Press the pause button again and the printer should start printing off labels with a barcode that gradually gets darker.
- Press the feed button (middle button) to stop the printer on your desired darkness.
GK420T/D
- Printing out Barcode and then Blank Labels
- On the top of the printer hold the feed button and you will see the green status light blink once.
- Keep holding the feed button until you see the light do a quick double blink and then let go.
- Press the feed button and one blank label should print out.
- Try printing a label to make sure the issue is resolved.
- Incorrect Sizing
- If your labels are off center:
- Hold the feed button until you see the light quickly blink 5 times.
- The printer should start printing out labels with a square that gets bigger with each label that prints.
- Once the printer has printed 7 labels press the feed button.
- The last label should say 1.89in 48mm.
- If your labels are off center:
- Labels Missing Part of Barcode or Text
- If your labels are printing but missing part of the label check to make sure the roller is clean and there is nothing stuck to the roller.
- Labels Print Off Too Light
- You can adjust the darkness settings for the printer in two ways.
- On the manager station:
- Go to Settings > Printers and Scanners and find the printer you are troubleshooting.
- Click on the printer and then on the next screen choose Printing Preferences.
- In the window that pops up increase the Darkness setting and then click Apply and OK.
- Printer adjustment method:
- Hold the feed button until you see the light quickly blink 6 times.
- The printer should start printing out labels with a barcode that gets darker with each label that prints.
- Press the feed button to stop the printer on your desired darkness.
Yealink Phones
- Yealink Phone Distribution in Store
- Each store receives at least three Yealink Phones.
- These are labeled and are to be distributed each shift to:
- Manager on Duty
- Party Host
- Register
- Yealink Phone End of Day Placement and Chargers
- Each phone can hold it’s charge for 12 hours.
- It is important that the phones are placed on their correct chargers at the end of the day when the store closes.
- Each charger should be labeled and match the label on a phone.
- Yealink Phone Intercom “Walkie Talkie”
- Press the up arrow on the phone and select who you want to call from the list.
- Manager on Duty
- Party Host
- Register
- Press the up arrow on the phone and select who you want to call from the list.
- Yealink Phone Ring Tones
- The Yealink Phone has two different ring tones based on who is calling.
- The traditional ring tone indicates that a guest is calling the store.
- The chirp ring tone indicates that someone is calling the phone internally in the store using the intercom function.
- The Yealink Phone has two different ring tones based on who is calling.
- How to Lock the Number Pad
- The number pad can be locked while not in use and in the employee’s apron.
- Press and hold the pound sign (#) to lock the number pad.
- Press and hold the pound sign (#) to unlock the number pad.
- Locating a Lost Yealink Phone
- If a phone is lost in the store, it can be found.
- Press the button the phones transmitted to make all the phones begin to ring.