
INVENTORY MANAGEMENT
Standard Operating Procedure & FAQ
Flags and Click Home buttons are clickable to make it easy to navigate the page


INTRODUCTION
THE PLAY:
Inventory Management ensures product is accurately received, tracked, maintained, and made available for sale and fulfillment.
Across Order of Operations, Cycle Counts, Direct Shipments, and Inventory Control, these processes work together to maintain inventory accuracy and support daily store execution. They allow teams to manage product flow, resolve discrepancies, and keep inventory aligned with what is physically in the store.
Strong execution requires clear prioritization, attention to detail, and consistent follow through. From receiving shipments to completing counts and managing adjustments, each step plays a role in maintaining inventory integrity and supporting the business.
IMPACT:
Effective inventory management drives accuracy, product availability, and overall store performance.
When done well:
- Inventory reflects what is physically in the store.
- Product is available for sale, fulfillment, and transfer.
- Pricing and ticketing are accurate across all items.
- Inventory issues are identified and resolved quickly.
- Shrink is controlled and monitored.
- Teams operate efficiently with clear visibility to inventory.
Breakdowns in inventory management lead to inaccuracies, missed sales, fulfillment issues, and increased workload to correct errors.
ON FIELD TERMINOLOGY
- Cycle Counts: Inventory checks used to validate product quantities and update inventory accuracy.
- Reticket: Updating item pricing and labels to reflect current price points.
- Clearance: Marking product to a reduced price to support sell through.
- Negative Inventory: Items showing below zero in the system that require correction.
- PO (Purchase Order): Record of product ordered from a vendor.
- Direct Shipment: Product shipped directly from a vendor to the store.
- PORT (Purchase Order Receiving Tool): System used to receive and validate incoming shipments.
- TOE: Transfer Order Engine
- PO Issues: Discrepancies or problems identified during receiving that require resolution.
- Shrink: Inventory loss caused by theft, errors, or miscounts.
- Customer Hold: Process used to reserve product for a customer until purchase.
- Backstock: Inventory stored off the sales floor for replenishment.
ORDER OF OPERATIONS
THE PLAY:
Order of Operations provides a structured approach to managing inventory tasks across the store.
Inventory Management includes a wide range of responsibilities that support accuracy, product flow, and overall store performance. This process helps teams understand what needs to be completed and how to prioritize work based on business needs.
While this list outlines a standard order, priorities may shift based on direction from Field Leaders or business demands. Some tasks can be completed at the same time, while others must be completed first as they directly impact downstream processes.
This structure ensures teams stay focused on the right work at the right time while maintaining control of inventory and supporting daily operations.
IMPACT:
Clear prioritization of inventory tasks ensures accuracy, efficiency, and strong operational control.
When done well:
- Teams focus on the most critical tasks first.
- Inventory remains accurate and up to date.
- Issues are resolved before they impact other processes.
- Workflows stay organized and efficient.
- Stores can adapt priorities without losing control of execution.
- Downstream tasks are completed without delays or rework.
Lack of structure leads to missed priorities, inventory inaccuracies, and increased workload to correct issues.
GAME PLAN
Order of Operations
This list is a perfect world example of how to complete Inventory Management Task. There will be time where Operations or the District Manager will need to adjust the priority to meet the needs of the business.
Note: Several of these tasks can be done at the same time and are not linear. Task with an asterisk should come first as they effect another item on the list.
1. Over/Short
2. Daily Deposit
3. Return Review
4. Customer Orders
- Hot Market
- Potential Fraud
- No Tracking
- Partial Bins
- Assigned Not Shipped
- Bins on HOLD
- Not Checked In
- Not Checked Out
- Pick Exceptions by Associate
5. Escalated POs from Operations
6. Blank XT or Not enough information XT
7. PO Issues
- Wrong location (Chat OPs immediately)
- Physical Item Count
- Unknown PO
- Item Not on PO
- Image or Color Does Not Match
- Arrival Issue
- Damaged Item
8. Receiving*
- Prevents and removes PO Bill Cycle Counts
9. PO Bills
- Note: All receiving and PO Issues assigned to the store must be completed before starting PO Bill Cycle Counts.
10. Pick Exceptions Review*
11. Shrink Review
12. Transfers with Pending Cycle Counts*
13. Cycle Counts
- Reticket
- Clearance
- Merge Item Reticket
- Clearance Merge Item Reticket
- Negative Inventory
- Theft
- Submitted Manually
- BOGO Program
- PIE Variance
- Audit (Will be #1 during Audit)

CYCLE COUNTS


THE PLAY:
Cycle Counts are used to maintain accurate inventory across the store by validating product quantities and updating inventory based on real time conditions.
There are multiple Cycle Count types that support different operational needs, including price changes, clearance updates, inventory corrections, and business driven requests. These counts ensure that product is properly ticketed, accurately reflected in the system, and available for sale or fulfillment.
Cycle Counts are a continuous process and should be completed consistently to keep inventory aligned with what is physically in the store. Execution requires strong attention to detail and full store awareness to ensure all product is accounted for.
IMPACT:
Accurate Cycle Counts are critical to inventory accuracy, sales, and overall operational performance.
When done well:
- Inventory reflects what is physically in the store
- Product is available for sale, fulfillment, and transfer
- Pricing is accurate and consistent across all items
- Inventory issues are identified and corrected quickly
- Teams maintain control of stock across all areas of the store
- Business decisions are supported with accurate data
Inconsistent execution leads to inventory inaccuracies, missed sales, fulfillment issues, and increased workload to correct errors.
GAME PLAN
Cycle Count Types
Reticket
- Items that have a price increase/decrease or an updated style that needs new 2×1 labels printed and applied.
Clearance
- Items that need to be updated or moved to a new clearance price and reticketed with the sale stickers from the 1-line price gun.
Merge Item Reticket
- Items that are identical but have different style numbers that need to be combined, reticket and labeled with a clearance sticker.
Clearance Merge Item Reticket
- Items that are identical but have different style numbers that need to be combined, reticketed and labeled with a clearance sticker.
Negative Inventory
- Items that have been sold or adjusted into negative inventory. The goal is to have the store’s inventory reflect accurately so that buyers have correct information to base orders on, allow the item to be purchased online, and be transferred if needed.
Theft
- Items listed as possible theft in an incident report.
Submitted Manually
- Counts requested by buyers, Corporate, or when the store request cycle counts using the Request Cycle Count form in the NetSuite Shortcuts portlet.
BOGO Program
- Items included in the BOGO sale that need to be ticketed with a BOGO sticker.
PIE Variance
- Issued after a store completes their physical inventory. It will include items that were included in the initial snapshot of the store’s inventory but were not scanned during the Physical Inventory. This is to help locate items that might have been missed or mis-scanned during inventory.
Audit
- Only used for completing HQ assigned audits. The store will be notified ahead of time and should plan to have the Store Manager onsite day(s) of the Audit. The Audit Cycle Counts should only be completed on the specified day, and if there is a request that a representative be present, the store will need to wait until the auditor is there to complete the count as well.

Reticket Cycle Count
Reticketing is done when the vendor’s price is updated, and product goes to a new price point. This can occur when items go Clearance as well. Reticketing should be done in conjunction with a Cycle Count to update the ticket price and the inventory of the item at the same time.
1. Log on to the NetSuite ERP.
- Check the “Reticket Cycle Count” portlet on the Store Dashboard before starting Cycle Counts.
- This will need to be checked daily to ensure all reticketing is completed timely
- If there are tickets to be printed, please follow the below instructions.
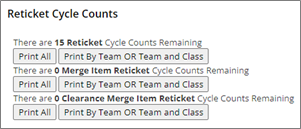
2. Click on “Print All” if all Reticket Cycle Counts will be completed at this time or click “Print By Team OR Team and Class” if only a portion of the Reticket Cycle Counts will be completed at this time.
3. Click the printer icon in the top right corner.
- Verify that the correct printer is selected.
- Click on “Change” and select the label printer from the list.
4. Click “Print”.
5. All price change tickets will print for the selected items within the Cycle Counts that require reticketing.
6. On a Zebra handheld device, click on the “Item Matrix” shortcut.
7. Log in using the Store Pass Phrase and your Muse User information.
- The Store Pass Phrase can be found in NetSuite in the Shortcuts portlet titled “My Pass Phrase”
- Individual User names and Muse Passwords will be emailed from IT.
8. Select the “Cycle Counts” tab.
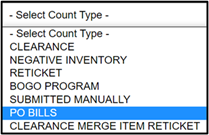
9. This will prompt the “Cycle Count” app.
10. Use the “Select Count Type” drop down menu to select “Reticket
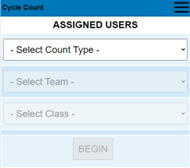
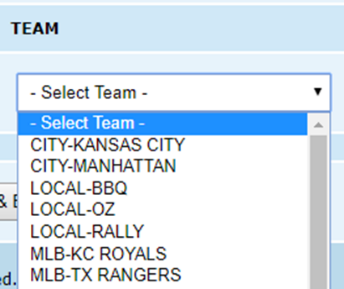
11. Select the first team to start with by choosing it from the “Select Team” drop down menu.
12. Click “Begin”.
13. This will bring up the first re-ticket cycle count.
- The cycle count app will list the style number, item description, team, department, vendor, an image of the item, and the fixture number if this item was scanned during inventory.
- Click on the image to enlarge it.
14. Start on the sales floor and find the first item.
15. Re-tag all units of the item with the tickets printed from NetSuite.
- If there are not enough tags to re-tag all units, print additional tags from NetSuite.
16. Scan the barcode of the re-tagged item.
- Note: Style numbers cannot be input.
- If the item does not have a barcode, even after reprinting tickets, create a support case.
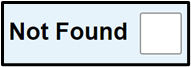
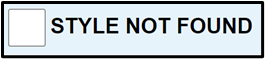
- If one of more sizes of a style cannot be found, scan the sizes that are available and then check the “Not Found” box next to the size that was not located.
- If no sizes are available for this item, then click the “Style Not Found” checkbox.
- Tap “Skip” if no units have been scanned and the item needs to be completed at a later time.
- If an item is accidentally scanned multiple times click the red “–“ to remove one unit from the total.
17. Be sure to check all areas for these items.
18. Verify that all units have been Cycle Counted and reticketed and then click the “Style Count Complete” button.
19. Repeat steps until all re-ticket cycle counts are complete.
Clearance Process
1. Select the “Count Type” as “Clearance”.
3. Click “Begin”.
4. This will bring up the first cycle count.
5. The cycle count app will list the style number, item description, team, department, vendor, an image of the item, and the fixture number if this item was scanned during inventory.
6. Click on the image to enlarge it.
7. Start on the sales floor and find the first item.
8. Use the 1-line price gun to print the orange sale sticker with the new sale price.
- Hardlines
- Back of the hardline receives an orange one-line label with the new price placed next to the original price. Do not cover the original price or barcode.
- Front of the hardline receives a hardline SALE sticker on the upper right side of the item.
- Apparel
- Tag with orange one-line label with the new price placed next to the original price. Do not cover the original price or barcode.
- Secondary Markdowns
- The new price of the item is tagged on an orange one-line sticker and is placed next to the first markdown price.
- This allows the guests to see the change in price and the great deal they are getting!
- Apparel
9. Scan the barcode of the item.
- Note: Style numbers cannot be entered.
- If the item does not have a label, then one will need to be printed and put on the item.
- If one of more sizes of a style cannot be found, scan the sizes that are available and then check the “Not Found” box next to the size that was not located.
- If no sizes are available for this item, then click the “Style Not Found” checkbox.
- Tap “Skip” if no units have been scanned and the item needs to be completed at a later time.
- If an item is accidentally scanned multiple times click the red “–“ between Scanned and Not Found to remove one unit from the total.
10. Be sure to check all areas for these items.
11. Verify that all units have been Cycle Counted and marked with clearance sticker and then click the “Style Count Complete” button.
12. Repeat steps until all clearance cycle counts are complete.
Merge Item Reticket
Merge Item and Clearance Merge Item Retickets are created to combine 2 or more styles into 1 style. This type will require that all units that are identical (regardless of style number) are found, reticketed to the updated style, and scanned into the app to update the on hand in NetSuite. Clearance Merge Items will also require the orange clearance sticker as well.
1. Log on to the NetSuite ERP.
2. Check the “Reticket Cycle Count” portlet on the Store Dashboard before starting Cycle Counts.
3. Click on “Print Labels”
4. Verify that the correct printer is selected.
5. Click on “Change” and select the label printer from the list
6. Click “Print”
- All price change tickets will print for the items within the Cycle Counts that require reticketing.
7. Prepare a workstation before beginning the Cycle Count Process.
8. Select the “Count Type” as “Merge Item” or “Clearance Merge Item”.
9. Select the first team to start with by choosing it from the “Team” drop down menu.
10. Click “Begin”.
11. This will bring up the first re-ticket cycle count.
12. Start on the sales floor and find the first item.
13. Reticket the item and use the 1-line price gun to print the orange sale sticker with the new sale price (if the type is Clearance).
14. Scan the barcode of the item.
- Style numbers cannot be input
- If the item does not have a label, then one will need to be printed and put on the item.
- If one of more sizes of a style cannot be found, scan the sizes that are available and then check the “Not Found” box next to the size that was not located.
- If no sizes are available for this item, then click the “Style Not Found” checkbox.
- Tap “Skip” if no units have been scanned and the item needs to be completed at a later time.
- If an item is accidentally scanned multiple times click the red “-“ to remove one unit from the total.
15. Be sure to check all areas for these items.
16. Verify that all units have been Cycle Counted, then click the “Style Count Complete” button.
17. Repeat steps until all clearance cycle counts are complete.
Negative Inventory
1. Start by using a Zebra handheld device.
2. Click on the “Item Matrix” shortcut.
3. Log in using the Store Pass Phrase and your Muse User information.
- The Store Pass Phrase can be found in NetSuite in the Shortcuts portlet titled “My Pass Phrase”.
- Individual User names and Muse Passwords will be emailed from IT.
4. Select the “Cycle Counts” tab.
5. This will prompt the “Cycle Count” app.
6. Use the “Type” drop down menu and select “Negative Inventory “.
7. Select the first team to start with by choosing it from the “Team” drop down menu.
8. Click “Begin”.
- This will assign the Muse User the selected cycle counts to complete.
- These will be released automatically at the end of the day.
9. Start on the sales floor and find the first item.
- The cycle count app will list the style number, item description, team, department, vendor, an image of the item, and the fixture number if this item was scanned during inventory.
- Click on the image to enlarge it.
10. Scan the barcode on the item.
- All available sizes will need to be scanned when doing the count.
- Scan all items from the sales floor and backroom.
- If the item does not have a label, then one will need to be printed and put on the item.
- If one of more sizes of a style cannot be found, scan the sizes that are available and then check the “Not Found” box next to the size that was not located.
- If no sizes are available for this item, then click the “Style Not Found” checkbox.
- Tap “Skip” if no units have been scanned and the item needs to be completed at a later time.
- If an item is accidentally scanned multiple times click the red “–“ to remove one unit from the total.
- If there is an issue with the item, contact your Operations Coordinator via chat or open a case to Operations.
- Be sure to check all areas for these items.
11. Once all units of the style have been scanned from the sales floor and backroom, click the “Style Count Complete” button.
12. Repeat steps until all “Cycle Counts” are complete.
PO Bill Cycle Counts
IMPORTANT: All incoming shipment and resolved PO Issues MUST be received before completing PO Bill Cycle Counts.
PO Bill Cycle Counts are issued for items that have been billed by the vendor on a PO but have not yet been received to help determine if the items have arrived.
1. Start by using a Zebra handheld device.
2. Click on the “Item Matrix” shortcut.
3. Log in using the Store Pass Phrase and your Muse User information.
- The Store Pass Phrase can be found in NetSuite in the Shortcuts portlet titled “My Pass Phrase”.
- Individual User names and Muse Passwords will be emailed from IT.
4. Select the “Cycle Counts” tab.
5. Click on the drop down for “Cycle Count Type”.
6. Select “PO Bills”.
7. Click on the drop down for “Select Team”.
8. Select a team from the options given.
9. Click on “Begin”.
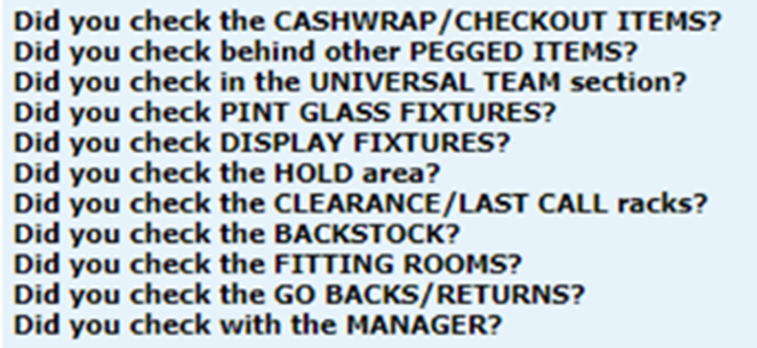
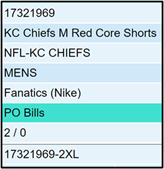
10. An image of the item needing to be counted will appear as well as the style number and description.
- The price and the current quantity on hand will also be provided for each size.
11. Locate the style and size(s) being requested.
12. Scan all the units physically in store of the requested style and size(s) into the barcode field.
- The physical on hand might be different than the QOH is showing, that is okay, scan all units in the store.
- If too many units are scanned, use the minus button to subtract the quantity until it is correct.

13. Once the “Qty” count matches the physical on hand, select “Style Count Complete”.
- If the physical on hand for the specific size is zero, select “Not Found”.
- If the physical on hand for all sizes requested is zero, select “Style Not Found”.
- If you would like to skip the item and come back to it later, click “Skip”.
14. Check the discrepancy area to make sure the item requested is not a current PO issue.
- If the item is in discrepancy, contact your Operations coordinator via chat or open a case to Operations.
15. Repeat steps 10-13 for all the style(s) requested.
16. If there are styles remaining in PO Bills cycle counts that will be completed later, select “Release My CCs”.
Submitted Manually
1. Start by using a Zebra handheld device.
2. Click on the “Item Matrix” shortcut.
3. Log in using the Store Pass Phrase and your Muse User information.
- The Store Pass Phrase can be found in NetSuite in the Shortcuts portlet titled “My Pass Phrase”.
- Individual User names and Muse Passwords will be emailed from IT.
4. Select the “Cycle Counts” tab.
- This will prompt the “Cycle Count” app.
5. Use the “Type” drop down menu and select “Submitted Manually “.
6. Select the first team to start with by choosing it from the “Team” drop down menu.
7. Click “Begin”.
- This will assign the Muse User the selected cycle counts to complete.
- These will be released automatically at the end of the day.
8. Start on the sales floor and find the first item.
- The cycle count app will list the style number, item description, team, department, vendor, an image of the item, and the fixture number if this item was scanned during inventory.
- Click on the image to enlarge it.
9. Scan the barcode on the item.
- All available sizes will need to be scanned when doing the count.
- Scan all items from the sales floor and backroom.
- Style numbers cannot be input.
- If the item does not have a label, then one will need to be printed and put on the item.
- If one of more sizes of a style cannot be found, scan the sizes that are available and then check the “Not Found” box next to the size that was not located.
- If no sizes are available for this item, then click the “Style Not Found” checkbox.
- Tap “Skip” if no units have been scanned and the item needs to be completed at a later time.
- If an item is accidentally scanned multiple times click the red “–“ to remove one unit from the total.
- If there is an issue with the item, contact your Operations Coordinator via chat or open a case to Operations.
- Be sure to check all areas for these items.
11. Once all units of the style have been scanned from the sales floor and backroom, click the “Style Count Complete” button.
12. Repeat steps until all “Cycle Counts” are complete.
Theft
Theft cycle counts are created based on the styles/sizes entered in an incident report. It’s important to complete these as soon as they are loaded in order to correct inventory from a theft incident.
1. Start by using a Zebra handheld device.
2. Click on the “Item Matrix” shortcut.
3. Log in using the Store Pass Phrase and your Muse User information.
- The Store Pass Phrase can be found in NetSuite in the Shortcuts portlet titled “My Pass Phrase”.
- Individual User names and Muse Passwords will be emailed from IT.
4. Select the “Cycle Counts” tab.
5. This will prompt the “Cycle Count” app.
6. Use the “Type” drop down menu and select “Theft“.
7. Select the first team to start with by choosing it from the “Team” drop down menu.
8. Click “Begin”.
- This will assign the Muse User the selected cycle counts to complete.
- These will be released automatically at the end of the day.
9. Start on the sales floor and find the first item.
- The cycle count app will list the style number, item description, team, department, vendor, an image of the item, and the fixture number if this item was scanned during inventory.
- Click on the image to enlarge it.
10.Scan the barcode on the item.
- All available sizes will need to be scanned when doing the count.
- Scan all items from the sales floor and backroom.
- Style numbers cannot be input.
- If the item does not have a label, then one will need to be printed and put on the item.
- If one of more sizes of a style cannot be found, scan the sizes that are available and then check the “Not Found” box next to the size that was not located.
- If no sizes are available for this item, then click the “Style Not Found” checkbox.
- Tap “Skip” if no units have been scanned and the item needs to be completed at a later time.
- If an item is accidentally scanned multiple times click the red “–“ to remove one unit from the total.
- If there is an issue with the item, contact your Operations Coordinator via chat or open a case to Operations.
- Be sure to check all areas for these items.
11. Once all units of the style have been scanned from the sales floor and backroom, click the “Style Count Complete” button.
12. Repeat steps until all “Cycle Counts” are complete.
INVENTORY CONTROL


THE PLAY:
Inventory Control ensures all product in the store is accurately tracked, maintained, and accounted for throughout its lifecycle.
This includes managing customer holds, monitoring inventory adjustments, reviewing shrink, and maintaining accuracy across all areas of the store. These processes work together to ensure inventory reflects what is physically in the building and is available for sale or fulfillment.
Execution requires consistent follow through, strong organization, and ownership at the store level. Teams must actively monitor inventory movement, resolve discrepancies, and maintain clear visibility to product across the sales floor and back of house.
IMPACT:
Strong inventory control protects accuracy, reduces loss, and supports overall store performance.
When done well:
- Inventory is accurate and aligned with physical product.
- Product is available for sale and customer fulfillment.
- Shrink and discrepancies are identified and addressed quickly.
- Teams maintain control of inventory across all areas of the store.
- Customer holds and product movement are properly managed.
- Store leaders have clear visibility to inventory health.
Breakdowns in inventory control lead to shrink, lost product, fulfillment issues, and increased workload to correct errors.
GAME PLAN
Customer Holds
To prevent items on hold from being sold online as Customer Orders, this process needs to be completed to properly place an item on hold for a customer wishing to purchase the item later. Customer Holds are until end of the business day; extensions can be made on a case-by-case scenario.
Process for Placing Item(s) On Hold
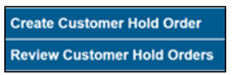
1. Click the “Place Item(s) on Hold” link in the “Shortcuts” portlet on the dashboard.
- Bookmark this page on each POS, Chrome Book, and Sled to avoid logging into NetSuite each time to use. Click here for a direct link.
2. Log in using your Store Pass Phrase and Muse User login information.
3. Click on the “Create Customer Hold Order” link.
4. This will prompt the hold form.
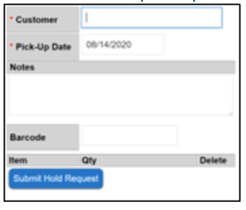
5. Enter the customer’s name in the “Customer” box.
6. Enter the date the customer will purchase the item in the “Pick-Up Date” box.
- A calendar will appear by clicking in the box.
- The current date will be the default.
7. Enter any special notes in the “Notes” box.
8. Scan the barcode for all items that are being placed on hold in the “Barcode” box.
- The style number can be used if the barcode is tied to multiple items.
- Quantities can be adjusted after the barcode is scanned.
- Item(s) can be deleted from the hold request after the barcode has been scanned.
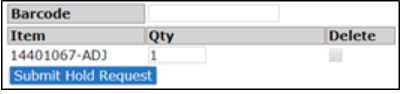
9. Click “Submit Hold Request”.
- This will prompt the “Success” box.
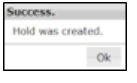
10. Click “OK”.
11. Add the paper hold slip to the item(s) and place it in the hold area for customer pick up.
Removing a Hold
1. Click the “Review Customer Hold Orders” link.

2. This will prompt all the current Customers on hold.
3. If the item has been picked up, click the “Del.” Checkbox.
4. This will prompt the “Success” box.

5. All holds are cleared each night at 12:00 AM.
6. If a customer needs to extend the hold repeat the steps for placing an item on hold and change the date to a later date.
Food Outdates Process
Replenishment
- The objective is to maintain the display with full representation.
- When replenishing:
- Shelves and Pegs:
- Pull current stock to the front and place the replenishment behind.
- Older products should be sold first.
- Boxes and Tables:
- Put replenishment on the bottom of any stack/display with the oldest stock on top.
- Display should not be empty.
- Shelves and Pegs:
Weekly Food Review
Each Monday morning the store will do the Food Review and it should be completed by 12:00 PM local time. This is how the buying team will replenish the store each Thursday.
- Open the Food OH Reviewlink in the Shortcuts.
- Print this report.
- Locate and count each food item and write in the Actual On Hand.
- Remember to check Back Stock and any secondary locations.
- Review and compare the NetSuite On Hand vs the Actual On Hand.
- If the two counts do not match, then request a cycle countusing the Request Cycle Count link in the Shortcuts.
- Create a new request for each style needed.
- If there are two options for the “size”, select NA unless the requested count is for expired (EX) units.
- Create a new request for each style needed.
Shrink Review
Inventory Adjustments happen during some of the normal operational processes that the store completes (Transfers, Customer Orders, etc.). If these adjustments exceed +/- 3 units or +/-$75 then the Store Manager will need to confirm that those adjustments are correct. It is imperative that the inventory is maintained properly. Inventory maintenance is the responsibility of the Store Manager. The process below will outline how to properly perform that function.
Process
1. Click on the “Stores-Shrink Review” link under the “Reminders” portlet on the NetSuite Dashboard.
- NOTE: If the store has not completed the adjustments that are over 5 days old, they will be highlighted in red. These need to be completed ASAP.
- The store will be emailed a list of all overdue reviews each morning.
- Overdue reviews need to be completed by the end of the day.
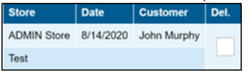
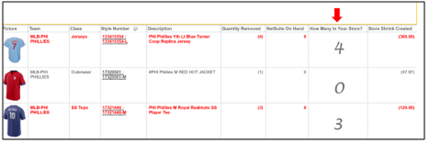
2. The “Stores-Shrink Review: Results” page will show a report of adjustments that need to be reviewed.

- The report will include information about each adjustment.
- Picture
- Team
- Class
- Style Number
- Description
- Quantity Removed: How many units were adjusted in/out.
- Positive quantity: Units were adjusted in.
- Negative quantity: Units were adjusted out.
- NetSuite On Hand: How many units are currently showing in inventory.
- How Many In Your Store: Empty field to enter the quantity physically found in store.
- Store Shrink Created: Retail value of units removed.
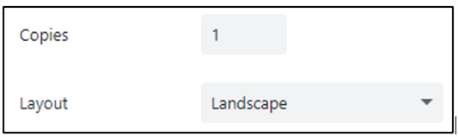
3. Click on the “Print” icon.
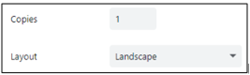
- Print the report in “Landscape” format.
4. Use the printed report to locate the items and verify the current On Hand.
- Write the current On Hand on the report in the “How Many In Your Store” column.
- This includes current receiving, holds, go backs, anywhere in the building.
5. Once all items have been found and recorded on the printed report, they need to be entered into NetSuite.
6. Return to the “Stores-Shrink Review” link under the “Reminders” portlet on the NetSuite Dashboard.
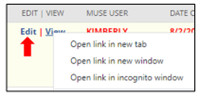
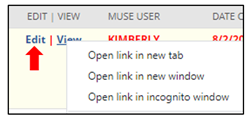
7. Right click on the “Edit” link to the left of the first line on the report that a physical count was completed for and select “Open link in new tab”.
8. This will open the “Inventory Transfer” record in a new tab in the browser.
9. Only the Store Manager should be doing this task.
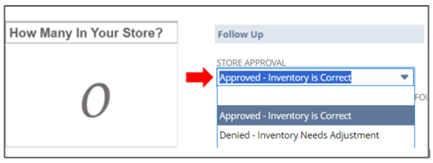
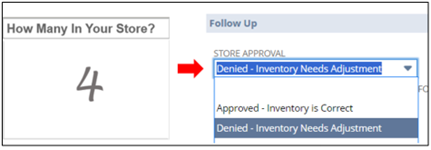
10. Fill out the following fields in the ‘Follow Up’ section:
- Shrink Review Completing Employee: This is the person completing the form.

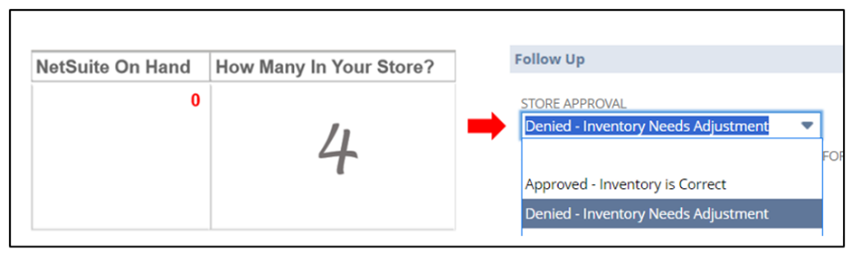
- Store Approval: On the printed form, compare the “NetSuite on Hand” and “How Many in Your Store?” columns.
- If “NetSuite on Hand” and “How Many in Your Store?” match, select ‘Approved– Inventory is Correct‘.
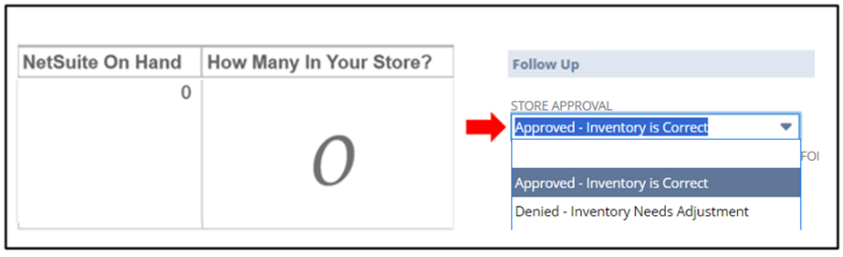
- If “NetSuite On Hand” and “How Many In Your Store?” do not match, select ‘Denied – Inventory Needs Adjustment’.
- Store Notes: Enter the reason for the adjustment. If there are multiple sizes/items on the same inventory transfer, list the physical on hand counts by style/size in this field.
- Current Physical on Hand: Enter the amount that was physically found in store from the “How Many In Your Store?” column of the printed form.
11. Store Approval, Store Notes, and Current Physical on Hand fields need to be entered for the item to be removed from the report.
12. Click “Save”.
13. Repeat this process for all adjustments to the report.
Vendor Pickup and Drop Off
There are select vendors that will come physically to the store and either pickup and/or drop off product. A vendor that does this often is Blakeway.
Pickup
1. The vendor rep with come in and pick out old styles to switch out.
- Before the old units are removed from the building, they will need to be damaged out.
2. Open the Admin site and login.
3. Hover over “Mobile” and click “Mobile Device Menu”.
4. Click “RTV-Corporate Directed”.
5. Select “Return to Vendor” for the “Reason Code”.
6. “Transfer from” should be your store’s location.
7. Under “Select Reason”, choose “Return to Vendor”.
8. Scan all units that the vendor rep is taking to remove them from your inventory.
Drop Off
1. The vendor rep will drop off new units/new styles with a packing slip and PO number.
- If the vendor does not provide a new PO number, open a support case to operations.
2. Receive the new units into PORT.
- Check to make sure all units are tagged with the new style numbers and the correct prices.
- Print new labels if needed.
Pick Exception Review
When an item is not found during the Customer Order process, it creates a Pick Exception. This removes the item from the store’s inventory and creates Shrink. Rally House is dedicated to maintaining an accurate inventory to avoid Pick Exceptions. It is the Store Manager’s responsibility to follow this process to identify the reasons for the exception and take appropriate training and coaching steps to prevent them in the future. The Rally House expectation is that the Store Manager is to review these exceptions during each shift and complete this process.
Note: By completing pick exception reviews first, they will be removed from the Shrink Review report as well.
Process
1. Click on the “Stores-Pick Exception Review” link under the “Reminders” portlet on the NetSuite Dashboard.
- NOTE: If the store has not completed the adjustments that are over 5 days old, they will be highlighted in red. These need to be completed ASAP.
2. The “Stores-Pick Exception Review: Results” page will show a report of items that could not be found for customer orders.

- The report will include information about each adjustment.
- Muse User: Employee who made the adjustment.
- Date
- Days Old
- Picture
- Team
- Class
- Style Number
- Description
- Quantity Removed: How many units were adjusted out.
- How Many In Your Store: Empty field to enter the quantity physically found in store.
- Store Shrink Created: Retail value of units removed.
3. Click on the “Print” icon
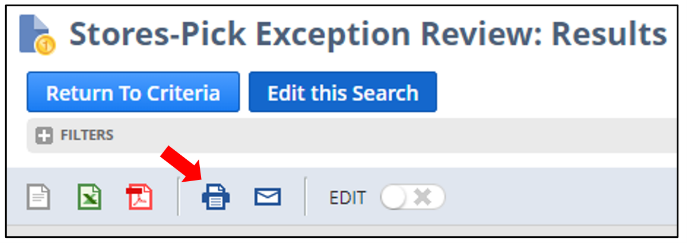
- Print the report in “Landscape” format.
4. Use the printed report to locate the items and provide a physical on hand count
- Write the quantity that is found in the “How Many In Your Store” column.
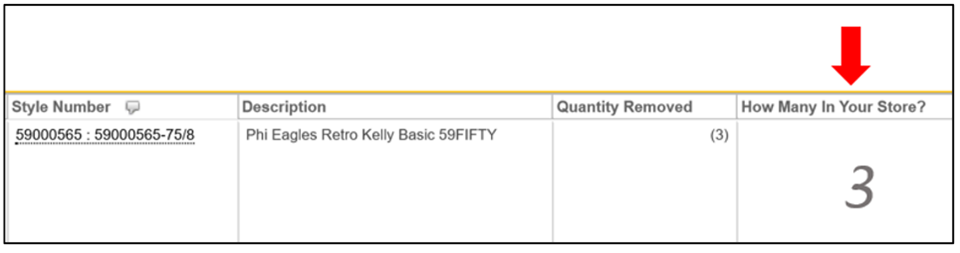
- This includes current receiving, holds, go backs, anywhere in the building.
5. Once all items have been found and recorded on the printed report, they need to be approved on the report in NetSuite.
6. Return to the “Stores-Pick Exception Review” link under the “Reminders” portlet on the NetSuite Dashboard.
7. Right click on the “Edit” link to the left of the first line on the report that a physical count was completed for and select “Open link in new tab”.
8. This will open the “Inventory Transfer” record in a new tab in the browser.
9. Only the Store Manager should be doing this task.
10. Fill out the following fields in the ‘Follow Up’ section:
- Store Approval: On the printed form, reference the “How Many In Your Store?” column for the item being reviewed and choose ‘Approved’ or ‘Recount Needed’.
- If NO units were found, select ‘Approved – Inventory is Correct’.
- If ANY units were found, select ‘Denied – Inventory Needs Adjustment‘
- Store Notes: Enter the reason for the adjustment and/or any relevant information regarding the item.
- Current Physical On Hand: Enter the amount that was physically found in store from the “How Many In Your Store?” column of the printed form.
- Pick Exception Reason: Select the appropriate reason for the pick exception.
- Employee Could Not Find (Found by Manager).
- Employee Could Not Find (Not Found).
- Found in Damages (Found by Manager)
- In Backroom/Fitting Room/Other Misc Area (Found by Manager).
- Incorrect Merchandising (Found by Manager).
- Incorrect Merchandising (Not Found).
- Other (MUST EXPLAIN IN PICK EXCEPTIONS NOTES).
- This option requires that the explanation be entered into the “Pick Exception Notes” box.
- Tagged Incorrectly (Found by Manager).
11. Click “Save”.
12. Repeat for all items.
TRANSFERS
THE PLAY:
Transfers help ensure the right product is in the right store at the right time. Through the Transfer Order Engine (TOE), stores redistribute inventory based on demand, sales trends, and assortment needs across the fleet. Consistently completing transfers on time helps maximize sell-through opportunities, supports new store openings, reduces excess inventory, and keeps product moving to where our guests are looking for it.
IMPACT:
Transfers are one of the most effective tools for improving inventory productivity. When transfers are completed accurately and within the expected timelines, stores help reduce overstocks, improve in-stock positions, support seasonal and event-driven demand, and create a better shopping experience for guests. Delayed or incomplete transfers can impact sales opportunities, inventory accuracy, and store readiness across the company. Every transfer completed correctly helps keep Rally House inventory working where it can have the greatest impact.
GAME PLAN
Scheduling for Transfers
1. Run the NetSuite report Stores-Transfer Forecast Report
2. Under “Filters” change Location to your store location.
3. This report will show the total units of transfers to be completed over the next 21 days, broken down by transfers to complete Now, This Week, Next Week, The Following Week and in the Future.
4 Transfers to campus locations must be completed by Wednesday each week when transfers to these locations populate. Use the NetSuite reminder Stores-TOE Transfersto see these transfers.
- Transfers to campus locations will highlight blue and have a 🔥 next to them as a visual cue that this transfer needs completed by Wednesday this week.
5. Labor hours are automatically allocated as part of the Supplemental hours in Legion.
- In extreme circumstances, a store may require additional hours and should partner with their District Manager.
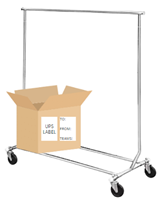
Equipment Needed
Apparel Hanging Cart (AHC)
Salesman Rack
Mall Cart
Additional Supplies:
- Zebra handheld device
- Manager Station/Laptop to print Shipping and Transfer Label
- Leftover shipment box
Transfer Process
Selecting store to transfer to:
1. Log into NetSuite.
2. Click on the “Stores-TOE Transfers” in the Reminders on the dashboard.
- This report will show all transfers that need to be completed.
- Transfers should be completed in the order listed on the report unless otherwise directed from Corporate or a Multi-Unit Leader.
- No other transfers should be completed unless otherwise directed.
3. Once you have selected the store, assess the total units going to the store and the Hangers On/Off column, then create a shipping label.
- Click the “Transfer Shipping Label” link in the Shortcuts on the NetSuite dashboard.
- The “From Location” will default to the shipping out store.
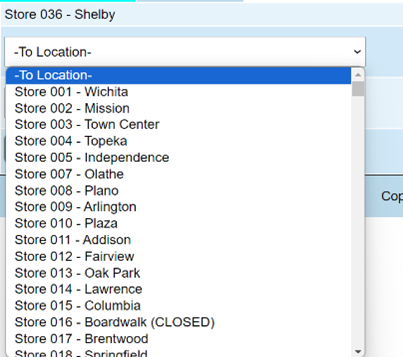
- Set the “To Location” by selecting from the drop-down menu or entering “Store (3 digit store number)”.
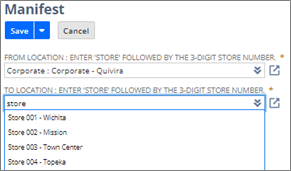
- Click “Save”.
- Click the “Print Shipping Label” button.
- Repeat as needed (1 label per box).
Start the Transfer Process:
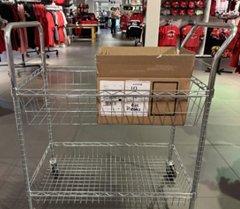
1. Choose an old shipment box based on the number of units in the transfer being completed.
2. Place the box you will use for the transfer on the bottom of the Apparel Hanging Cart, Salesman Rack, or Mall Cart.
- Place a small shelf or broken-down box on the base of the salesman rack cart if needed to support the box.
3. Cover all previous PO numbers, old shipping labels, and bar codes with blank Shipping Labels.
4. Place the Shipping Label and TOE transfer sticker on the box before beginning.
- Print the TOE Transfer Sticker.
- The TOE Transfer Stickeris available on NetSuite under Shortcuts.
- Print on a 4X6 label.
- The TOE Transfer Stickeris available on NetSuite under Shortcuts.
- Place the labels on the side of the box.
5. Grab Zebra Handheld Device:
6. Log in to the Transfer Order Engine.
- Open the app on the Zebra.
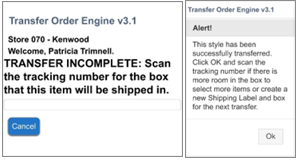
7. Scan the tracking number on the Shipping Label into the “Tracking #” box.
8. The “-To Store-” field will default to the location selected when printing a shipping label.
- THIS MUST MATCH THE STORE LISTED ON THE SHIPPING LABEL!
- If the Store listed in TOE does not match the store on the shipping label, contact Operations using the Help Chat from the Admin Site.
9. Select the team and class from the “Team/Class” drop-down menu.
- This will pull up the items to transfer.
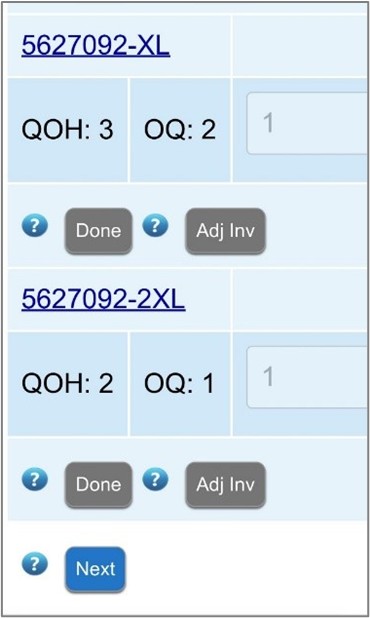
10. Use the information listed to locate the item(s) for the transfer and move to the cart.
- Place apparel in size order and verify size beads/sticker.
- Find ALL units of the style prior to beginning to scan.
- If you’re missing a unit, partner with Manager on Duty.
- Verify the size of the item matches the tag and the size bead/sticker.
- If items are folded, separate sizes.
- If hardlines are breakable STOP and follow packing plan and then proceed with caution.
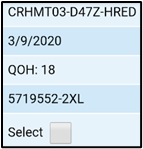
11. The “QOH” column shows the current quantity on hand.
- The “OQ” (Order Quantity) column shows the total quantity that should be transferred.
- If “OQ” says “ALL”, then store should transfer the total quantity that is actually on hand, regardless of the shown “QOH”
- If the item(s) needs to be found later today, click “Skip”.
- If the item needs to be found tomorrow, click “tomorrow”.
- This will remove the transfer for this style until the next day.
12. Clicking on the image will provide further information about the item(s).
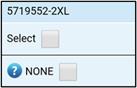
13. Scan the barcode of one of the sizes for the item in the “Barcode” box.
14. This will highlight that size in green.
15. Enter the quantity of this size that is being transferred. If you are missing something, STOP-double check and then check again with the Manager on Duty.
16. Click Done.
If the size(s) cannot be found, verify with Manager on Duty and then click “Adjust Inventory”.
This will remove the inventory from your store of the item(s).
Repeat the process for all sizes before proceeding to transfer completion
Transfer Completion:
1. Once all sizes have been scanned into the transfer, click “Next”.
- This will only be available when all sizes have a quantity or the “Not Found” button was clicked.
- The button will be grey when unavailable and blue when available.
2. Scan the tracking number to confirm the transfer.
- This will transfer all quantities of that style on that tracking number
3. Pack the items(s) in the transfer box that is on the cart.
- Hard sensors are to be kept on the product being sent in the transfer.
- If the “Hangers On/Off” column from the Stores-TOE Transfers search said “Leave Plastic Hangers On For This Location”, keep the product on plastic hangers when placing in the box.
- Do not send wood hangers.
- Size beads remain on the hangers.
- If the “Hangers On/Off” column from the Stores-TOE Transfers search said “Take Hangers Off Product Before Shipping”, remove hangers before placing the product in the box.
4. Repeat the transfer process for the next item on the transfer.
- You will receive an alert if there are no more transfers for complete for that location.
5. When the transfer box is full, click “Box Full”.
- Scan the tracking number when asked to “Confirm Tracking”.
6. Print the packing slip for the transfer.
- From the NetSuite Shortcuts, click the Transfer Packing Slip
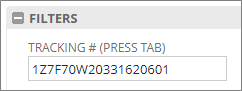
- In the filters, scan the Tracking Number on the transfer shipping label into the “Tracking #” box.
- The packing slip will load below.
- Click the printer icon and print the packing slip.
- The manager on duty will sign off with the full first and last name on the packing slip.
- Place the signed packing slip in the box.
- NOTE: The receiving store will use this to verify the correct items and units were sent.
7. Print the Lost Package Sheet and place in each box.
- Log into NetSuite.
- Under Shortcuts, select “Lost Package Sheet”.
- Print using the 4X6 label printer.
8. Fill out the TOE Transfer Sticker.
- To Store – this is the store that you are completing the transfer for
- New Store or Existing Store – check the correct box
- Add the Ship Date from the Stores-TOE Transfers report
- This transfer must not be shipped out prior to this date
- From Store – this is your store
- Team / Gender – this is written on the label after the box is full and ready to be taped shut with the team(s) that are in the box.
- MOD Sign Off – this is signed off by the Manager on Duty when the box is full but before the box is taped shut
9. Complete MOD Sign-off on Transfer sticker and sign full name on packing slip
- MOD will verify transfer was completed accurately.
- MOD will ensure transfer was packed correctly.
- MOD will ensure the packing slip and lost in transit page are included.
- MOD will ensure old labels on the box are covered with a blank Shipping Label.
- MOD should then instruct where to place the box.
10. LAST STEP: Tape the box shut and place with, either outgoing shipment or NSO Transfer staging area, as instructed by Manager on Duty.
- To begin the next box, print a new shipping label and begin at “Grab Zebra Handheld Device”. Reminder: Every box must have a new shipping label.
Printing the Packing Slip
1. From the NetSuite Shortcuts, click the Transfer Packing Slip
2. In the filters, scan the Tracking Number on the transfer shipping label into the “Tracking #” box.
3. The packing slip will load below.
4. Click the printer icon.
5. The manager on Duty will sign off with the full first and last name on the packing slip.
6. Place it in the box, then tape the box shut, and move it to the outgoing shipment or NSO Transfer staging area.
7. Repeat for all transfers.
8. NOTE: The receiving store will use this to verify the correct items and units that were sent.
Local Area Delivery
1. A Multi-Unit Leader will direct and approve Local Area Delivery transfers.
- This will require the Store Manager to work with the Multi-Unit Leader to come up
with a plan to drive this transfer to the receiving store on the same day. Local Area Delivery Transfers cannot be left overnight in a vehicle. - New Store Opening
- Pick and hold for delivery for the New Store Delivery date.
- When processing Local Area Delivery Transfers for a New Store Opening, the Store Manager will work with the Multi-Unit Leader to identify a space in the store to stage and clearly identify all Local Area Delivery transfers until they can be driven to the New Store Opening
- Current Open Store
- If a Multi-Unit Leader plans to drive product from one store to another or has arranged for someone to drive product from one store to another, a Local Area Delivery transfer may be created as long as it is being delivered the same day it is processed.
2. Create a Local Area Delivery Label.
- Log into the Rally House Apps site.
- Store Pass Phrase can be found on the dashboard under shortcuts titled “My
Pass Phrase”. - Username is the first initial and full last name of the person logging in.
- EX: jmurphy.
- Password is the user’s MUSE password.
- Contact your supervisor if this password is unknown.
- Click on the “LAD” tab
- Click on the “LAD – Create Label” tab.

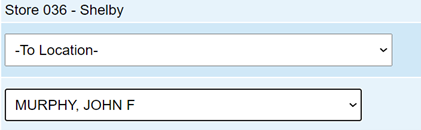
- Select the store the transfer will be driven to from the “To Location” drop down menu.
- Select the driver that will be driving the transfer to the store from the “Driver” drop
down menu. This should be your multi-unit leader unless otherwise directed.
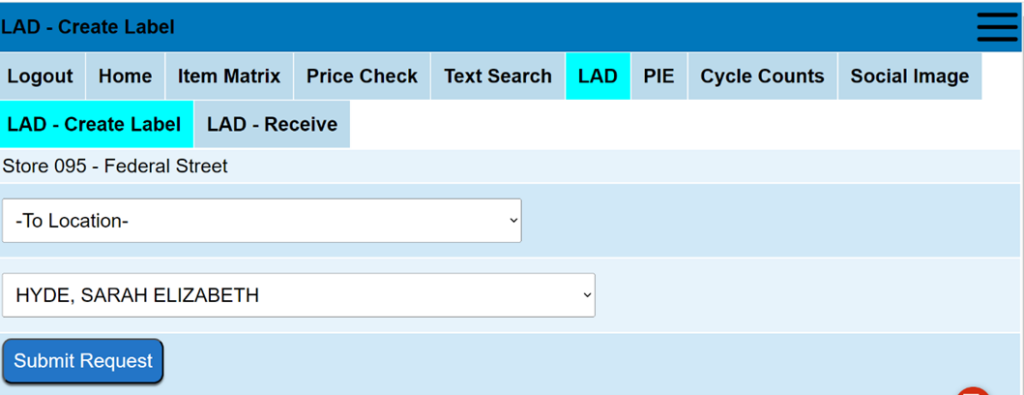
- Click “Submit Request”.
- This will prompt a PDF of the Shipping Label.
- Print this label using the 4×6 Label Printer.
- Print one label per box.
- Completing an entire store may require multiple labels.
- Create a new label for each new box.
- When completing the transfer in TOE use the Local Area Delivery Label in place of the shipping label to complete the transfer and follow steps in transfer process to pick and pack transfer.
Receiving Local Area Delivery Transfers
Once the transfer is completed and delivered, the receiving store must scan the label to receive it. The Multi-Unit Leader will need to verify receipt of transfers.
1. Log into the Rally House Apps site.
2. Click on the “LAD” tab
3. Click on the “LAD – Receive” tab.

4. Scan the Local Area Delivery Label barcode in the “Scan Barcode” box.
5. If the Local Area Delivery transfer was successfully received, the message “Tracking Number xxxx has been submitted for receipt” will appear in GREEN.
IMPORTANT: do not proceed with scanning additional packages until this notification appears.
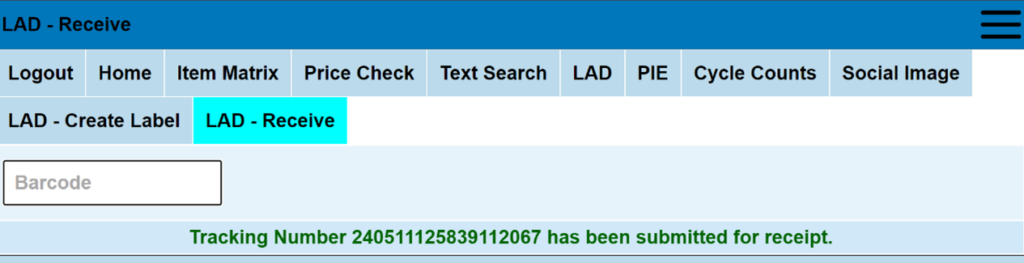
6. If the message invalid tracking number appears, open an OPS chat before proceeding.
7. Complete this for each Local Area Delivery Label that was delivered.
DIRECT SHIPMENTS


THE PLAY:
Direct Shipments are a key part of inventory flow, ensuring product is accurately received, validated, and made available for sale.
These shipments come directly from vendors and must be processed through the Purchase Order Receiving Tool to confirm accuracy, resolve discrepancies, and update inventory in the system. This includes verifying product details, identifying issues, and ensuring all items are properly ticketed before moving to the sales floor.
Execution requires strong attention to detail and consistent follow through to ensure all shipments are received correctly and any issues are addressed in a timely manner.
IMPACT:
Accurate processing of Direct Shipments ensures inventory integrity and product availability.
When done well:
- Inventory is accurate and aligned with what is physically received.
- Product is available for sale and fulfillment without delay.
- Shipment issues are identified and resolved quickly.
- Pricing and product details are correct before reaching the sales floor.
- Teams maintain control of incoming inventory.
Breakdowns in this process lead to inventory discrepancies, delays in product availability, and increased workload to resolve issues.
GAME PLAN
How to Receive in the Purchase Order Receiving Tool (PORT)
1. Using the Zebra Handheld device, select the “PORT” app.
2. Login in using your Store Pass Phrase and your Muse User credentials.
- Find the Store Pass Phrase in the Shortcuts portlet on your NetSuite dashboard under “My Pass Phrase”.
- Muse User Credentials will come from IT.P
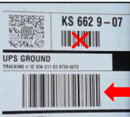
3. Scan the UPS label tracking number for the package being received into the “Tracking#” field.
- Use the barcode on the UPS label listed below the tracking number, not the barcode listed below the zip code.
4. Verify the following:
- PO: PO # listed matches the PO # on the UPS label and/or packing slip.
- Vendor: Vendor listed matches the product that arrived.
- Location: Location listed matches your store.
5. Click “Receive PO“.
6. Lay out all units by style and size.
- A folding table may be used for this process when receiving sized apparel.
- When sized apparel is not being received, the folding table should be put away.
7. Scan your first item/size into the “Scan Barcode” field.
8. This will bring you to the item associated with the barcode you scanned.
- Click the arrow at the bottom left to minimize the keyboard.
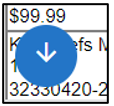
9. Verify the information listed on the scanner matches the product that arrived.
- Description
- Style #
- Size Entered
- Price on Item
- Image
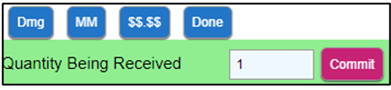
10. Once you have verified that the item scanned matches what PORT shows, enter the quantity in the field to the right of “Quantity Being Received”.
11. Then click “Commit”.
12. Repeat these steps for all sizes and styles.
13. If the item(s) do not include the style number and/or price, reprint tags and reticket the items.
- IMPORTANT: All items must have the style number and price on the tag before they can be placed on the sales floor.
14. Once all sizes and styles have been scanned, scroll to the bottom of the page or use the blue down arrow.
15. Click “Complete Receipt”.
16. This product is now received and needs to be moved to a Baker’s Rack and then placed on the sales floor.
Finding Unkown POs
1. Use the PO Find Tool located in NetSuite Shortcuts portlet.
2. Expand the filters section and enter information about the contents using one filter at a time.
- UPC – Enter and Press Tab
- Style – Enter with no size and Press Tab
- Vendor – Type in the Vendor and Press Tab
- Department – Choose from the dropdown list
- Class – Choose from the dropdown list
- Description – Type in a description of the item
3. After filtering, review the results and locate the PO number in the far-left column.
4. If there are no results or are multiple POs listed for the same item, contact Store Support via the Help Chat.
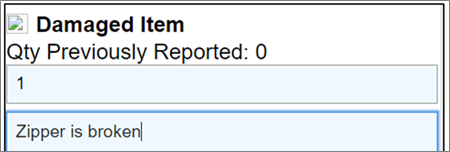
Reporting PO Issues in PORT
Damaged items:
1. Scan the item into the “Scan Barcode” field.
2. Enter the total quantity that arrived of that style/size into the “Qty” field.
- This number will include the damaged items.
3. Click the “Dmg” button.

4. Enter the quantity that arrived damaged in the “Dmg Qty” field.
5. Describe the damaged item(s) in the “Notes” field.
6. Click “Select Image(s) and Save” and take a picture of the damaged item.
- The image must be clear, in focus, and easy to tell what the ‘damage’ is.

7. Once a picture has been taken, wait for the app to take you back to the items page.
- This may take some time and it will look like the app has frozen, DO NOT REFRESH, let the app load.
8. Once the app has loaded back to the items page, scroll down to find the style/size you were working on.
- The item will be highlighted in green.
9. Click “Commit” to finish that style/size.
10. Place the damaged units in your discrepancy area in the original box labeled with the PO #, the date, and the “Damaged Item” marked on side.
- All un-damaged items received on the PO can be placed on the sales floor.
- The POL will be assigned back to your store with direction for the damaged item(s).
- If the issue has been un-resolved for over 48 business hours, chat Operations through the Help Chat!
Image Mismatch and Defective Items
Image Mismatch and Defective Items include vendor misprints, incorrect team, incorrect spelling, incorrect graphic, incorrect color, incorrect garment type, missing pieces, etc.
1. Scan the item into the “Scan Barcode” field.
2. Enter the total quantity that arrived of that style/size into the “Qty” field.
- This number will include the mismatch/defective items.
3. Click the “MM” button.
4. Enter the quantity that arrived mismatched/defective in the “Mismatch Qty” field.
5. Describe the mismatch/defect in the “Notes” field.
- Be as detailed as possible.
6. Click “Select Image(s) and Save” and take a picture of the damaged item.
- The image must be clear, in focus, and easy to tell what the ‘mismatch/defect’ is.

7. Once a picture has been taken, wait for the app to take you back to the items page.
- This may take some time and it will look like the app has frozen, DO NOT REFRESH, let the app load.
8. Once the app has loaded back to the items page, scroll down to find the style/size you were working on.
- The item will be highlighted in green.
9. Click “Commit” to finish that style/size.
10. Place the mismatch/defective units in your discrepancy area in the original box labeled with the PO #, the date, and the “Item Mismatch” or “Defective Item” marked on side.
- All non-mismatched/defective items received on the PO can be placed on the sales floor.
- The POL will be assigned back to your store with direction for the mismatch/defective item(s).
- If the issue has been un-resolved for over 48 business hours, chat Operations through the Help Chat!
Price Mismatch
1. If the price on the vendor tag does not match the Rally House price listed for the item, this will need to be reported using the “$$.$$” button.
2. Scan the item into the “Scan Barcode” field.
3. Enter the total quantity that arrived of that style/size into the “Qty” field.
4. Click the “$$.$$” button.

5. Enter the price that arrived on the vendor tag in the “Price” field.
- The price listed below is the Rally House price for the item, if the vendor tag matches that price click the button to Cancel and Close.
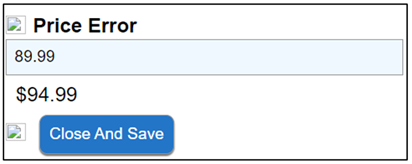
6. Click “Close and Save”.
7. Follow the directions on the pop-up window.
8. Click “OK” once the items have been re-labeled.
- The receiving app will take you back to the items page.
9. Scroll down to find the style/size you were working on.
- The item will be highlighted in green.
10. Click “Commit” to finish that style/size.
Unknown Item
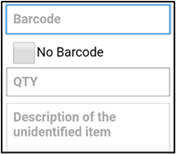
- If an item arrives that is the incorrect team/incorrect item and does not have a barcode, use the Unknown Item button to create a POL.
- Contact Operations through the Help Chat after the item(s) have been reported in PORT.
- If the item has a barcode: Scan the item into the “Scan Barcode” field.
- If the barcode scanned takes you to an item on the PO that is not the item you are trying to receive, determine if this is a mismatch or if the item that arrived is completely different.
- If the item that arrived is the same type of item but a different team/color/graphic,use the mismatch buttonto report the discrepancy.
- If the item is completely different, click “Commit” without entering a Qty and skip to reporting an item with no barcode.
- If the barcode scanned is not recognized, an error will pop up telling you to select the item you are trying to receive.

- If the item that arrived is listed on the PO, match the style number and size and then check the box next to “Select” and proceed receiving like normal.
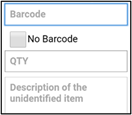
- If the item that arrived is not listed on the PO, scroll down to the box next to “NONE” and click to check the box.
- The next screen will ask for information about the item that arrived.
- Scan the barcode into the “Barcode” field
- Enter the quantity that arrived of that style/size into the “QTY” field.
- Provide a description of the item into the Description of the unidentified item field
- Click “Select Image(s) and Save.”
- Repeat these steps for all sizes of the item. Each size must be reported separately, do not combine the quantity to include multiple sizes.
- After the item has been reported in PORT, chat Operations through the Help Chat for resolution.
- Click “Select Image(s) and Save.”
- Repeat these steps for all sizes of the item. Each size must be reported separately, do not combine the quantity to include multiple sizes.
- After the item has been reported in PORT, chat Operations through the Help Chat for resolution
If the item does not have a barcode tag or the barcode scans in as the incorrect item:
- Click the “Unknown Item” button.
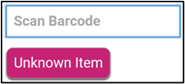
- The next screen will ask for information about the item that arrived.
- Scan the barcode into the “Barcode” field.
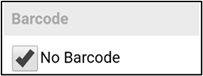
- Check the box next to “No Barcode” if there is no UPC on the item.
- Enter the quantity that arrived of that style/size into the “QTY” field.
- Provide a description of the item into the “Description of the unidentified item” field.
- Click “Select Image(s) and Save.

- Repeat these steps for all sizes of the item. Each size must be reported separately, do not combine the quantity to include multiple sizes.
- After the item has been reported in PORT, chat Operations through the Help Chat for resolution.
Items Not On PO:
- When an item is scanned that is not listed on the PO to receive, PORT will automatically prompt you with fields to report the item(s). Contact Operations through the Help Chat after the item(s) have been reported in PORT.
- Scan the item into the “Scan Barcode” field.
- PORT will automatically take you to the ‘Item Not On PO’ pop-up.
- Read the pop-up carefully. This item will not be received.
- Enter the quantity that arrived of that style/size into the “Qty” field.
- Describe what arrived in the “Notes” field.
- Click out of the “Notes” field into any open white space.
- Click “Select Image(s) and Save”.
- Take a picture of the item that arrived with the tag visible and then wait for the device to load.
- The image of the item MUST be clear, in focus, with the tag readable.
- The next screen will show the item highlighted in yellow.
- Verify the quantity is correct.
- It will carry over from what was entered on the previous screen.
- Click “Done”.
- Repeat these steps to scan in all sizes of the item not on PO.
- Once all sizes have been entered, scroll to the bottom of the page and click “Complete Receipt”.
- Chat Operations through the Help Chat after the item has been reported in PORT for resolution.
- If the issue is outside of business hours, create a case to Operations.
- Verify the quantity is correct.
Wrong Location:
If scanning the UPS label and confirming the PO number gives a Wrong Location Warning, PORT has created a Wrong Location PO Log.
- Open the PO in NetSuiteand review the style(s) on the PO as well as the location listed.
- If the PO number was entered by mistake and a Wrong Location PO issue was created, go to “Stores-PO Issues (PO Receiving Tool)” in the Reminders portlet of NetSuite, and set the status of the PO Log to “Aaroneous”.
- If the item(s) shipped do not match the style(s) on the POor the location shown is your location, chat Operations through the Help Chat.
- If the issue occurs outside of business hours, create a case to Operations.
- If the item(s) shipped match the style(s) on the PO and the location listed is another store, go to “Stores-PO Issues (PO Receiving Tool)” in the Reminders portlet of NetSuite and view the wrong location PO Log.
- Verify the PO number on the PO Log matches the box currently being worked on.
- Click “Print Wrong Location Label” to print a new UPS label to the intended location.
- Place the new UPS label over the original shipping label on the box, tape the box shut, and place with the outbound packages.
- If there are any issues with this process, contact Operations through Help Chat.
Completing PO Issues
Actions to take for PO issues
- Physical Item Count
- Items on this PO require a physical count.
- Locate the items listed in the “Physical Item Count Item 1-8” fields.
- Complete a physical count of the styles listed.
- Enter the quantity found in the “Current On Hand 1-8” fields.
- Assign the POL back to Operations with the Status In Progress.
- Arrived, Closed
- These issues will display a message stating “PO has no open lines”.
- Contact the Help Chat.
- Provide the styles, sizes, and quantities that arrived.
- If this issue occurs outside of Mon-Fri 8a-5p, create a case to Operations.
- Items on this PO require a physical count.
- Damaged Item
- The item(s) came in damaged/defective.
- The operations/buying team will assign the PO Issue to the store with instructions.
- Dropship
- This is a PO that came from a Sales Order (Customer Order).
- The buying team will determine if the PO should have been shipped to the store or the customer.
- The buying team will assign the PO Issue to the store with instructions.
- Image or Color does not match
- Item(s) arrived where the image/color/graphic is incorrect.
- The buying team will assign the PO Issue to the store with instructions.
- POL status must be “Process” in order to receive.
- Item Not On PO
- Item(s) arrived that was not originally written on the PO.
- Contact the Help Chat.
- Provide the styles, sizes, and quantities that arrived.
- If this issue occurs outside of Mon-Fri 8a-5p, create a case to Operations.
- POL status must be “Process” in order to receive.
- Multi Store PO With Allocations / Proceed With Receiving / Transfer
- PO arrived with allocations.
- This triggers the multi-store process notification.
- Complete the Multi-Store Allocation process.
- Unexpected On Hand Units
- Units arrive in excess of the expected quantity for an item(s).
- Verify the PO was double shipped/over-shipped.
- If the PO was received twice by mistake, place the items on the sales floor.
- If the PO was double shipped/over shipped, open a support case to Operations with the PO number, style number(s) and quantities, and an image of the packing slip.
- Unidentified Item / Request For Information
- The store clicks the “Unknown Item” button and submits the issue.
- The Buying/Operations team will assign the PO Issue to the store with instructions.
- Wrong Location
- Open the PO in NetSuiteand review the style(s) on the PO as well as the location listed.
- If the PO number was entered by mistake and a Wrong Location PO issue was created, go to “Stores-PO Issues (PO Receiving Tool)” in the Reminders portlet of NetSuite, and set the status of the PO Log to “Erroneous”.
- If the item(s) shipped do not match the style(s) on the POor the location shown is your location, chat Operations through the Help Chat.
- If the issue occurs outside of Mon-Fri 8a-5p, create a case to Operations.
- If the item(s) shipped match the style(s) on the PO and the location listed is another store, go to “Stores-PO Issues (PO Receiving Tool)” in the Reminders portlet of NetSuite and view the wrong location PO Log.
- Verify the PO number on the PO Log matches the box currently being worked on.
- Click “Print Wrong Location Label” to print a new UPS label to the intended location.
- Place the new UPS label over the original shipping label on the box, tape the box shut, and place with the outbound packages.
- Open the PO in NetSuiteand review the style(s) on the PO as well as the location listed.
NOTE: PO Issues are to be completed daily prior to receiving.
- Click on the Stores-PO Issues (PO Receiving Tool) link in the Reminders portlet in NetSuite.
- Review the “Buyer Notes” and/or “OPS Notes”.
- Complete any action required from the notes.
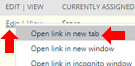
- If there is a question asked, right click “Edit” and open the POL in a new tab.
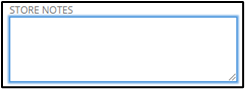
- Respond to the question in the “Store Notes” field.
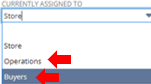
- Click on the “Currently Assigned To:” field and select the department that asked the question.
- Leave the status “In Progress”.
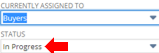
- IMPORTANT: Do not assign the status to “Completed”.
- Click “Save”.
- Once the POL direction has been completed and the PO is received, edit the POL, change the status to “Completed”, then save.
- This should only be done after the discrepancy item(s) are received, do not complete the POL before receiving.
- If the POL direction states the PO is ready to receive but PORT still tells you to place the PO in your discrepancy area, assign the POL to Operations stating the error that PORT is showing.
- If the POL direction is to RTV, the status can be changed to “Completed” once the PO has been marked as an RTV and placed in your RTV area.
- This should only be done after the discrepancy item(s) are received, do not complete the POL before receiving.
- Once the POL status has been changed to “Completed” and saved, the POL will be removed from your PO Issues report.
Supply, Fixture, and Maintenance POs
Supply, fixture, and maintenance purchase orders are the only POs that are received in NetSuite ERP. All other POs are received in PORT.
1. Using the “Stores-Receive Supply/Maintenance PO’s” saved search, review your PO’s.
2. Choose your store location from the list.
3. Click “View”to review the purchase order that arrived.
- This will prompt the “Purchase Order” screen.
4. Once in “Purchase Order”screen, verify that the PO is for the correct store.
- Scroll down to the “Classification” section and ensure the correct store location is listed under the “Location”.
5. To receive the PO in NetSuite, click the “Receive” button.
- This will prompt the “Item Receipt” page.
6. Once on the “Item Receipt” page, scroll down the screen to the “Items & Expenses” tab.
7. Only receive the items and quantities that were physically delivered, even if that varies from the PO quantities.
- If the quantity of an item delivered is different than the PO lists, update the quantity to the correct amount under the “Quantity” column for that item.

- If an item is listed on the PO but did not arrive in this shipment, uncheck the box under the “Receive” column for that item.
8. Review the “Items and Expenses” tab to ensure that all the items with a checkbox under the “Receive” column physically arrived and that the quantity for each item matches what was delivered.
9. Fill out the “Memo”field.
- Enter in your initials and “confirmed”.
10. Click the “Save” button when complete.
11. This will prompt confirmation of the PO.
12. If you need to receive a second portion of this Purchase Order, repeat the same process.
- Use the “Stores-Receive Supply/Maintenance PO’s” saved search.
- Choose your store location from the list
- Choose the correct PO and click the “View” button.
- Open the PO, click “Receive”.
- On the “Item Receipt”page, receive the items that were delivered.
- This will now only show the items of the PO that have not been received and items that have not had the full quantities received.
- i.e. If you originally were only delivered 1 pack of tissue paper and you only received 1 on the first “Item Receipt”, but you were supposed to receive 2 from the full order, then the second “Item Receipt”, will only show 1 available to receive.
13. If there is an item not on the PO to receive, open a support case to Operations for assistance.
• Include the PO number, item number and description, as well as a picture of the packing slip.
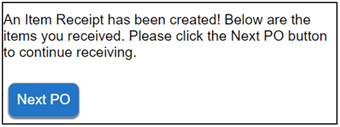
PO Bill Cycle Counts
IMPORTANT: All incoming shipment and resolved PO Issues MUST be received before completing PO Bill Cycle Counts.
PO Bill Cycle Counts are issued for items that have been billed by the vendor on a PO but have not yet been received to help determine if the items have arrived.
1. Start by using a Zebra handheld device.
2. Click on the “Item Matrix” shortcut.
3. Log in using the Store Pass Phrase and your Muse User information.
- The Store Pass Phrase can be found in NetSuite in the Shortcuts portlet titled “My Pass Phrase”.
- Individual User names and Muse Passwords will be emailed from IT.
4. Select the “Cycle Counts” tab.
5. Click on the drop down for “Cycle Count Type”.
6. Select “PO Bills”.
7. Click on the drop down for “Select Team”.
8. Select a team from the options given.
9. Click on “Begin”.
10. An image of the item needing to be counted will appear as well as the style number and description.
- The price and the current quantity on hand will also be provided for each size.
11. Locate the style and size(s) being requested.
12. Scan all the units physically in store of the requested style and size(s) into the barcode field.
- The physical on hand might be different than the QOH is showing, that is okay, scan all units in the store.
- If too many units are scanned, use the minus button to subtract the quantity until it is correct.
13. Once the “Qty” count matches the physical on hand, select “Style Count Complete”.
- If the physical on hand for the specific size is zero, select “Not Found”.
- If the physical on hand for all sizes requested is zero, select “Style Not Found”.
- If you would like to skip the item and come back to it later, click “Skip”.
14. Check the discrepancy area to make sure the item requested is not a current PO issue.
- If the item is in discrepancy, contact your Operations coordinator via chat or open a case to Operations.
15. Repeat steps 10-13 for all the style(s) requested.
16. If there are styles remaining in PO Bills cycle counts that will be completed later, select “Release My CCs”.
Receiving HUB POs
There are times where Rally House needs to order product that will be transferred from the receiving store to other stores. This is a HUB PO. It is received as normal through PORT, then the Buyers will create TOE transfers to send the excess product to the correct location. This Best Practice outlines how to address these types of PO’s.
1. Identify the PO as a Hub PO.
- When the PO is entered into PORT to receive, the PO Type will read ‘Hub Store’ in red text.
2. Receive the PO as normal through PORT.
3. Place 12 units on the Sales Floor.
- If, the product is apparel, then this should be a proper size run.
4. The remaining units should be stored in backstock.
5. The Buyer will then go in and create TOE transfers for this backstock product.
- This will only happen after the PO has been received.
6. The store will then complete the TOE transfers as normal along with any other transfers that need to be completed.
- This will show in the Reminders under Stores-TOE Transfers.
7. If there are any issues with this process, then create a Support Case and assign to Operations.
- Note: An automatic email will be sent to the store after each HUB PO is received in the store that has these instructions as well.
Multi-Store Receiving (BULK)
Multi-Store PO’s are PO’s that are written to one location but will have product for other locations in them. This requires the receiving store to transfer the correct amount of product to specific locations.
1. Identify the PO as a Multi-Store PO.
- The PO Type will read ‘Bulk’ and the Distribution Type will read ‘Multi Store’, both in red Text.
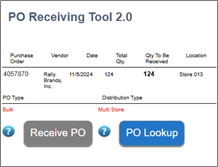
2. This process should only be completed by a TSL or above.
- If the PO is listed in PORT as a Multi-Store PO, place the PO to the side and get a manager to assist.
3. Pull all boxes for the PO together.
4. Receive the PO in PORT as normal.
- Lay out each style by size.
5. Log in to the NetSuite ERP.
6. Go to the “Multi-Store PO Allocations” portlet on the dashboard and click on the truck icon.
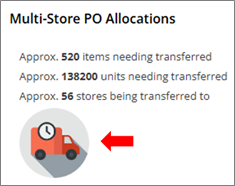
7. Select the store.
- It will default to the user location.
8. Enter the PO number into the “Purchase Order” box.
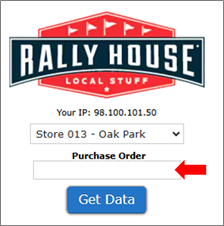
9. Click “Get Data”.
10. The first box will show the style by size that the store should keep in their inventory, these will not be transferred.
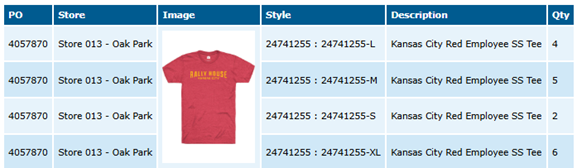
- Pull the quantities listed and place with your received product to be placed on the sales floor.
- Pay close attention to the size of the item that is to be transferred as they are not in size order.
11. The second box will show the style by size that need to be transferred to other store(s).
12. Create shipping labels for each of the stores listed.
- Click the “Transfer Shipping Label” link in the Shortcuts on the NetSuite dashboard.
- The “From Location” will default to the shipping out store.
- Set the “To Location” by selecting from the drop-down menu or entering “Store (3 digit store number)”
- Click “Save”.
- Click the “Print Shipping Label” button
- Repeat as needed (1 label per box).
13. Build a box for each store and attach the shipping label.
14. Return to the “Allocation Transfers” page in NetSuite.
15. Enter the quantity being transferred to the store in the “Xfer” box in the far-right column.
- Pay close attention to the size of the item that is to be transferred as they are not in size order.
16. Scan the Shipping label tracking number into the “Tracking Number” box.
- This must be done to complete the transfer.
17. Click “Close & Fulfill”.
- This will prompt the “Processing Successful” notification.
18. Place the styles by size in the box.
- If the box is full, tape it closed and place with outbound shipments then create another box setup for that location.
- If the box is not full, continue adding to it with other transfers for that store until it is full.
19. Repeat steps for all locations for this PO.
- If the PO was shipped a higher quantity than what was ordered, then complete all the transfers as requested and the additional units will remain in the receiving store.
- If the PO was shipped a lower quantity than what was ordered, then transfer the available quantities evenly across all the stores.
- When the remainder arrives the rest of the transfers will be available using the same method.
Troubleshooting
- Transfer Quantity is different from Allocation Quantity. Proceed?
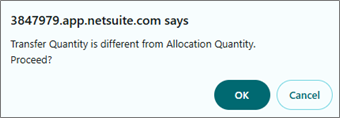
- This error is caused by entering a number higher or lower than the amount needed to transfer.
- This is acceptable when the PO was over or under shipped product.
- If the PO quantities were shipped in full, double check the requested transfer quantity and correct the amount entered in the “Xfer” field.
- Transfer Quantity exceeds quantity available at this location!
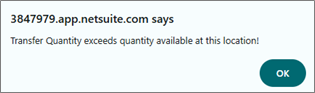
- This error is caused by entering a number higher than the store has available to transfer, meaning the inventory and/or number entered is wrong.
- This transfer cannot be completed.
- Double check the number entered is correct and then contact Operations using the Help Chatfound on the admin site or by creating a case in NetSuite.
- Double check the PO number was entered correctly. If PO is not allocated, contact Operations via the Help Chat or create a case in NetSuite.
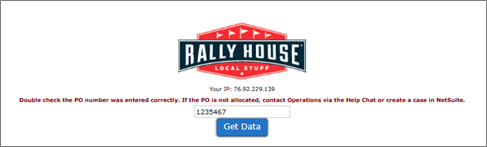
- Double check the PO number was entered correctly and the PO Type was Bulk with the Distribution Type Multi Store.
- Contact Operations using the Help Chat found on the admin site or by creating a case in NetSuite.
- Provide the PO Number, Style Number(s), sizes, quantities, and the error message shown.
PORT Tips and Troubleshooting
Wrong Location PO Issue (PO entered incorrectly)
- Mark POL status as “Erroneous”
Hard Sell Dates
- Hard Sell Date alert will populate and Hard Sell Date will be shown above the product image.
Item missing barcode/Barcode won’t scan
- Reprint Tickets:
- From the collapsed list, click into the item that needs to be reprinted to expand the data.
- Click the print icon.
- Enter the quantity to print.
- Click OK.
New tag printed the style number-size in place of the barcode.
- Scan the vendor tag into PORT to prompt the “Barcode not recognized. Select item you are trying to receive” message.
- Select style number-size of the item that was scanned.
- When prompted, enter the size of the item scanned.
- Click Complete Receipt
- An error message will be prompted to alert no items have been received, click Next PO.
- Scan the training/enter the PO number into PORT and repeat steps above for all sizes.
- You will need to complete receipt and reenter the PO into PORT after each size.
- Print new tags for all sizes and re-tag with new barcodes.
- Scan the tracking/enter the PO number into PORT and receive the items as normal.
All items need to be re-tagged
- Click the down arrow located under the Unknown Item button.
- Use the Print All Tickets button.
Units already received previously
- The quantity previously received will be shown in the upper right corner as “Recv”.
- Only input the units that arrived in the current shipment, do not receive units that were already received.
Item scanned but shouldn’t be on PO
- Scan the item again and enter 0 for the QTY.
- Click Commit – This will not create a PO Issue and if the PO is reloaded it will be removed.
Bad Scan/Barcode not recognized
- Click None of the Above
- Click Save and Close – Without putting in any information
- This will not create a PO Issue and will return to the scan screen without problems.
Error: Invalid Tracking Number
- Toggle from “Track#” to “PO#” and enter PO from packing slip
Error: Invalid Tracking Number (PO also fails)
- Contact Store Support via help Chat