


To-Do List (2 Weeks Out from Start Date):
- Meet with your Inventory Coordinator to review completed map/plan and go over the scanning and review processes.
- Opt-in and complete the training ‘SM Course: Manage Inventory’.
- Have all scanners Opt-In to ‘Scanner Training Course’.
- Store Manager is responsible for ensuring all scanners Opt-In to the Scanner Training Course including helpers from other stores.
Meet With Your Inventory Coordinator:
- Have the scheduled Teams Call with your Inventory Coordinator to review the map/plan.
- Your plan will be approved or feedback will be given for revisions needed.
- If revisions are needed, edit the Physical Inventory Plan from ‘Stores-Physical Inventory Plan” in the NetSuite Reminders portlet.
- Upload the revised map and/or update the plan in the Detailed Store Plan Notes.
- Check “Store Revised”.
- Save.
- If revisions are needed, edit the Physical Inventory Plan from ‘Stores-Physical Inventory Plan” in the NetSuite Reminders portlet.
- Your plan will be approved or feedback will be given for revisions needed.
Follow this link to opt-in to the SM training course: 🔗Manage Inventory
- Any member of management that will be acting as an Inventory Leader during the Physical Inventory will need to opt-in the the training course Manage Inventory and complete by the end of week.
Assign Inventory Scanner Course to your Scan Team:
1. The Store Manager will need to assign the “Physical Inventory: Inventory Scanner” course to team members from your Home store.
- Follow this process to assign a course from the Learning Catalog: 🔗Assign LMS Courses
- Note: Only Store Managers can assign LMS Courses.
2. For team members on your Scan Team from outside you Home store:
- Contact the team members and share this link to the course 🔗 Physical Inventory: Inventory Scanner from the Zipline Learning Catalog.

Contact your Inventory Coordinator with any questions throughout this process.

To-Do List (1 Week Out from Start Date):
- Place fixture tags on Walls and Fixtures.
- Ensure scanners have completed training course.
- Complete all inventory control related tasks.
- Set store to the visual merchandising standards.
- Verify the supplies needed are on hand and IT equipment arrived by Friday.
Tag Fixtures and Walls
- Print the tags.
- Open the 🔗Physical Inventory Labels (2026) document.
- Make sure the printer is set to the store’s 1×2 label printer.
- Do not print “All”.
- Update the Pages to Custom.
- Enter the range needed.
- Each page is 1 label so if the store needs 400 labels, then select the range of 1-400.

- For the “Trouble Racks” print 1000-1001.
- Individual tags can be printed/reprinted as needed by printing just that page (fixture number)
- Example: Fixture label ‘100.26’ = Fixture 100 for Inventory in 2026.
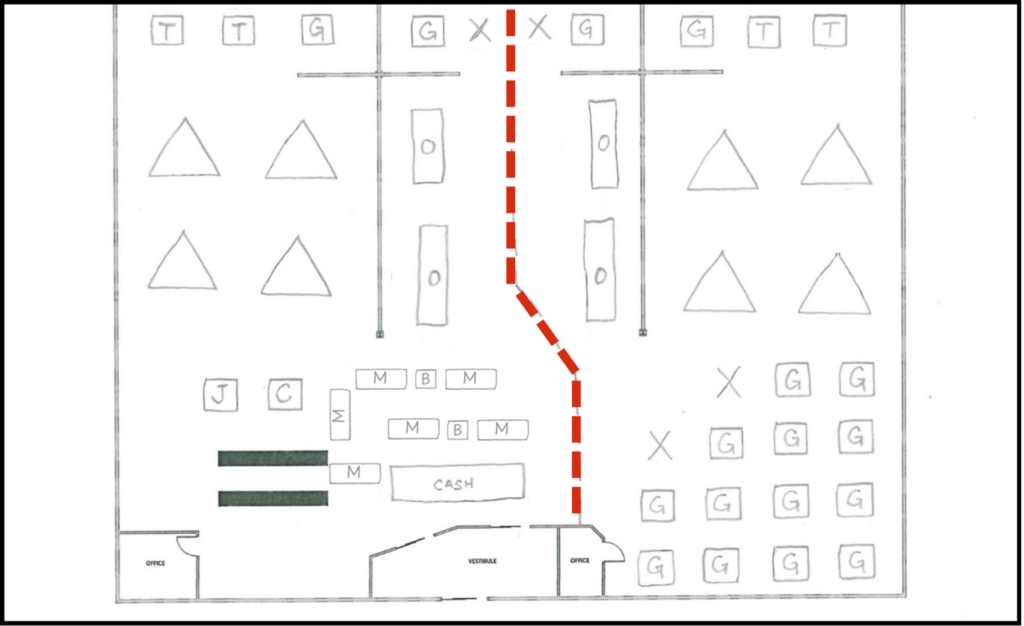
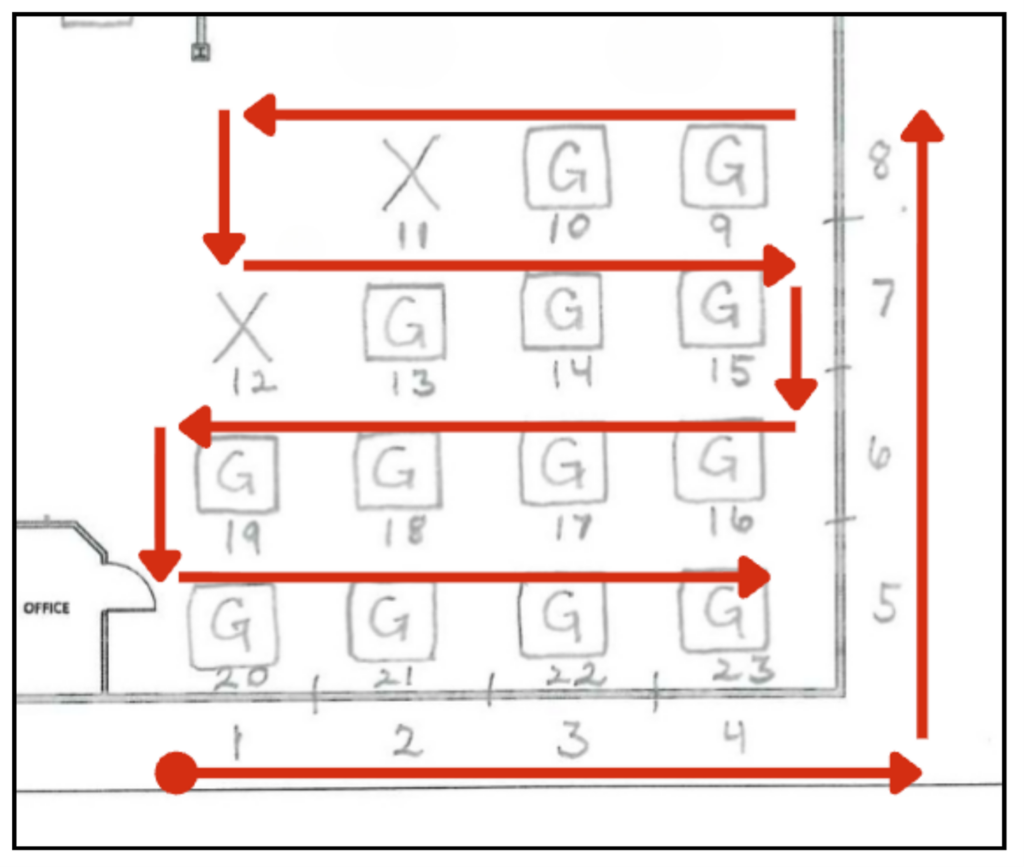
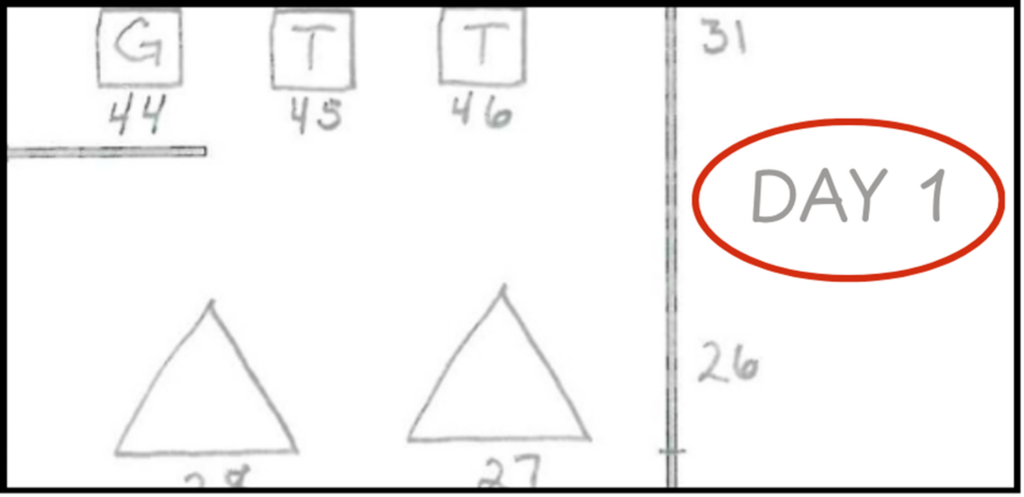
- Tag all fixtures and walls in the store to match the numbers on the map.
- Place painter’s tape underneath the tag sticker on fixtures for easy removal

- For tagging walls, place tag on the lowest face-out starting on the right side.
- For tagging fixtures, place tag in an easy to see/scan location on the frame of the fixture.
- Reference your numbered map, larger fixtures (5Gs, 8Gs, Ochos, and I-Wall/Monster Walls) may have more than one tag per fixture.
- For trouble racks, place the fixture tags on the empty baker’s racks that will be used.
- Once fixtures are tagged, the fixtures cannot be moved or remerchandised.
Follow up on Scanners training progress
- Store Manager is responsible for following up and ensuring all scanners have completed the Inventory Scanner Course by the end of this week.
Complete inventory control tasks prior to Physical Inventory
- Process all Damages.
- Complete all Reticket Cycle Counts.
- Receive all pending incoming shipment.
- Review and resolve all PO issues.
- Excluding RTVs – Follow up with the Inventory Coordinator on PO’s marked as RTV to check on the status.
Set the store to the visual merchandising standards.
- This is not a “perfect” set, but rather getting all teams, genders, and styles together for the inventory.
- Replenish for any needed teams.
- Do not overfill, arms should not be “bulging”.
- It is preferred that excess product is in the back room.
Verify supplies and IT equipment are ready.
- Ensure your store has the following on hand and ready:
- Handheld Devices.
- Make sure these are working and keep charging when not in use.
- 1X2 printer.
- Roll(s) of 1×2 labels.
- Post-Its.
- Highlighters.
- Walkie-Talkies/Phones.
- Salesman or Z-Racks.
- Baker’s Rack for troubleshooting.
- Handheld Devices.
- A PIE Kit will be provided containing:
- 6-8 Handheld Devices
- Charging cables
Contact your Inventory Coordinator with any questions throughout this process.
Setting up Scanning Equipment
- Ensure the Admin apps are accessible on each handheld device and that PIE is listed as an option.
- Charge all units before and during all breaks and at the end of day.
- Ensure the 1X2 label printer is functional.
Starting Inventory
Your Inventory Coordinator will Teams message the store once inventory has been initialized and scanning can begin.
- All inventory related tasks will be suspended during the inventory.
- ❌ No receiving unless directed.
- Write the date the shipment was delivered in Sharpie on the side of the box.
- ❌ No transfers unless directed.
- ❌ No cycle counts.
- ❌ No shrink review.
- Customer Orders will be set to the lowest level.
- In-Store Pickup will be turned off.
- ❌ No receiving unless directed.
- Once the inventory is started there can be:
- ❌ No re-merchandising.
- ❌ No moving of fixtures.
- ❌ No moving of product.
- ❌ No placing unscanned items on a fixture that has already been counted.

How to Scan Fixtures
🔗 Click here for the printable Scanning Walls & Fixtures Guide (Keep this guide with your map for reference during Scan Days)
- Walls
- Remove top level, (and 2nd level if there is room on rack) product to Salesman or Z-Rack.
- Approx. 3 adult face-outs.
- Leave at least 6 inches of space on the rack to slide as you count.
- Move all product to the left of the rack.
- Start scanning each item and slide to the right once complete with each item.
- Complete and replace back on wall according to the visual merchandising standard.
- Repeat with 2nd and 3rd levels and so on until complete with that section.
- Remove top level, (and 2nd level if there is room on rack) product to Salesman or Z-Rack.
- Hardlines (Pegged)
- Scan each item.
Do not scan the same item multiple times.
- Scan items left to right from top to bottom.
- Remove all items on the peg and flip them over.
- Scan each item, placing it back on the peg once scanned.
- This will put them back on the peg in the same order.
- Scan each item.
- Hardlines (Shelved)
- Scan each item.
- Do not scan the same item multiple times.
- Scan items left to right from top to bottom.
- One shelf at a time.
- Tag each shelf at the right and or bottom with post it once complete.
- Complete all sides 1 at a time.
- Scan each item.
- 4-Ways/2-Ways
- Start on the front face-out.
Compete all sides working left to right
Complete all items on top working front to back.
- Include all folded Tees, misc. Items, Mini H and Accessory topper.
- Tables/Folded
- Scan items left to right from front to back.
- Rounders
- Find the starting point at the smallest size ring indicator.
- Scan from left to right around the fixture.
- Complete all items on rounder bar.
- Complete all items on top working front to back.
- Displays
- Don’t forget to scan items on mannequins, displays, and t-shirt towers.
Scanning Process
1. Ensure the volume on the handheld device is turned up loud.
- This is important to hear the sounds for successful scans versus error scans.
2. Tap the “Item Matrix” shortcut on the handheld device.
3. Log in using the store Pass Phrase and your Muse User information.
4. Ensure there are no additional tabs open.
- If there are multiple pages open, close all other tabs before continuing.
5. Click on “PIE”.

6. Scan the fixture tag of the fixture that is going to be scanned in the “Fixture” box.

7. Scan each item on the fixture in the “Barcode” box.

- Do not scan the same item multiple times to add quantity for that size, scan each unit.
8. Once a barcode is scanned, the app will display information about the item.

- Note: Style number and barcode of last item scanned will be the last new item. If the style/size scanned was previously scanned then quantity will be added to the total quantity for that style/size but might not show as the last item scanned.
9. Once all items from the current fixture tag have been scanned, click “Change Fixture”.

- This must be done to complete the current fixture and start a new one.
- Click “Change Fixture” on your last fixture to complete it, even if you will not start a new one.
- Once a fixture has been completely scanned, mark through the fixture tag and on the map with a highlighter.

10. Repeat for each fixture.
🚨Troubleshooting🚨
- If an item does not have a barcode/label, or the barcode is unreadable.
- Inventory Leader is available to assist:
- Call the Inventory Leader to come re-ticket the item so that it can be scanned on the fixture.
- Inventory Leader is not available to assist:
- Write the style number and size on a 1×2 label and stick it to the item.
- If the style number is not known, then place on Trouble Rack without.
- Place the item on the Trouble Rack.
- The trouble rack should be close to the scanner, not at the cash wrap.
- Write the style number and size on a 1×2 label and stick it to the item.
- Inventory Leader is available to assist:
- If the “Reprint Ticket and Try Again” error message appears:
- Inventory Leader is available to assist:
- Call them to come re-ticket the item so that it can be scanned on the fixture.
- Inventory Leader is not available to assist:
- Write “Reprint” on the 1X2 label and place it on the Trouble Rack.
- The trouble rack should be close to the scanner, not at the cash wrap.
- Write “Reprint” on the 1X2 label and place it on the Trouble Rack.
- Inventory Leader is available to assist:
- If the “Set on Trouble Rack (OPS Will Send Email Direction)” error message appears.
- Call the Inventory Leader to assist:
- Contact your Inventory Coordinator providing the error message received, style number & size, as well as the UPC scanned and the Inventory Coordinator will provide direction.
- If it cannot be resolved in the moment, Write “OPS – UPC Error” on the blank 1X2 label and place on the trouble rack.
- Follow up at the end of the day if you have not heard back.
- Call the Inventory Leader to assist:
- If a scanner is interrupted in the middle of a fixture:
- Use a Post-It to mark where the scanner left off.
- This will avoid rescans or duplicate scans.
- Use a Post-It to mark where the scanner left off.
- If an item was accidentally scanned or the wrong item shows up:
- Click the red “X”.

- This will remove (1) unit from the scan total.
- This can be clicked multiple times to remove multiple units.
- The app will keep track of the last (10) items that were scanned.
- If the app gets refreshed or a button is accidentally clicked:
- Navigate back to the PIE app and log in.
- The app will ask to enter the fixture number and no previous scan data will show.
- This information has not been lost, continue scanning where you left off.
- Do not rescan items that were previously scanned.
- If a scanner accidentally starts scanning another fixture without changing the fixture number:
- Once recognized, contact the Inventory Leader.
- Scanner – Change the fixture to the correct one, even if items have already been scanned.
- Inventory Leader – Notate the combined fixture numbers on the map so other Inventory Leaders will know why it may not be accurately represented in reports.
- Combined fixtures are not eligible for audits.
- If the store receives a Transfer from another store during the scanning of the inventory:
- Contact your Inventory Coordinator with the tracking number to verify if the transfer has been received.
- Once received, open the transfer.
- If the sections for the product have ALREADY been scanned, then scan these new items into the inventory and then place in their section.
- If the sections for the product have NOT been scanned, then place in their section and scan when that section comes up.
- If the store needs to receive a PO during the scanning of the inventory:
- THIS MUST BE APPROVED BY OPS.
- If the sections for the product have ALREADY been scanned, then scan these new items into the inventory and then place in their section.
- If the sections for the product have NOT been scanned, then place in their section and scan when that section comes up.
- If there is a customer return during the scanning of the inventory:
- If the sections for the product have ALREADY been scanned, then scan these new items into the inventory and then place in their section.
- If the sections for the product have NOT been scanned, then place in their section and scan when that section comes up.
📄Bulk Items – Complete on Day 1
This task can be delegated by the Inventory Leader.
- Locate the email from your Inventory Coordinator with the shared Bulk Items List report.
- Openthe spreadsheet in your Microsoft 365 portal.
- If you are having trouble opening the spreadsheet, message your Inventory Coordinator via Teams.
- Print the spreadsheet.
- Set the scaling to ‘Fit All Columns on One Page‘.
- Use Narrow Margins.
- For each item, locate all units of the style and get a physical count.
- Record the count in the “Physical On Hand” column.
- Input the physical counts from the printed document to the shared Excel spreadsheet.
- Once all counts have been entered, save the shared Excel spreadsheet.
- Respond to your Inventory Coordinator via email or Teams letting them know the Bulk Items report has been completed.
📋Inventory Leader Tasks
The Inventory Leader is the most senior leader present in the store at that time. This person is responsible for ensuring that the inventory is being completed according to this company process.
- Print the “Daily Inventory Leader Checklist”.
- Print double-sided.
- Fill this out on each scan day.
- Hourly audits need to be recorded on this checklist.
- Keep this completed checklist with the inventory map for District Manager review.
- A completed scanned/photo copy needs to be emailed to the Inventory Coordinator each night before closing.
- Oversee the inventory process.
- Assign scanners a range of fixtures to scan.
- Follow up with the scanners frequently to ensure they are on task, moving at an acceptable pace, and following all the scanning directions.
- Ensure scanned fixtures are being highlighted on the map.
- Perform at least (2) audits per hour.
- Run the Inventory Fixtures report.
- Pick a fixture that has been scanned today.
- Physically count the units on that fixture.
- Compare physical count to the units listed on the report.
- If the count is off by +/- 3% or more, then remove the fixture and have a different scanner scan the fixture again.
- Use the Remove Fixtures Report found on the Admin site in the Reports Menu under Inventory Management.
- If the count is the same or falls within +/- 3%, then the fixture does not need to be recounted.
- If the count is off by +/- 3% or more, then remove the fixture and have a different scanner scan the fixture again.
- Record the audits on the Daily Inventory Leader Checklist.
- Use the Inventory Fixtures report to determine if fixtures have been missed.
Check throughout the day.
- Re-ticket any items from the scanners so the item can be inventoried on the fixture.
- Resolve the Trouble Rack items throughout the day.
These items will be scanned on the trouble rack fixture tag during the last hour of the day.
Once scanned, the items can be placed back in their original locations on the scanned fixtures.
Do this after scanning has been completed for the day.
- Confirm scanning devices are being charged on breaks and overnight.
- Work with IT and your Inventory Coordinator directly with any and all inventory issues.
📈Reports and Tools
All reports can be found on the Admin site in the Reports menu under Inventory Management.
- Remove Fixtures:
- This tool should only be used if a fixture failed an audit, with a variance +/-3%, and needs to be recounted.
- Find the fixture that needs to be recounted and click “Remove”.
- Inventory Fixtures:
- This report will show all the fixtures that have been scanned or are being scanned.
- The Inventory Leader will use this report to perform audits on fixtures as well as ensure all fixtures are being scanned.
- Use this report to complete 2 fixture audits per hour and record on the daily inventory checklist.
- Inventory Store Progress:
- This report will show the percent completed of the entire inventory.
- It is based on the total units that were on hand at the start of the inventory versus how many units have been scanned so far.
- Inventory Fixture Progress:
- This report will show the 2+ days for inventory and the total fixtures that are assigned to be completed for each day.
- It will show the percent completed of those fixtures for each day.
- The goal is to be 100% complete for each day.
- If this is not 100% complete, then pull the Inventory Fixtures report to determine what fixtures were not scanned.
- If any fixtures were combined, the percentage will not be 100%.
- Use this report to monitor pace.
- Items Not Scanned:
- This report will show all the items that are currently on hand in NetSuite but have not been scanned during the inventory process.
- Use this to ensure all items get scanned.
- Potential Variance:
- This report will show what the variance will be if the inventory was completed right now.
- Use this report to help identify potential issues that could be corrected before the inventory is completed.
- PIE Employee Report
- This report will list the count of fixtures, styles, units, hours and units/hour by employee as well as the Avg Units/Hour between all scanners.
- Use this report to track employee progress and follow up with any scanners with less than 300 units per hour.
⭐ Review Day
Review Day Report
- The District Manager and Store Manager will use the day following scanning to complete the Review Day Report.
- The morning of review day, the Inventory Coordinator will share the Review Day report, a spreadsheet of styles to review and provide physical counts for.
- Open the shared spreadsheet in your Microsoft 365 portal.
- If you are having trouble opening the spreadsheet, message your Inventory Coordinator via Teams.
- Print the spreadsheet.
- Select Landscape Orientation.
- Set the scaling to ‘Fit All Columns on One Page‘.
- Use Narrow Margins.
- Locate the items requested and record the physical count in the Physical Count column.
- The report will provide the item requested, fixture number(s) that the item was scanned on, the on hand amount before inventory, and the quantity that was scanned during inventory.
- Input the physical counts from the printed document to the shared Excel spreadsheet.
- The physical count will be input in Column L.
- Once all counts have been entered, save the shared Excel spreadsheet.
- Respond to your Inventory Coordinator via email or Teams letting them know the Review Day report has been completed.
- This will need to be completed before the Inventory Completion Checklist.
Pack IT Inventory Kit
- Return all PIE Kit devices and accessories to the Kit.
- Check the asset tag on each device to ensure all handhelds listed on the PIE Kit Handheld packing sticker are accounted for.
- If any devices are missing or broken, notify your Inventory Coordinator ASAP.
- If the next inventory location is in the same market, the DM will be responsible for moving the PIE kit between stores.
- If the next inventory location is out of market, your Inventory Coordinator will provide a shipping label to use.
- The Kit should be shipped out as soon as a label is provided to ensure it arrives to the next location on time.
Inventory Completion Checklist
- Print and fill out the Inventory Completion Checklist to confirm the following:
- All fixtures have been scanned and marked as complete on the map.
- Use the Inventory Fixture Progress Report (Admin) to identify missing fixtures.
- Physical audit counts were completed by the Inventory Leader hourly and any failed fixtures were removed and rescanned.
- The Bulk Item Report was completed and your Inventory Coordinator was notified.
- All Trouble Rack items have been resolved and scanned on the Trouble Rack fixtures.
- Contact your Inventory Coordinator for assistance with any unresolved items.
- Daily Inventory Leader Checklists were completed for each scan day and submitted to your Inventory Coordinator.
- The Review Day Report was completed and your Inventory Coordinator was notified.
- The IT PIE Kit was packed and all devices were accounted for.
- Any missing or damaged units need to be reported to your Inventory Coordinator ASAP.
- The Inventory Store Progress Report was reviewed and is accurate.
- All fixtures have been scanned and marked as complete on the map.
- If the District Manager is onsite:
- The District Manager will review the Inventory Completion Checklist with the Store Manager to determine if the store’s inventory can be submitted for completion.
- The District Manager will communicate to the Inventory Coordinator when the inventory can be closed.
- If the District Manager is not onsite, email the completed checklist with SM signoff to your District Manager and Inventory Coordinator requesting your District Manager signoff.
- The District Manager will review the Inventory Completion Checklist to determine if the store’s inventory can be submitted for completion.
- The District Manager will need to signoff on the Inventory Completion Checklist and communicate to the Inventory Coordinator when the inventory can be closed.
- The DM and SM are responsible for ensuring the PIE Reports have been reviewed and inventory is accurately represented before submitting the Inventory Completion Checklist.
😎 Finish Inventory
Wrong Team Report
- Your Inventory Coordinator will share the Wrong Team Report spreadsheet with you after inventory has been closed.
- Open the shared spreadsheet in your Microsoft 365 portal.
- If you are having trouble opening the spreadsheet, message your Inventory Coordinator via Teams.
- Open the shared spreadsheet in your Microsoft 365 portal.
- This report will show items that were scanned during inventory for a team the store does not carry.
- The purpose of this report is to ensure those items are tagged correctly.
- Print the spreadsheet.
- Select Landscape Orientation.
- Set the scaling to ‘Fit All Columns on One Page‘.
- Use Narrow Margins.
- Locate these items and determine if the item is indeed that team or an incorrect barcode.
- The Wrong Team Report spreadsheet will show what fixture the item was scanned on.
- Use Item Matrix on the handheld and scan each item on the fixture to find what barcode caused the incorrect scan.
- Write the correct style number of the item in the Actual Style Number column.
- Re-tag the item if needed.
- Input the numbers from the printed report to the shared Excel Spreadsheet.
- If the style number on the report is correct and the item listed is physically in your store, enter “Correct” in the Actual Style Number column.
- Once complete, save the shared Excel spreadsheet.
- Respond to the Inventory Coordinator via email or Teams letting them know the Wrong Team Report has been completed.
Variance Cycle Counts
- Cycle counts will be issued to the store for items that were on hand at the start of inventory but not scanned during inventory.
- These will be available in the afternoon, around 1pm, on the day the inventory was finalized.
- Variance Cycle Counts need to be completed before any other type of cycle counts.
Clean Up
- Inventory Stickers need to be removed from fixtures, walls, shelves, etc.
- If you will need supplemental hours to get the store back to visual standards, work with your Field Leader for this request.
Pick Exception Plan and Shrink
- Once the Physical Inventory is completed stores will return to the previous process of having the MOD create any Pick Exceptions from Customer Orders.
- If the store’s SHRINK is +/- 3% then the store is required to activate the High Shrink Store Action Plan.
📞 Contact your Inventory Coordinator with any questions throughout this process.