
SITOO
Standard Operating Procedure & FAQ
Flags and Click Home buttons are clickable to make it easy to navigate the page


INTRODUCTION
THE PLAY:
The Sitoo Playbook serves as the standard for how stores execute all point of sale activity. It provides clear direction on how to move through the full transaction lifecycle, from logging in and capturing customer information to completing sales, processing payments, and handling returns, exchanges, and exceptions. This playbook also outlines the daily operational routines that support register accuracy, including deposits, return review, and documentation practices.
In addition to standard transaction flow, this playbook addresses the real scenarios teams encounter at the register, such as items that will not scan, incorrect tagging, discount overrides, and special payment situations. It is designed to give Team Members and Store Leadership the tools and clarity needed to make the right decisions in the moment while staying aligned with company standards. When used consistently, this playbook creates a repeatable and reliable approach to executing in Sitoo across all stores.
IMPACT:
Consistent execution in Sitoo directly impacts the accuracy of sales, inventory, and financial reporting across the business. Every transaction completed correctly ensures that inventory levels remain accurate, pricing is applied as intended, and reporting in NetSuite reflects the true performance of the store. Strong adherence to these processes reduces errors, limits the need for corrections, and minimizes follow-up from Operations, Finance, and Loss Prevention.
Beyond operational accuracy, execution at the register plays a key role in the overall customer experience. Clear, confident transactions build trust, reduce friction, and create a more efficient checkout process. Proper handling of returns, discounts, and payment scenarios also helps prevent confusion and ensures consistency from store to store.
At a broader level, disciplined execution supports accountability across all locations. It allows Field Leaders and HQ to quickly identify trends, address issues, and support stores effectively. When every store follows the same standards, it creates alignment, improves efficiency, and strengthens the overall performance of the business.
When done well:
- Transactions are completed accurately the first time with minimal errors.
- Inventory and financial reporting remain clean and reliable.
- Team Members execute with confidence and consistency.
- Customers experience a smooth, efficient checkout process.
- Stores reduce follow-up and corrections from Operations and Finance.
ON FIELD TERMINOLOGY
- Sitoo: Point of Sale system used to complete all in-store transactions.
- Customer Capture: Collecting and attaching customer information, such as email, to a transaction.
- XT: Used when an item cannot be scanned or located, allowing details to be sent to Operations.
- Endless Aisle: Process of ordering product from company-wide inventory when it is not available in-store.
- Burrito: Daily envelope system used to store return slips and register documentation.
- EODR (End of Day Reports): Daily register documentation including receipts and supporting paperwork.
- Hand Ticket: A transaction completed without collecting payment, requiring a Hand Ticket Survey in NetSuite.
- Split Tender: Using multiple payment methods in a single transaction.
TRANSACTION BASICS
THE PLAY:
Transaction Basics is your foundation for working in Sitoo. From logging in and completing a sale to handling tax exempt transactions, XT scans, and incorrectly tagged items, this section outlines the core actions Team Members take at the register every day.
IMPACT:
Strong execution at the register drives a smooth Guest experience and protects the business from inventory inaccuracies, pricing errors, and operational issues. Following these processes ensures consistency across stores, supports accurate reporting, and reduces the need for follow-up from Operations.
GAME PLAN
Login Sitoo
1. Each employee is given a confidential Sitoo PIN.
- These PINs are for the employee’s eyes only and are not to be shared with other employees or managers.
- Using another employee’s PIN to login, including to verify returns or price adjustments, is strictly prohibited.
2. To confidentially send an employee their PIN.
- Log into NetSuite.
- In the NetSuite search bar type “E: ” followed by the employee’s name.
- Click on the employee’s name to open their profile.
- At the top of the profile, click “Sitoo Credentials”.
- An email will be sent to the employee’s email that is shown in the profile.
- If they are a new employee and their PIN is not working, wait a day or contact IT.
- New employees are imported into Sitoo on a schedule and are not always immediately available to ring Guests.
3. Logging in
- Enter your confidential six-digit Sitoo PIN.
Completing a Sale
First, add the customer! Before scanning the items, ask the guest “What is a good email for you today?”
- If the guest provides an e-mail:
- Select “Add Customer” on the right at the top of the cart.
- Type in the customer’s e-mail and click “Search” – (if the keyboard display is in the way, click any blank space).
- If there is no record for the customer, it will display “No existing customer found”.
- Click “Add Customer” and say to the guest “it looks like you aren’t in our system yet, what’s your name so I can add you?”
- Enter the customer’s name and click “Create” – The profile page will appear – When creating a NEW customer, “Accepts Email” is defaulted to green since they provided their email
- Leave this as is unless the guest volunteers that they want to be opted out of marketing
- Click “Close”
- The guest will receive a welcome e-mail with a coupon and be directed to finish their profile to receive birthday coupons
- If the guest does NOT provide an e-mail, continue with the transaction
Ringing up the items:
1. Scan the item(s) into the system
- If an item information page displays before adding to the cart, then you are in search mode.
- Hit “Cancel” on the item page to exit search.
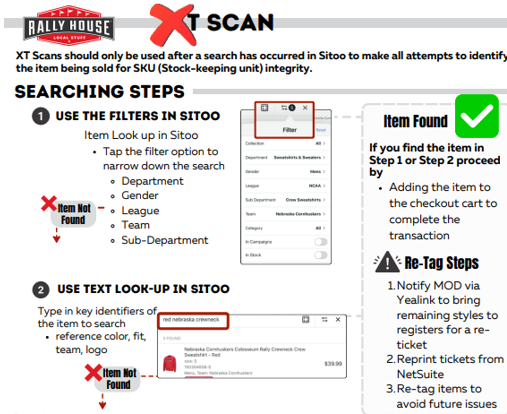
2. If the barcode will not scan, use the search bar to search by style number, barcode, or keywords
- If you cannot find the item, print a new barcode for the item from NetSuite to scan
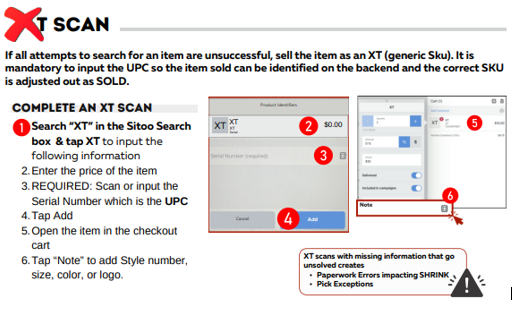
- If that still does not work, select XT from the main product page on the left, adjust the amount before adding and scan the barcode into “Notes”
- This information will be sent to Operations so you do not need to create a case
3. If you need to modify the quantity, price, or discount of an item, click on the item in the cart for an information window where you can make modifications
- Manual discounts and price overrides will require a reason code and a two PIN verification and the cashier logged in will need to enter their PIN first
4. To remove an item from the cart, swipe left on the item and click “Delete”
5. To cancel the transaction, select the Trash Can icon
Accepting Payment:
When everything has been rung up, click “Pay” and select the payment type, then select “Commit”.
Cards – “Adyen”/Card
1. For Card transactions, we accept Tap to Pay (preferred), Apple Pay, Android Pay, Chip, Debit, and Swipe Cards.
2. When the amount populates on the card terminal have the customer tap, insert, or swipe their card.
3. It may ask for a PIN if they have a debit card or a chip and PIN card.
- If the customer does not know their PIN, try Tap to Pay instead, or Apple/Google Pay.
- If a PIN is still required, they will need to contact their bank or find another form of payment.
4. Manual card entry is not allowed, they can add their card to a mobile wallet if they do not have a physical card.
5. Prepaid Visa/MC/Amex/Discover gift cards are ran as Card.
- Not all prepaid gift cards will be accepted by Adyen, especially “Vanilla” branded cards.
- If they do not go through, they customer will need another form of payment.
Cash
1. Select Cash and enter the amount the guest hands you.
2. Change due to the customer will populate.
- Always leave the tender the customer gives you on top of the register until you have handed them the change, so that you can verify the tender they gave you if they have any concerns.
Gift Card
1. Remove the foil from the barcode, select into the Card Number box, and scan the barcode.
- If that does not work, enter the PIN ONLY.
- Use CAPS and confirm letters vs numbers are entered correctly (e.g. zeroes vs the letter O).
2. For e-gift card codes, in the Card Number box, enter ONLY the code, using CAPS and confirm letters vs numbers.
Hand Ticket
- Used in rare instances, which can be found in the “Gift Card Dos and Don’ts” document.
- Do not accept prepaid gift cards as hand tickets.
Split Tender
1. Use the following recommended order to determine which payment method to choose first
- Gift Card
- Cash
- Card
2. Enter the first tender type into the system.
3. If a card is being used in a split tender payment, click the pencil icon prior to selecting Adyen to change the amount to the amount the customer wishes to pay with the card.
- If not done, the card will be charged the full remaining amount.
4. Enter the second tender type into the system to complete the transaction with split tender payment.
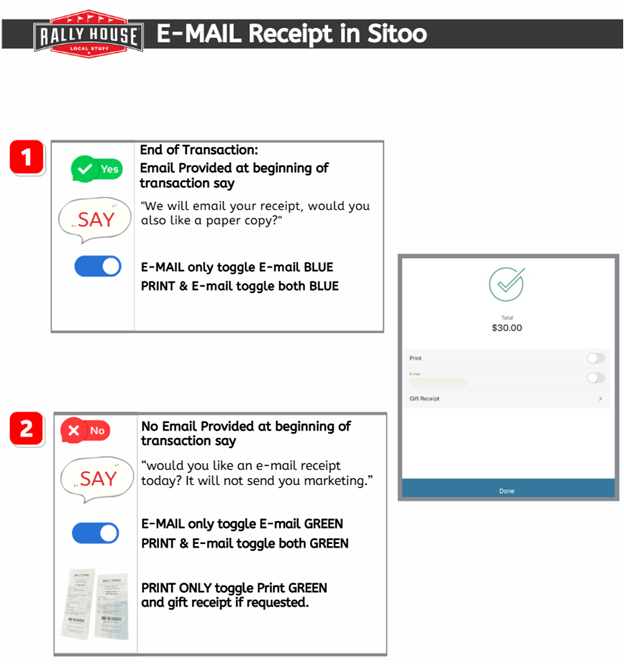
Finalizing the transaction:
1. Once payment is accepted, the receipt page will load.
2. If the guest provided an e-mail at the beginning, e-mail receipt should be defaulted to GREEN.
- Do not automatically print a receipt.
- Say to the guest “Is email receipt okay or would you like a printed receipt or a gift receipt as well?”.
- If they would like a printed receipt, keep the email receipt toggled to GREEN unless they ask for no emailed receipt, and also toggle “Print” to GREEN.
- If they would like a gift receipt, keep the email receipt toggled to GREEN and select “Gift Receipt”.
- Ask which items should go on the gift receipt.
3. If the guest did not provide an e-mail at the beginning, say to the guest “Would you like a gift receipt today? I can also send you an email receipt if you would like, and it won’t sign you up for our marketing campaigns.”
- If the guest says yes to email, enter their e-mail into the E-mail field and toggle E-mail to GREEN.
- If the guest says no, print the guest a paper receipt.
- If the guest would like a gift receipt, tap “Gift Receipt.
- Ask which items should go on the gift receipt.
4. Click “Print” and then “Done”
Tax Exempt Transaction
This applies to eligible tax exempt customer who can provide proof if tax exempt status
1. The guest must present tax documentation at the time of checkout as the cashier will need to make a copy of the paperwork using the store’s scanner.
2. To complete a Tax Exempt Transaction, a customer profile needs to be added and the e-mail used should be associated with the organization of the tax exempt certificate.
3. Once all items are scanned, swipe left on the tax line item to remove tax.
4. Click “Deactivate”.
5. This will strike through the tax line item to visibly show that the tax has been.
6. Scan the tax exempt certificate on the store’s scanner.
7. After a copy is made, give the certificate back to the guest and finish the transaction.
8. Navigate to NetSuite ERP.
9. Under Shortcuts, select “Tax Exempt Form” and fill out the information.
10. Upload the copy of the certificate into the Tax Exempt Form under “Files”.
11. Click “Save”.
XT Scans
Selling an Item Tagged Incorrectly
There are times when an item inadvertently gets tagged with the wrong label or has been switched.
This issue causes inventory inaccuracies, negative on hands, extreme price discrepancies and more.
Please follow the steps below to combat these issues.
1. An item rings up at the register with the incorrect style number.
- Use the Item Matrix, Text Search, or NetSuite to identify the correct item.
- Print a new label for the item.
- Ring the correct item and void the incorrect item on the transaction.
- Explain to the customer what happened and what was done to correct the sale.
- If the customer expects to pay the lower amount for the item, then override the
price of the correctly entered item to the selling price for the incorrect item. - Complete the sale.
- After the sale reprint labels for all units remaining with the incorrect label.
- Retag all units.
- Request Cycle Counts to correct inventory.
2. An item rings up at the wrong price.
- Use the Item Matrix, Text Search, or NetSuite to identify the correct price.
- Explain to the customer what happened and what was done to correct the sale.
- If the customer expects to pay the lower amount for the item, then override the price of the correctly entered item to the selling price for the incorrect item.
- Complete the sale.
- After the sale reprint labels for all units remaining with the incorrect price.
- Retag all units.
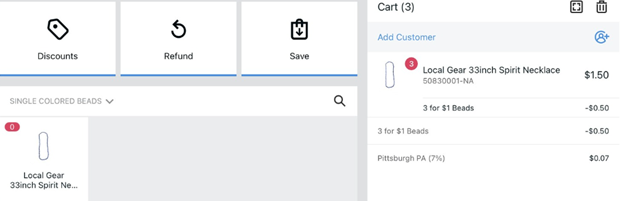
Selling Single Strands of Colored Beads
1. Tap All Products.
2. Tap Single Colored Beads.

3. Tap the correct color from the item options.
- Add the correct quantity of the color to the cart.
4. When purchased in an interval of 3, Rally deal will auto apply.
- 3 beads for $1 is the Rally Deal.

LEADERSHIP EXECUTION
THE PLAY:
Leadership Execution focuses on the daily actions that keep the store running smoothly and accurately. From opening and closing the register to completing deposits, managing EODR and “burritos,” reviewing returns, and processing paid outs, these routines ensure consistency, accountability, and operational control each day.
IMPACT:
Consistent execution of these daily processes protects the business, supports accurate financial reporting, and ensures issues are identified and addressed quickly. Strong routines reduce errors, improve visibility for Field Leaders and HQ, and keep store operations running efficiently.
GAME PLAN
Opening and Closing the Register
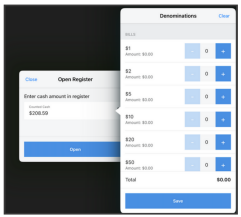
Opening the register
1. In the morning, when logging into the register for the first time, on each POS click Open Register.
2. If the register does NOT have a cash drawer:
- Enter “0” into the field labeled “Enter cash amount in register”.
- Click “Open”.
3. If the register DOES have a cash drawer.
- The cash drawer should already be open, use a key to open if it is locked.
- Press the home button on the iPad and open Sitoo.
- Select Open Register.
- In the cash counted field, select the cash button.
- Enter the amounts as you count the cash and coin in the drawer.
- Click Save.
- Click Open.
Closing Hour Notes:
- Never count cash in from of Guests.
- Know that no one from Corporate or Law Enforcement will ever call you to tell you that the store is under investigation and ask you to take the cash and buy gift cards at a local pharmacy.
- IMPORTANT: Corporate will NEVER call or text you asking you to buy Gift Cards at a local pharmacy or otherwise.
Closing the Register – NO Cash Drawer
1. Go the the menu and select Close Register.
2. Enter “0” in the Counted Cash field.
3. Select Close Register.
Closing the Register – WITH Cash Drawer
1. Go to the menu and select Close Register.
2. Select Open Cash Drawer on the bottom left.
3. In the Counted Cash field, select the Cash Button.
- Enter the amounts as you count the cash and coin in the drawer.
IMPORTANT: Expected Cash should match counted cash, otherwise there is a discrepency that will show as the difference.
- If there is a difference, recount the drawer before finalizing.
- If the difference remains, enter the over/short reason, if known.
- Select the Reason Code and add a Reason Comment.

4. In the Remaining Cash field enter the approved till amount, e.g. $350.
5. The “Withdrawl to Bank” field will populate how much you need to count for the deposit.
- This amount of all registers “Withdrawl to Bank” will be your total deposit for the day.
6. Select Close Register.
7. Continue to the next register until they are all closed.
Deposits
Deposit Entry in the ERP
1. Complete the closing procedure on each register in the POS.
2. Login to the NetSuite ERP.
3. Click on the “Deposit Entry” link under the “Banking” portlet on the NetSuite Dashboard.
4. This will prompt the “Deposit Entry” form.
5. Enter the Date of the deposit entry.
6. Select the Type of deposit from the “Deposit Type” drop down menu.
- Choose “Closing Deposit” to complete the deposit for the end of the night.
- Choose “Midday Deposit” to complete the deposit when a “Cash Pickup” is performed during the day
- All Midday Deposits should be completed in separate entries.
- All Midday Deposits should be $1500 or greater.
- If the register prompts to complete a “Cash Pickup” override the request until the cash amount is $1500 or more.
7. Enter the Deposit Bag Number under the Deposit Bag Information.
8. Enter the amount of the deposit (what you are actually sending to the bank) in the “Enter the amount you are depositing in the bank” box.
9. Hit the “Tab” key.
10. Enter the Actual Till Count Receipt Information for each register.
- This will be the information that prints when you complete the till count.
- Complete this for all registers.
- Register #1 Amount
- Register #1 Actual
- Complete this for all registers.
11. Enter the Tender Loan Amount
- This is the amount on the POS Sales Audit in the “Tender Control Transactions” section.
12. If the “NetSuite Expected Deposit” does not match the “Remaining Expected Cash” this will cause a “NetSuite Over/Short”.
- This will be represented under the “NetSuite Over/Short”.
- This will result in Over/Short follow up
- See the Over/Short Review and follow up instructions.
13. Click “Save”
14. The deposit has now been saved.
15. Over/Short Follow Up portion does not need to be filled out on the initial Deposit Entry form.
Submit Daily Deposit Receipt
1. MOD will gather the deposit and create a change order, if needed.
2. The associate will take the deposit and change order to the bank.
- Notes: Minors cannot drive for work tasks. Therefore the associate who takes the deposit and change order to the bank cannot be a minor.
- Team member must have a passed MVR (Motor Vehicle Registration) check to drive to the bank. Check for car symbol in Legion 🚗
3. The associate will complete the deposit drop/change order and obtain a bank receipt from the teller before returning to the store.
4. Finalize the register process and scan the bank receipt into the NetSuite ERP “Submit Daily Deposit Receipt” form.
- Login to the NetSuite ERP and click on the “Submit Daily Deposit Receipt” form.
- Enter Store Location.
- Sales Date is the date of business the deposit is from.
- Deposit Receipt Date is the date the bank processed the deposit and gave a receipt.
- Amount is the actual amount from the deposit receipt.
5. Use the scanner to obtain a digital copy of the deposit receipt.
6. Save the digital copy of the deposit receipt in the Company Share Drive.
7. To upload the picture of the deposit slip receipt to the NetSuite form
- Hover the mouse over the under the Attach File dialog box
- Click on the “+” symbol
- Attach From = “Computer”
- Click into the File Name dialog box
- Enter the File Name as the “Three-digit store number”.”Month”.”Day”.”Year”
8. Under Folder: Click on then click on list
- Type “Store Files” in the search box
- Click “Search”
- Use the Store Files drop down menu to find the page that contains your store number.
- Choose “Your Store: Deposit Receipt Scan” from the list.
9. Click on “Choose File” and select the image from the Company Share Deposit Receipt Scan folder
- Click on the arrow next to the yellow folder icon in the top menu bar.
- Click on the arrow next to “This PC” and select the Company Share Drive from “This PC” drop down menu.
- From the Company Share Drive, click on “STORE FOLDERS”.
- Click on the “Deposit Receipt Scan” Folder.
- Choose the sales date of the receipt being uploaded
- Click “Save”.
10. Click “Save” and complete the Daily Deposit Receipt Form
Store Deposit Completed Last Night
1. Login to the NetSuite ERP
2. Use the store dashboard reminders portlet to view whether or not both the nightly deposit and the deposit receipt upload has been completed.
3. If the “Stores-Store Deposit Completed Last Night” is showing a green line and a “1” next to it, in the reminders portlet, that means the nightly deposit was completed correctly in NetSuite at closing.
4. If the “Stores-Store Deposit Completed Last Night” is showing a red line and a “0” next to it, in the reminders portlet, that means the nightly deposit was not completed in NetSuite at closing.
- This would require action to complete this task and the color will change to green and show a “1”.
Daily Deposit Receipt Completed Today
1. Use the store dashboard reminders portlet to view whether or not both the nightly deposit and the deposit receipt upload has been completed.
2. If the “Stores-Daily Deposit Receipt Completed Today” is showing a green line and a “1” next to it, in the reminders portlet, that means the previous day’s deposit receipt was uploaded into the “Submit Daily Deposit Receipt” form in NetSuite.
3. If the “Stores-Daily Deposit Receipt Completed Today” is showing a red line and a “0” next to it, in the reminders portlet, that means the “Submit Daily Deposit Receipt” form was not completed in NetSuite for the previous day’s deposit.
- This would require action to complete this task and the color will change to green and show a “1”.
Over/Short Review and Follow Up
1. Click on the “Stores-Over/Short” link in the “Reminders” portlet on the dashboard.
- The report will be highlighted in red if there are over/shorts that require attention.
- This will prompt the “Stores-Over/Short” report.
2. Click “Edit” for each over/short.
- This will prompt the “Deposit Entry” page.
3. Confirm the deposited amount is correct in the “Enter The Amount You Are Depositing In The Bank” box under the “Deposit Bag Information” section of the form.
4. Confirm the till counts are accurate in the “Actual Till Counts Receipts” section of the form.
5. Confirm the “Tender Loan Amount” is correct in the “Tender Loan Amount” section of the form.
6. The “Calculated Deposit Information” section will display all deposit information.
7. Check the checkboxes for each of the steps taken to resolve the over/short in the “Over/Short Follow Up” section of the form.
- This is only required when an over/short has been created and is not needed when completing the end of the night deposit.
8. Enter the reason for the over/short in the “Over/Short Reason” box.
9. Enter any follow up notes in the “Store Notes” box.
- This will be used to respond when the District Manager or Corporate has entered a question in the “DM/Corporate Notes” section.
- These notes will be on the report as well as on the form in the “DM/Corporate Information” section of the form.
10. Enter each of the cashiers that rang for the day in the “Cashier Information” section of the form.
- There are 10 boxes for staff members.
- If the store had more than 10 cashiers for the day, then add those to the “Store Notes” box.
- Enter the associate full name and the box will allow a selection from a drop-down menu.
11. Change the “Assigned To:” box in the “DM/Corporate Information” section of the form to “District Manager” once all information has been filled out.
- This will remove the over/short from the report on the dashboard.
12. Click “Save”.
Chase ATM Process
Important: You can only deposit bills in the ATM, no coins.
Follow this process to make a deposit to a Chase ATM:
1. MOD will gather the cash deposit (bills only) & fill out the manual Rally House deposit slip.
2. The associate will take the deposit to the Chase ATM:
- Notes: Minors cannot drive for work tasks. Therefore the associate who takes the deposit and change order to the bank cannot be a minor. Team member must have a passed MVR (Motor Vehicle Registration) check to drive to the bank. Check for car symbol in Legion 🚗
- If you have ANY issues with the ATM machine, please work with the bank staff immediately to resolve the issues.
- Insert the ATM card and enter the PIN.
- Use the PIN number 9750.
- Select “Make a Deposit”.
- Select “Insert Cash”.
- Insert the cash into the ATM.
- Deposit the number of bills that comfortably fit in the machine (no coins).
- If the cash stack is too high, please split the deposit into two separate deposits.
- Deposit the number of bills that comfortably fit in the machine (no coins).
- Verify the cash total and select “Complete Deposit”.
- A deposit confirmationwill be displayed.
- Select “Exit” to complete the deposit.
- Select “Print Receipt”.
- Insert the cash into the ATM.
- The receipt will list the quantity of each denomination deposited.
- If you have ANY issues with the ATM machine, please work with the bank staff immediately to resolve the issues.
Change Orders:
If you need a change order, follow this process:
1. When the bank is open, you can exchange $100 or less at the counter at Chase bank.
2. Present the ATM card to demonstrate account ownership and complete the change order.
- Note – Some banks may require a specific account number.
- If so, the account is: Chase Bank, 794 466 979, under the name Rally House of Texas Inc, 9750 Quivira Rd, Lenexa, KS, 66215-1668.
3. Obtain a bank receipt from the teller before returning to the store.
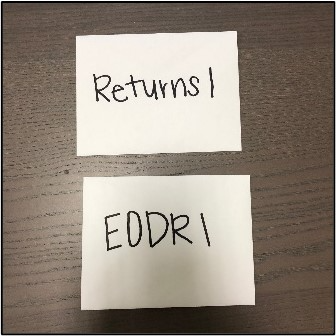
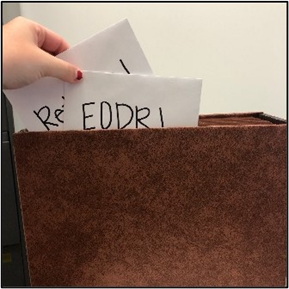
EODR and “Burritos”
Each store will keep their nightly envelopes in a 31 day file folder.
- Each tab of the file folder marks a day of the month.
- Tab 1 is day 1 of the month.
- Each tab should have two envelopes with the corresponding days number written on each envelope. (Example: The 1stof the month will be 1, the 2ndday of the month will be 2, and so on). Each envelope will also be labeled with one of the following subjects:
- Returns
- EODR
- Example: In tab 1 (Day 1), the two envelopes will read Returns 1 and EODR 1 for the first day of the month.
- As customer make returns throughout the day, the receipts are placed in the Returns envelope.
- If the receipts envelope gets too large an additional envelope can be used and should be labeled “Additional Returns” with the days number on it.
- Items in the EODR envelope would be Till Receipts, Paid In/Paid Out receipts, hand ticket receipts, and any other items that the manager on duty believes they need to keep.
- At closing, the sales audit should be printed and used to fill out the Deposit Entry on NetSuite. The sales audit is to be kept in the days tab with the envelopes.
- Rally Rewards and Credit card receipts do not need to be kept and can be torn in half and thrown away once inputted into the system.
- If the store’s chip reader is not set up, the credit card receipts will need to be kept until there is a function chip card reader for the store.
- At the end of the day the envelopes are placed into their days tab in the file folder.
The envelopes stay in the file folder until the next month on the same day.
- When the same day of the next month arrives, the envelopes are reused for that day. Any receipts, misc. items, and sales audits can be torn in half and discarded.
- Example: On the first of August file the Returns 1 and EODR 1 envelopes in tab 1 of the file folder. On September 1st, pull the two envelopes and the sales audit that are from August 1stand discard these items. Reuse the Returns 1 and EODR 1 envelopes for September 1st.
- Before discarding the return receipts, ensure that all return reviews have been completed on the NetSuite dashboard.
- Reviews that are highlighted in red require additional input as these are follow up questions from Corporate.
- Envelopes are to be used until they are worn, and need replaced.

Penny Shortage Process
The U.S. Mint has stopped the production of Pennies, and these will be retired from circulation over time. Due to this, supply is being impacted, and banks are no longer providing bulk penny orders.
This will impact the daily deposit process for all stores. Please follow the Penny Shortage Deposit Process starting 11/12/2025.
To safeguard against penny shortages, please follow the steps below:
1. Encourage card or exact cash payments whenever possible. Recommend payment using debit/ credit forms of payment, or when paying with cash, encourage exact change whenever possible.
- Print the 🔗Penny Shortage Signage and place at each register.
2. Do not include coins in deposits. This helps prevent change shortages and reduces the need for future change orders.
3. We encourage team members to bring extra pennies from home and exchange them for larger currency.
Penny Shortage Deposit Process (Effective Immediately ALL Stores)
Closing Once your deposit total has populated, follow these steps:
1. Take your opening float and end-of-day total.
2. Subtract the opening float from your end-of-day total to get the deposit amount.
3. If the deposit includes coin, remove the coin from the deposit and leave it in the drawer.
4. Your drawer will close at the opening amount plus any remaining change.
Example:
$444.44 (ending total) – $350 (opening float) = $94.44
Remove $0.44 from the deposit and leave it in the drawer
Deposit = $94.00 | Drawer closes at $350.44 as the float.
Opening:
1. Carefully count the drawer. Your opening total may fluctuate from the standard $350 because coins are no longer deposited.
2. If your drawer goes over $350 in whole dollars, remove and deposit the extra bills to bring it back to $350 (or your current float amount).
Example:
If you close at $351.56, remove and deposit $1 to bring the drawer to $350.56.
Important Reporting Note: It is essential that your closing drawer total match in NetSuite and your opening bank.
Example:
- Closing amount in Sitoo $350.42
- Enter closing bank in NetSuite as $350.42
- Opening Sitoo should be $350.42
Out of Pennies Process – Only Progress if the store has no pennies!
If your store is fully out of pennies, and are unable to get any from the bank, store teams will need to:
- Complete the “Out of Pennies” form in Zipline
- Print and place the 🔗Quick Guide at all registers
- Walk each MOD and Cashier through the manual round down process
Manual Round Down Process
- Manually round down the total transaction amount to the nearest $.05 — see below for a rounding chart.
- The quick guide outlines this as well.
- Note that there is not a systematic rounding that will occur, this will need to be self-calculated only in the case that you are fully out of pennies.
Transaction Total Ending Cents | Round Down to Amount |
.01 – .04 | 0.00 |
.06 – .09 | 0.05 |
Examples:
Transaction total is $32.43, you would round down to a new cash total of $32.40
Transaction total is $32.48, you would round down to a new cash total of $32.45
Please continually seek pennies from the bank when you do your deposits/ change orders, as they may build up a supply over time.
Daily Manager Return Review
Daily Manager Return Review
Each morning, managers will review yesterday’s returns:
1. Pull the return slips from yesterday’s “burrito”
2. Open the NetSuite Search: Stores-Sitoo Return Review Yesterday
3. Review transactions for any anomalies or concerns
- For instance, large cash returns, sales reps with more than their fair share of returns, fake customers, etc.
5. Confirm each return has a matching signed return slip
6. If any return seem suspicious, review the transaction by finding the corresponding return slip and clicking on the store receipt number to open the credit memo
6. Fill out the items under Transaction Review if the transaction was reviewed
7. If cameras are reviewed, confirm that a customer was present, and another associate entered their PIN
Drop Ship Items
1. On occasion, customers will return drop ship items that do not have a typical place in the store (cornhole, etc)
2. Returns of drop ship items will be in BLUE
3. Make sure the store has receipt of the item and find the best placement in the store for re-sell – If you cannot find the item, check cameras to make sure the return was valid
All rows highlighted in Yellow have no customer capture and are therefore required to be reviewed and confirmed in NetSuite
1. Find the corresponding return slip from the burrito
2. Click the receipt # to open the credit memo in a new tab
3. On the credit memo, check off the following items under “Transaction Review,” as appropriate:
- Store Reviewed
- Return Receipt Filled Out Properly
- the customer signed the receipt and added their name & contact info
- Coached/Reviewed with Cashier
- the return slip was not filled out properly and was addressed with associate, this may need to be returned to later
- If certain associates have a higher proportion of returns without customer capture, they likely also need coaching
- SPECO reviewed for this transaction
- If cameras were reviewed
4. Add notes if applicable (required for camera reviews)
5. If this transaction was sent to store management for review by Ops, then “Attach picture of receipts” will also be required – only the return slip is required
All rows IN RED are transactions where the associate selected “Gift Card” as a refund method.
1. These transactions will fail when they hit NetSuite and the gift card will have no value until addressed by customer service, which can take days and keeps them from addressing other time-sensitive customers matters
2. This is a legacy NetSuite issue and will be resolved later this fall when we replace NetSuite gift cards with GiveX
3. Yes, we can “refund to gift card” for gift receipts, however the instructions are to SELL a new gift card in the same transaction
Paid Outs on Sitoo POS
When completing an eligible paid out for cash purchases, such as emergency supplies, follow these steps in Sitoo and in NetSuite.
1. Tap the hamburger menu in the top left corner
2. Select “Cash In/Out”
3. For a Paid Out, select “Withdrawal”
4. Enter the amount of the paid out
5. Select the reason for the paid out from the drop-down menu of reason codes
6. If the reason code states to add a note, use the note field
7. Select “OK”
8. A petty cash deposit receipt will print out once completed
9. Place this receipt in the EODR envelope for the day
10. Complete the Paid In/Paid Out Form in NetSuite
To return money to the drawer, such as change from a Paid Out, follow the steps above, except choose “Deposit” instead of “Withdrawal.
CUSTOMER CAPTURE
THE PLAY:
Customer Capture focuses on collecting accurate Guest information during each transaction. Capturing email and profile details at the register ensures Guests are properly connected to Rally Rewards, receipts, and future communications.
IMPACT:
Accurate Customer Capture drives loyalty engagement, improves marketing effectiveness, and supports better visibility into Guest behavior. Consistent execution ensures Guests receive their rewards, coupons, and receipts while helping the business build stronger, long-term relationships.
GAME PLAN
Customer Capture Steps
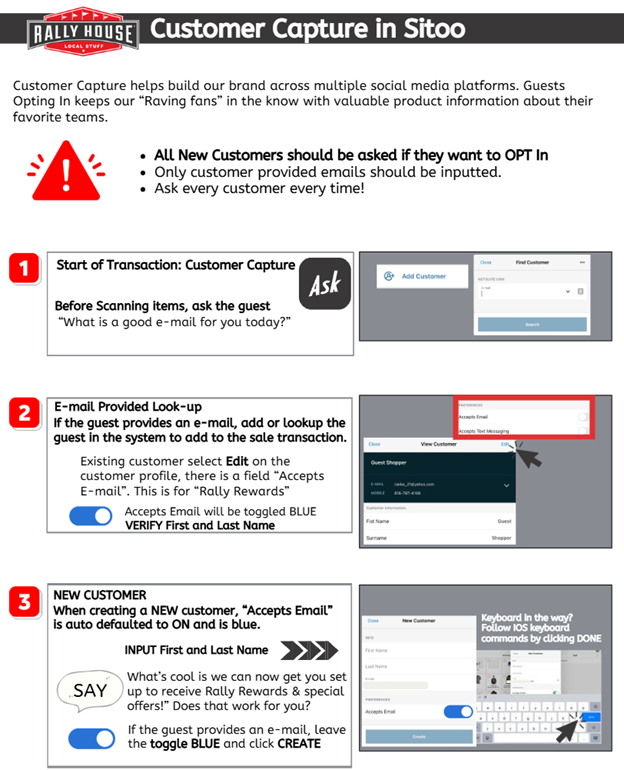
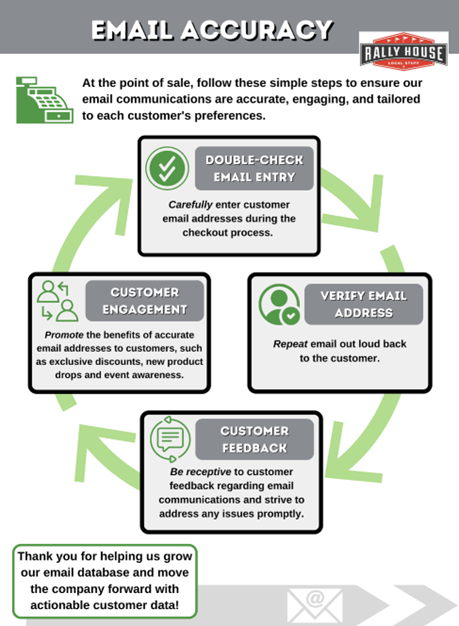
Email Receipt
Email Accuracy
ENDLESS AISLES
THE PLAY:
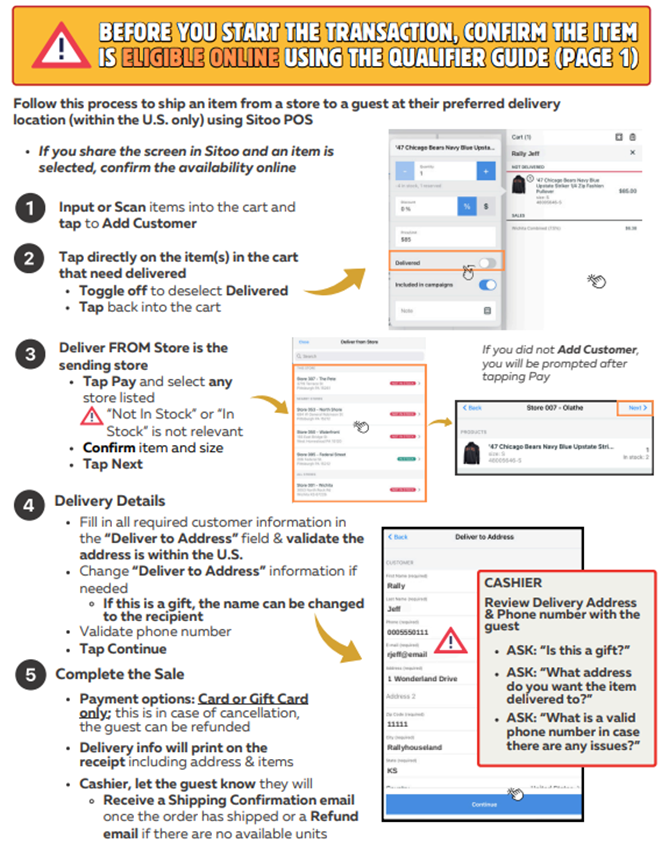
Endless Aisles allows Team Members to complete orders for Guests in-store by accessing inventory across the company. When an item is not available in the store, this process ensures the Guest can still purchase the product and have it shipped directly to them.
IMPACT:
Endless Aisles helps capture sales that would otherwise be lost due to out-of-stock product. It improves the Guest experience by providing solutions in the moment and ensures the initiating store receives credit for the sale.
GAME PLAN
Endless Aisles Overview
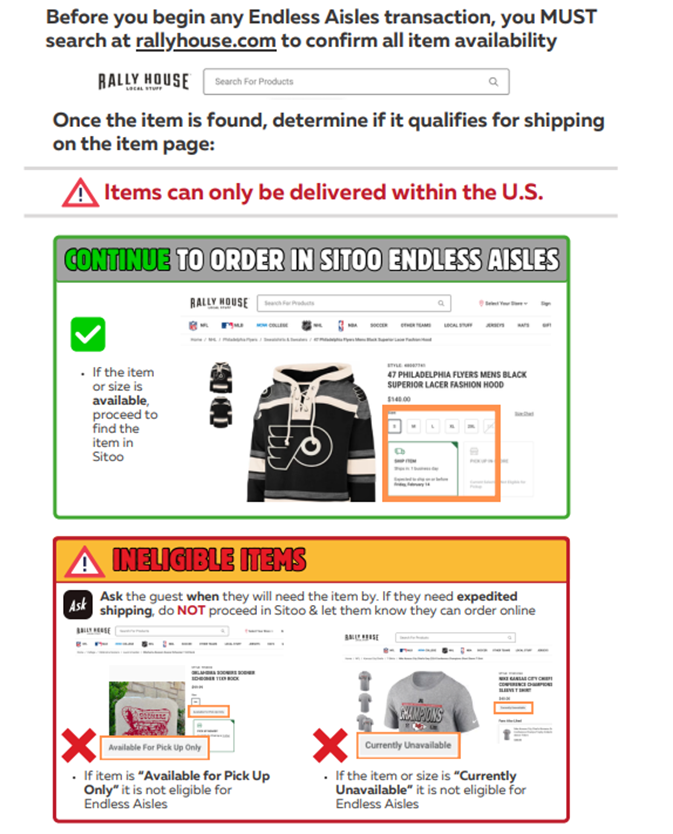
Endless Aisle is the process of being able to complete any online order or select an item from a different location in Sitoo for the guest while they are in-store. The transaction is completed in-store with standard shipping covered, and the initiating store gets the revenue.
- Sitoo Process: Inventory availability “in-stock” and “out-of-stock” when selecting a store is irrelevant at this time. The system will search all company inventory to fulfill the order
- If Online shows “currently unavailable” on a desired item, DO NOT proceed to Sitoo to complete the Endless Aisle order.
Item Matrix can still be used on the sales floor for quick inventory look-up, especially when a guest comes in with an item pulled up from the website, however the inventory levels in Item Matrix does NOT determine if you proceed to Sitoo. If the Rally House Website shows the item as available the order can be placed in Sitoo.
Endless Aisles Process
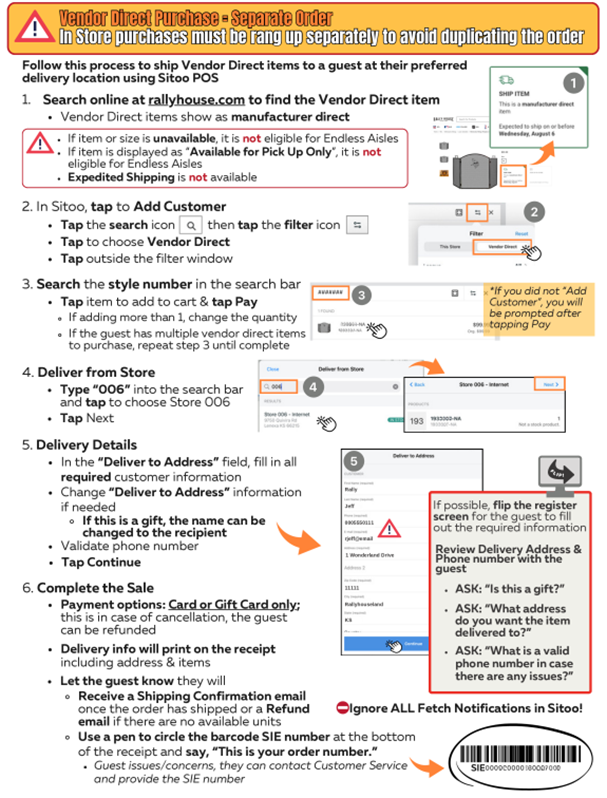
Vendor Direct Process
GIFT CARDS
THE PLAY:
Gift Cards cover how to sell, redeem, check balances, and issue in-store credit within Sitoo. This process ensures Gift Cards are handled accurately at the register while supporting a smooth Guest experience.
IMPACT:
Accurate Gift Card handling protects the business from balance issues, reduces Guest friction, and ensures transactions are processed correctly the first time. Consistency in this process also prevents delays for Customer Support and follow-up from Operations.
GAME PLAN
Sell a Gift Card:
1. Grab a new Gift Card.
2. In the Sitoo POS main product page, tap the Gift Card icon in the upper left.
3. Enter the amount of the gift card to be activated and tap Done.
4. Click into the card number box and scan the barcode.
5. Tap Done. If the keyboard is in the way, click a blank space first.
Redeem a Gift Card:
1. On the payment method screen, tap Gift Card.
2. Click into the card number box and scan the gift card.
3. Tap OK.
If the GiveX card number does not work when scanned or entered:
- First, try entering the PIN (case sensitive, all CAPS). Scratch off to see the PIN on the back of the card.
- If that does not work, enter the first 9 digits.
- If that still does not work, contact Customer Support.
- If the gift card does not have the GiveX logo on the back of the card in the top right corner, and you are having issues, contact your MOD for support.
Check Gift Card Balance:
1. In Sitoo, go to menu and select Gift Card Balance.
2. Click into the card number box and scan the gift card.
3. Tap OK.
- If this does not work or if there is no balance, you can double check the balance online at: www.rallyhouse.com/gift-cards
Check Balance Troubleshooting:
1. Scan the Gift Card.
2. Enter PIN, all CAPS.
3. Enter first 9 digits.
Issuing “In Store Credit” or “Refunding” to a Gift Card:
1. Rally House policy states that in store credit is only offered when the return is for:
- A gift AND the customer has a gift receipt, OR
- The receipt shows the original transaction was paid for with a gift card.
2. If the above applies, follow one of the options below:
- Ask if they plan to make a purchase today. If so, keep the merchandise at the cash wrap and have them shop around first so you can complete an exchange instead.
- If they are not making a purchase, return the merchandise by scanning the items and swiping left on them in the cart to refund/return.
- Cashiers are NO longer required to sell a gift card to issue a refund to a gift card.
- Scan the GiveX Gift Card for the refund.
- Use the Gift Card number.
- no Pin scratch off required, unless troubleshooting to scan in the card.
Issuing “In Store Credit” or “Refunding” to a Gift Card:
1. If the customer does not have a receipt, look to see if they saved the transaction with their customer profile:
- Go to the cart and tap Add Customer
- Type in the customer’s email
- In the Customer Information pop-up, select Previous Transactions and find the transaction that matches the refund
2. If the transaction cannot be found and they do not have an online receipt emailed to them, they can exchange the merchandise for new product or keep the product.
Returning a Gift Card:
1. Gift card purchases cannot be returned.
2. If the customer would like to escalate the issue, give them the number to Customer Service:
- 1-800-381-9177
RETURNS AND EXCHANGES
THE PLAY:
Returns and Exchanges outlines how to process returns, complete exchanges, and review transactions in Sitoo. This includes handling receipts, identifying issues, and ensuring each return is completed accurately and documented properly.
IMPACT:
Accurate return and exchange execution protects the business from loss, prevents fraud, and ensures inventory and financial data remain correct. Consistent review and documentation also support visibility for Field Leaders and HQ while improving accountability at the store level.
GAME PLAN
Refund and Exchange Policy
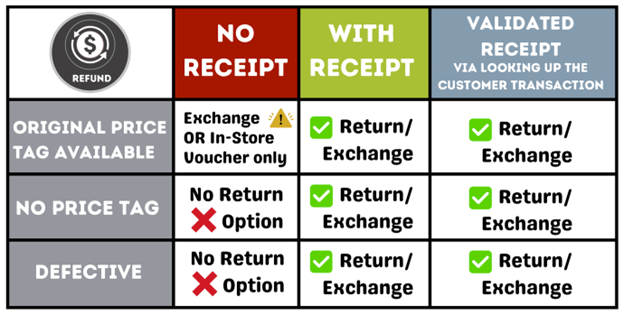
Rally House gladly refunds purchases accompanied by a receipt that are unworn, unwashed, odorless, and undamaged merchandise purchased in our retail stores for full refund within 120 days of original purchase date. Refunds will be made in the form of the original payment.
For purchases without a receipt, items must be in unworn, unwashed, odorless, undamaged and have the original box/packaging and tags. Purchases without a receipt are eligible for exchange only at the lowest selling price. Customers will need to provide a valid government-issued photo ID when returning an item(s) without a receipt.
Food may be returned within 120 days of purchase if unopened, not expired, and accompanied by a receipt. If the food is defective for any reason, it may be returned.
Opened face masks are not eligible for return or exchange. Customized Jerseys are not eligible for return or exchange. Gift cards are not eligible for return or exchange.
Customer’s name, e-mail, and zip code will be needed for all refunds and exchanges. A manager will approve all returns.
Please Note: We are unable to accept returns on select customized, NIL, or manufacture direct items.
Online Order Return
ALL Online Returns, whether the guest is in-store or not, should be processed through Sitoo.
Only if the Sitoo process is unsuccessful should one proceed to the NetSuite process.
Must be processed same day received
1. Begin in Netsuite, click here: Online Order Lookup
- Enter Customer Order number in the box
- Hit Tab
2. Return in NetSuite
- On the order search, click the transaction listed under:
- Invoice/Cash Sale to Create Return
- Click Refund or Credit
- Select:
- Online Return Reason
- How did the customer return this item
- Select Yes/No for Gift Return
- If yes is selected please provide customers email or contact info
- Scroll down:
- Delete any items not being returned
- Change the QTY of the return items if different from original order
- Click OK and Save

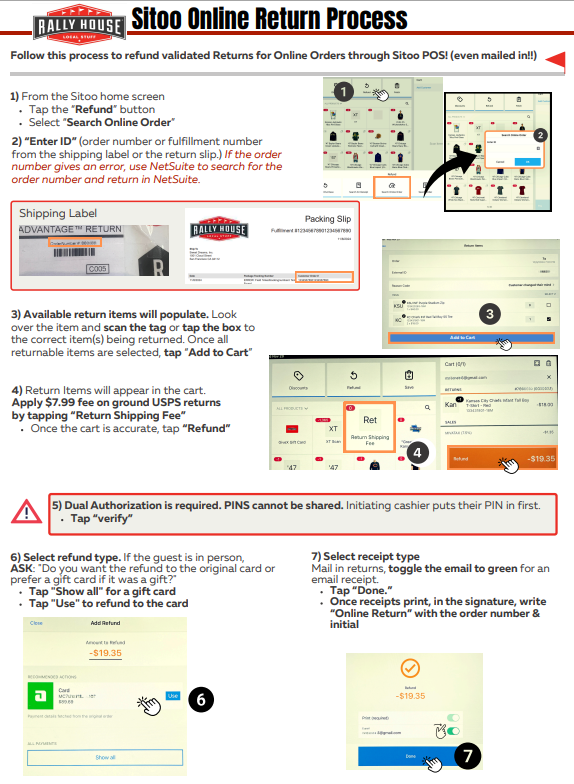
Online Return Process
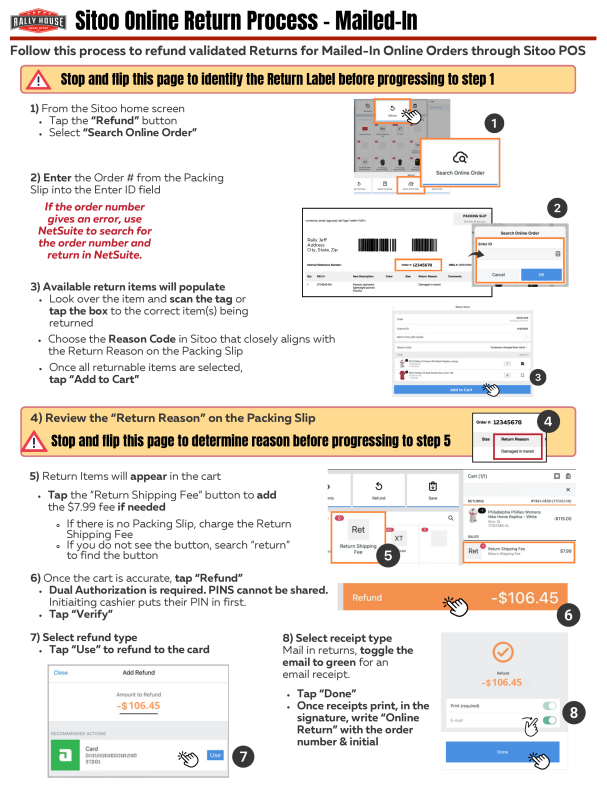
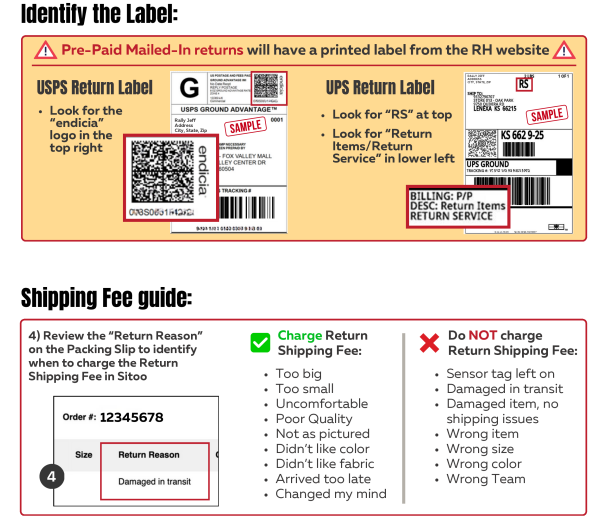
Online Return Process – Mailed In
Online Return – Customer Not Present
Unknown Refund Process – NetSuite
There may be times when a customer mails in a return without a Sales Order number. In this case follow the steps below.
1. Item is delivered without a Packing Slip or a Sales Order number on the Shipping label.
- Double Check the Shipping Label.
2. Click on the “Unknown Customer Order Return Form” link in the Shortcuts.
3. Enter all the information on the form:
- Customer first and last name.
- Can be found on the Shipping Label.
- Customer Address.
- Image of the product.
- Image of the Shipping Label.
- Style number of the item being returned.
- If more than one item, then enter those in the box below the style number.
2. Click “Save”.
- This will provide Customer Service with the necessary information to find the Sales Order.
3. Once the return has been reported, the item(s) can be placed on the sales floor.
- Transfer if it is a team that is not carried by the store.
No Receipt In-Store Voucher


DISCOUNTS
THE PLAY:
Discounts outlines how to apply promotions, Rally Rewards, and manual overrides in Sitoo. This includes ensuring discounts are applied correctly while maintaining control over pricing accuracy and approval processes.
IMPACT:
Proper discount execution protects margin, ensures Guests receive the correct offers, and prevents pricing inconsistencies. Following the correct process also supports visibility for Operations and reduces the need for follow-up on overrides.
GAME PLAN
Rally Rewards Overview
How to Sign-up
Customers can sign up on the website or in-store
- Signing Up In Store: Customer can request assistance from store associate to sign up
- NOTE: Providing an email for a receipt in store does not automatically sign up the customer for Rally Rewards – they must specifically request to be signed up for program
- Signing Up Online: Customer can enter their email into the Rally Rewards field at bottom of any page on the Rally House website
Once the customer enters their email, the website will automatically load the Email Preference Center and subscribe them to the program
General Perks
Customers can sign up on the website or in-store
- Signing Up In Store: Customer can request assistance from store associate to sign up
- NOTE: Providing an email for a receipt in store does not automatically sign up the customer for Rally Rewards – they must specifically request to be signed up for program
- Signing Up Online: Customer can enter their email into the Rally Rewards field at bottom of any page on the Rally House website
- Once the customer enters their email, the website will automatically load the Email Preference Center and subscribe them to the program.
WELCOME COUPON CODE
- When a customer signs up for Rally Rewards, they will receive a Welcome Coupon Code within two days of signing up
- Coupon code is valid for 30 days after customer receives it.
BIRTHDAY COUPON CODE
Customers will receive a Birthday Coupon Code on their birthday each year
- Birthday coupon code is valid for 30 days after customer receives it.
- To receive Birthday Coupon Code: Customer must sign up and enter birthday onto profile at least one week before their birthday
- Adding Birthday to Rally Rewards Profile:
- When customer receives email from Rally Rewards, they can click on the link at the bottom titled “Preference Center”
- Once in Preference Center, customer can enter their birthday in the required field
- Customers can also Log-in to their profile directly on the Rally House website and select “Email Preferences” from the account drop down menu
- If customer does not receive Birthday Coupon Code, they are encouraged to use the Contact Us form on the Rally House website for further assistance.
ANNIVERSARY COUPON CODE
- Customers will receive an Anniversary Coupon Code each year on the anniversary of their Rally Rewards sign-up date.
- Discount amount may vary based on the customer’s years of email subscription.
- Coupon code is valid for 30 days after customer receives it.
- Coupon can be redeemed either online using the code or in-store by scanning the barcode provided in the email.
Preferred Center
The Preference Center is where the customer can customize their Rally Rewards profile, including:
- Enter birthday for yearly coupon code
- Select their favorite teams for customized, team-specific messaging
- Preferred store location
- Email Preferences: Discounts & Deals, My Teams (news, collections, etc.), New Arrivals & Exclusive Products, Local Events (player signings, new store openings, giveaways, etc.)
Updating Rally Rewards Profile
- Customers can only update their Rally Rewards profile one way:
- Customers will click on the “Preference Center” link at the bottom of any Rally Rewards email they receive.
- This link will take them to the page where they can update their contact information, favorite teams, and email preferences
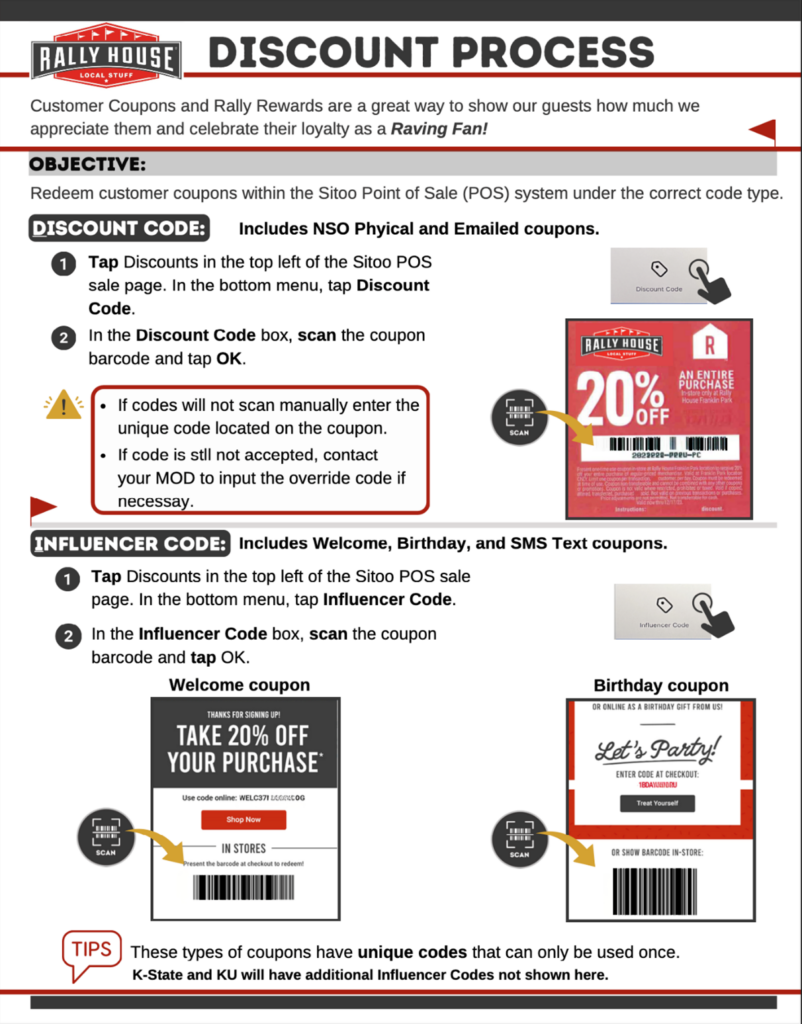
Discount Process
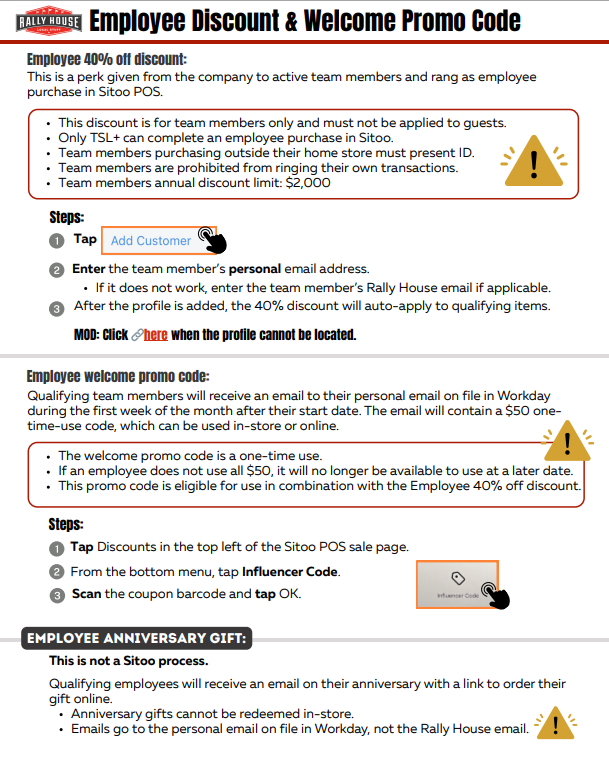
Employee Discount & Welcome Promo Code
Discount Override
Simon+ Loyalty Program Details
Simon+ is a free loyalty program available at Simon Malls and Premium Outlets. It offers guests cash back, points, and perks for shopping in-store and online. Members receive exclusive offers and discounts from participating retailers and can earn points on purchases made at Simon centers and on ShopSimon.com.
- Guests may present a Simon+ deal on their phone at checkout
- The coupon will specify the discount being redeemed
- Only one deal may be used at a time
- Each deal can only be used once
Exclusive Offer
- $10 off $50
- Code: simon10off50
- $10 off $100
- Code: simon10off100
- Ensure all cashiers are familiar with this process.
- Cashiers will be required to manually enter the unique code located on the coupon.
FUNCTIONS AND PROCESSES
THE PLAY:
Functions and Processes outlines key scenarios that require additional awareness and action at the register. From identifying counterfeit bills to completing hand ticket surveys and correcting items that ring incorrectly, these processes support accurate transactions and protect the business.
IMPACT:
Executing these processes correctly helps prevent financial loss, ensures accurate reporting, and maintains trust with Guests. Strong awareness and follow-through also reduce errors, limit risk, and support consistent operations across all stores.
GAME PLAN
Counterfeit Detection
Cash Handling Awareness
- All Cashiers are responsible for maintaining awareness of cash intake and bill validation during every transaction. This protects both you and the store from potential loss or counterfeit activity.
- Always verify $50 and $100 bills at the register before accepting them.
- Accuracy and awareness at the register build trust, protect our business, and ensure every guest experience runs smoothly.
Detection Methods
Feel the Paper – Raised Printing on the new $100 bill
- Move your finger up and down Benjamin Franklin’s shoulder on the left side of the note. It should feel rough to the touch, a result of the enhanced intaglio printing process used to create the image. Traditional raised printing can be felt throughout the $100 note, and gives genuine U.S. currency its distinctive texture
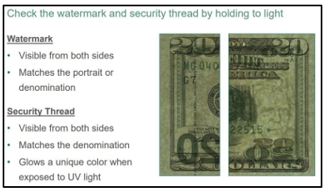
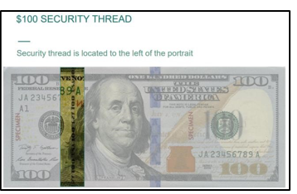
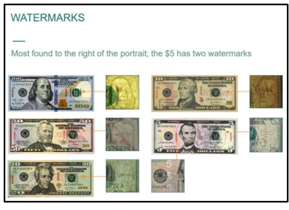
Tilt the Note
- The current style $100 includes two other security features you can check by tilting.
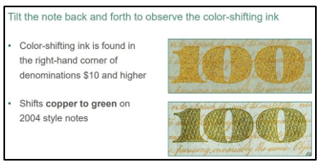
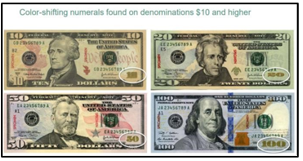
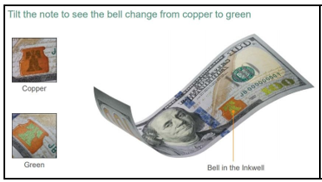
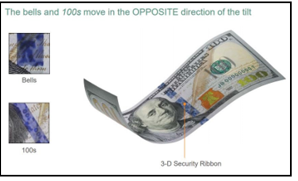
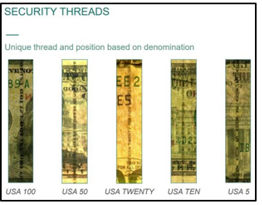
- Check watermark and security thread.
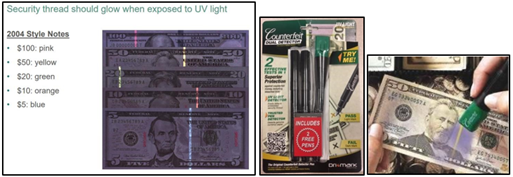
Check with UV Light must be used
- Use the Counterfeit Detection Pen with UV Light, which can be ordered from Amazon.
- These are used to determine if a bill has been bleached and reprinted with a higher denomination. When the UV light shines on the bill, it will reveal the hidden strip that shows what the original denomination was.
Electronic Counterfeit Detector (Select Store ONLY)
1. Once the device arrives (Ponnor AL-135) at the store, plug in at the register.
2. Ensure the feedback direction is set to “come back.”
- This will feed the money back to you, instead of out the other side of the machine.
3. Insert the bill through the feeder.
- The bill can be placed in any orientation; it does not need to be reoriented.
4. The screen will show a  if the bill is authentic.
- If the bill is not authentic, it will show a
 .
.

MOD, What to do if bill is suspected to be counterfeit?
If one or more of these come back as fake, it will be best to ask for another form of payment. Based off the Governmental Detection Guide it is not recommended to accept the money.
A member of management should be the one to ask for another form of payment if absolutely sure the bill/card is fake.
- We would never want to accuse or embarrass the customer.
- Act as though they must have mistakenly received a counterfeit bill and share that we are not able to accept it as a form of payment
- “I will have to ask for another form of payment as this bill is coming back as a possible counterfeit and I am not permitted to accept it”
- Remain professional and polite when discussing with the customer
- “I apologize for the inconvenience, but based off the U.S. Department of Treasuring Detection Guide, this bill/card is counterfeit and cannot be used as a tender”
- If the customer becomes rude or upset
- “I am terribly sorry for the inconvenience, but as a business we are not able to accept this bill”
- If you are not sure after politely evaluating the bill, do not refuse the payment or accuse the customer.
- Act as though they must have mistakenly received a counterfeit bill and share that we are not able to accept it as a form of payment
- Make sure to exhaust all testing in a casual manner and if you cannot determine authenticity, it is best to take the bill and further investigate once the customer is gone.
- If in fact you determine the bill is fake after the customer has left the store, contact your District Manager to review then possibly local law enforcement and share with them that you believe you have taken a counterfeit bill.
- Keep the bill separate from the other bills.
- Try not to handle the bill more than necessary.
- Document any additional information you have about the customer that presented it to you.
- Share camera footage if law enforcement asks for it.
- Submit an incident report if bill is determined to be counterfeit by law enforcement.
Steps if Bank Alerts to Counterfeit Bill in Deposit
1. Bank will alert that a counterfeit bill was taken in the deposit.
2. Bank will issue Rally House team member paperwork regarding counterfeit bill.
- If you are not given paperwork from the bank, ask the bank for documentation.
3. Upload your deposit receipt and paperwork for counterfeit bill to daily deposit entry for the deposit.
Hand Ticket Survey
Overview
The Hand Ticket tender is used as needed to complete a transaction at the register without collecting payment. This is used when a Gift Card will not scan or any special circumstance at the manager’s discretion, such as a receipt or an in-store voucher is not legible. Anytime hand ticket is selected as a payment method, a Hand Ticket Survey needs to be completed in NetSuite. Fill out all necessary information relevant to the transaction. This will allow the Finance team to reconcile the transaction correctly and avoid further communication with the store regarding errant transactions.
- When the hand ticket tender is selected, no payment will be collected, even if a card is scanned at the terminal. The transaction would need to be re-processed using the credit card tender, and a credit entered for the hand ticket transaction.
- Gift Card: Hand Ticket Surveys should include the actual gift card number, amount of card used, and any additional information. If the gift card information wasn’t saved at time of transaction, please complete a hand ticket survey stating that the information wasn’t collected/saved.
- If hand ticket is ever selected by accident, please complete the hand ticket survey and fill out the necessary information.
Survey Completion
1. Complete the transaction and reprint the original receipt.
- This will help fill out the survey.
2. Log into the NetSuite ERP.
3. Click on the “Hand Ticket Survey” link in the “Shortcuts” portlet on the dashboard.
- This will prompt the “Hand Ticket Survey” page.
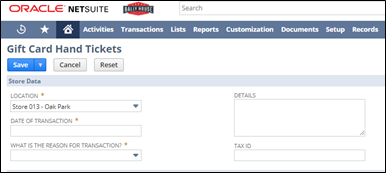
- Fill out the necessary fields (relevant to the transaction).
- Store Data:
- This section is used for each transaction where a “Hand Ticket” tender was used.
- The “Location” box will default to the user location.
- This should be the store where the transaction occurred.
- Enter the date the transaction occurred in the “Date of Transaction” box.
- Select the reason for the transaction from the “What is the reason for transaction?” drop down menu.
- Redeemed old Gift Card.
- Other.
- If this is selected, then the “Reason Other” box will need to be filled out with a detailed description of why a “Hand Ticket” was used.
- Other.
- Corporate Approved Donation (Must Provide Tax ID and details on the requesting company in the text box)
- Corporate Approved Marketing (Must provide details in the text box)
- Enter all details pertaining to the transaction within the “Details” dialogue box
- Enter the TAX ID for the company requesting donation
- Gift Card Data:
- This section is used when a Gift Card was involved.
- Enter the gift card number that was used in the “Gift Card #” box.
- Enter the total amount that was on the gift card prior to the transaction in the “Amount on old gift card” box.
- Enter the amount used from the old gift card in the “Amount to Clear” box.
- Select the appropriate answer in the “Did you assign a new gift card” drop down menu.
- Yes; the total cost was not more than the old gift card amount and a new gift card was issued for the remaining balance.
- Enter the amount issued on the new gift card in the “Amount of new gift card” box below.
- Yes; the total cost was not more than the old gift card amount and a new gift card was issued for the remaining balance.
- No; the total cost was greater than the old gift card and the remaining balance was paid in cash, credit card, or another functioning gift card.
- Corporate Data:
- Do not enter any information in this section.
- Click “Save”.
Wrong Item Ringing Up
There are times where an item will ring up at the POS as a different item. This is usually caused by a tagging or barcode issue. It is imperative that these issues are caught and corrected at the time of the sale. Use this Best Practice to outline how to correct the item.
1. Scan the item into the POS.
2. Use the Description and Price listed on the POS to confirm the item.
3. If this is not the correct item:
- Remove the item from the sale.
- Use Text Search or rallyhouse.com to find the correct item.
- Call for a manager if the item cannot be found.
- If the item cannot be found by the manager, then create an XT for the item.
- Ensure that Team, Gender, Brand, Size, Color, Graphic, Barcode, and Description of the item are entered into the XT box.
- If this is not done, then it will create inventory inaccuracies.
- Enter the correct item into the POS.
- Enter style number or UPC.
4. Once the transaction has been completed:
- Find all units of that item on the sales floor.
- Retag all units with a reprinted label from NetSuite.
- Request a Cycle Count for both the incorrect and correct items.
- Click the Request Cycle Count link in the Shortcuts on the Dashboard.
5. If there are any other issues with the item, then create a Support Case and assign the case to Buying.