MAINTENANCE
Standard Operating Procedure & FAQ
Flags and Click Home buttons are clickable to make it easy to navigate the page


INTRODUCTION
THE PLAY:
Maintenance issues happen; what matters is how quickly and clearly, we respond.
This playbook gives Team Members and Store Leadership a simple, consistent way to identify, prioritize, and report maintenance needs while knowing what can be handled in-store and what
needs additional support. From emergency situations to everyday repairs, the goal is to keep stores safe, operational, and ready for Guests always.
IMPACT:
When maintenance is handled the right way, it protects the business, the team, and the Guest experience.
Clear reporting and proper prioritization allow the Maintenance team to respond quickly and efficiently, preventing small issues from turning into larger, more costly problems. Strong execution also ensures stores remain safe, compliant, and fully operational — supporting sales, reducing risk, and keeping the focus on the Guest.
ON FIELD TERMINOLOGY
- Maintenance Case: A request submitted through NetSuite to report a facilities or maintenance issue and route it to the appropriate support team.
- Priority Levels:
- Immediate: Life safety issue, risk to people, or store cannot open, operate, or be secured.
- High: Issue impacts sales or Guest experience and needs quick attention.
- Medium: Issue needs repair but does not impact immediate operations.
- Emergency Situation: Any condition involving safety risk such as fire, flooding, electrical hazard, or environmental threat that requires contacting local authorities first.
- NetSuite Dashboard: The primary system used by stores to submit and track Maintenance Cases.
- Ecotrak: Facilities management platform used for work order visibility, tracking, and coordination with vendors.
- Asset: The specific area, fixture, or equipment in the store where the issue is occurring (example: ceiling, track lighting, thermostat).
- Support Case / Work Order: The record created after submitting a maintenance issue, used to track updates, communication, and resolution.
MAINTENANCE
GAME PLAN
Maintenance Overview
- Weekend Emergency Facilities Support (Facilities/Maintenance)
- DM calls facilities emergency phone number: 1-888-397-0150.
- When prompted, say “facility emergency”.
- Call will be forwarded to personal on call.
- Wait through the IT messaging.
- Prioritization for Stores (Maintenance)
- Immediate: Life/Safety Issue or Cannot Open, Operate or Secure the Store, Violation Notice.
- High: Issue can negatively impact your ability to drive sales.
- Medium: Issue or item that might need to be fixed but it’s not impacting your immediate sales and operations.
- Response Expectations from Maintenance Team
- Immediate: Review within 1 hour; Respond within 24 hours.
- High: Review within 1 business day: Respond within 5 business days.
- Medium: Review and determine response within 30 days.
- How Can a Store Help the Maintenance Team
- Provide a complete description of the issue in the request.
- Attach photos whenever possible or relevant.
- Close any Open requests where there is no longer an issue.
- If escalating the prioritization of a request, provide additional information.
- Keep as much communication in the Request record as possible.
- After hours support, submit a Request and contact your DM. They can determine if CPM needs to be engaged outside business hours.
- CPM team will publish up-to-date weekend support schedule of you will monitor cases and other communication.

Maintenance and Emergency Procedures
Policy Statement:
Sampler Stores recognizes that from time to time there may be unplanned occurrences which may require employees to take immediate action, solve problems, answer questions and/or do whatever is necessary to maintain the integrity of store operations. This policy defines the various types of incidents that may occur and to what extent each employee is empowered to take action. For insurance purposes and control, the following should be followed in the event of fire damage, smoke damage, wind damage, water damage, earthquake damage, break-in, theft or robbery (both employee and customer), bomb threats, and any and all other events that would disrupt the normal operations of the store.
General Emergency Procedure:
1. Notify applicable local authorities (fire, police, ambulance, etc.).
2. Notify the Store Manager and the Corporate Office immediately.
3. Employees must receive instructions from the Corporate Office before:
- Talking to any insurance adjuster.
- Discussing the occurrence with anyone outside of the company.
- Talking to anyone from the media.
- Accusing any person(s) of wrongdoing.
- Implying there has been a loss.
- Sharing any specifics of a loss should the loss be apparent.
Non-Emergency Prodedure:
1. To better track the various issues that crop up and are reported to us and to give stores a view into the status(es) of these issues’ stores should use the NetSuite Dashboard to Open a Support Case.
- Select “Maintenance” as the case type and select an appropriate Case Issue form the drop-down menu.
- Enter as much information about the maintenance issue as possible in the Message area.
- See Creating a Support Case Best Practice for the full procedure.
2. These Support Cases go to the Maintenance department at the Corporate Office, and they will decide the correct action to take to resolve the issue.
3. If the Maintenance department sends a service person to the store, this will be noted in the case. Open cases can be viewed on the stores NetSuite Dashboard. If a service person arrives unscheduled, the store manager should request that person hold from doing any maintenance; call Corporate; and verify that this service has been authorized.
Maintenance Support Case (Mobile NetSuite)
Clear and timely maintenance requests keep Rally House locations in proper working order and prevent small issues from becoming costly problems. It is the MOD’s responsibility to report issues promptly and accurately so support teams can assess priority and resolve them based off that priority. No issue is too small to report.
WHO Completes the Support Case
- MOD (Manager on Duty) completes the case as soon as the issue is noticed
- Emergency rule: If there is immediate danger (flooding, fire, electrical hazard, injury risk), call local authorities first. Then notify the Store Manager, District Manager, and Corporate immediately
WHAT: Define the tool or process.
- Submit a NetSuite “Maintenance Case” to report a facilities or maintenance issue at your store
- This case routes the issue to the correct support team/vendor based on Asset and Problem
BY WHEN: Timing expectations.
- Immediate: Emergency. Safety risk, flooding, major leak, electrical hazard, or risk of store closure. Call emergency services and company contacts first. Submit immediately
- High: Impacts sales or guest experience. Needs quick action to prevent escalation. Reviewed and actioned within 24–48 hours
- Medium: Needs repair but not urgent. Reviewed and actioned within 7 days
- Low: Minor issue with low impact. Reviewed and actioned within 30 days
HOW (PROCESS) Step-by-step breakdown.
1. Log into NetSuite on Zebra > click the hamburger in upper left corner
2. Select Records > scroll to Maintenance case and click
3. Primary section, Select Maintenance Case as the Form Type and provide the MOD(Store) information.
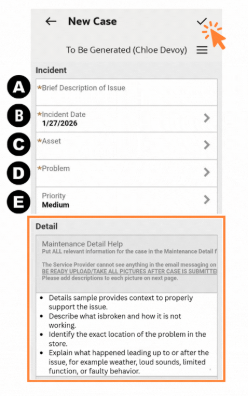
4. Incident section
- Brief Description of Issue: write 3–8 words (example: “Ceiling tile wet near backroom”)
- Incident Date: select the date you are submitting the case
- Asset: select the area/item (example: Ceiling)
- Problem: select the best match under that Asset
- If the exact option is not listed, select the closest match
- Priority: choose Immediate / High / Medium / Low using the priority guide
5. Detail Section should be reviewed in full. The details provided in this section will communicate and determine the best support to resolve the issue. See the Maintenance Detail section below for key information that should be included.
6. Select the Checkmark in upper right corner.
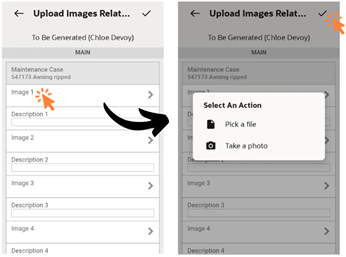
7. A new screen will prompt you to upload photos
- At least one photo is required and should clearly show the issue to help assess severity and next steps
- Upload only relevant photos that directly support the reported problem
- Tap Image 1 Choose File
- This will give the user the option for Pick a File or Take a Photo. Insert photo here
- Describe photo
- Select the Checkmark in upper right corner
The case is now open. All updates and communication regarding the reported issue will be tracked here
MUST KNOW / TIPS
- All maintenance and facilities support cases must be submitted through NetSuite
- Existing EcoTrak cases will remain in EcoTrak and will not be transferred
Ecotrak
ATTENTION: General Emergency Procedure do not change with Ecotrak. If there is an immediate situation that could endanger others like signs of fire or natural gas or other potential threats in the environment
1. Notify applicable local authorities (fire, police, ambulance, etc.).
2. Notify the Store Manager and the Corporate Office immediately.
Login Ecotrak
Ecotrack URL https://radstuff.ecotrak.com/ bookmark for future use
Store Credentials This is not a single user sign on system
- Username: store email address
- Password: RallyHouse2024!
Ecotrak FAQ
- What is the Ecotrak URL?
- Ecotrack URL https://radstuff.ecotrak.com/
- Which devices will have Eco Track
- Zebras will be the main device used to report issues
- Desktops may be used
- Who can submit a case in Ecotrak?
- An MOD can submit a workorder. If an existing order is open the system will ask if you want to open a duplicate
- What is happening to an existing NetSuite case?
- Existing cases in NetSuite that need resolution will not be transferred into Ecotrak. We are working to clean up older cases that are either resolved or are duplicate
- With Ecotrak can we input any topic as a work order?
- Stores will only be able to place workorders and select from the Facilities assets that have been entered into Ecotrak
- How can the store view previous work orders outside of alerts?
- Reference the One Pager, click How to Submit a Service Request
- Who has access to view open work orders?
- Users who are admins will be able to see any store’s dashboard. Currently, that is the Facilities team, the Construction team, DMs and RDs can see all their markets stores’ dashboards. Stores can only see their own work orders
- Can a case be opened in NetSuite for facilities like if I need help with EcoTrack
- No more cases in NS. We’ll designate an email address for stores to contact with issues with the platform
- Will work orders always be resolved?
- Not all cases will be resolved. There is a review process with the Facilities team that includes a few determining factors. Budget/time of year/how longer the lease is/etc. may impact the case getting resolved
- How do we contact for Login issues?
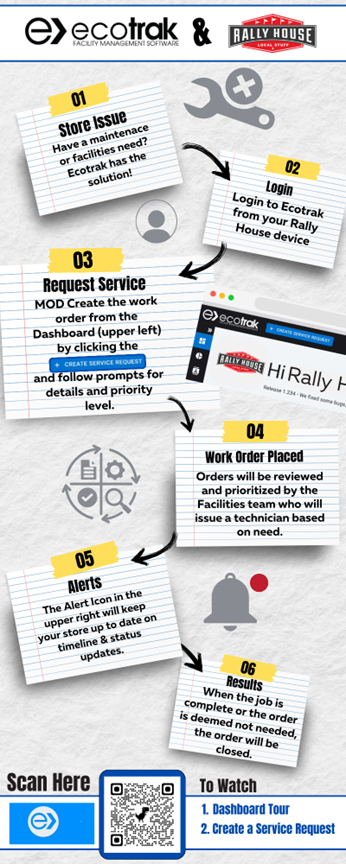
Look over this Infographic and at the bottom scan the QR Code to watch two videos
1. Dashboard Tour (2mins)
2. Create a Service Request (2 mins)
The QR will open onto a landing page “Ecotrak Training Videos” and the required videos are the first 2.
In-Store Lighting Maintenance
Quality and effective lighting is one of the most important components of your visual merchandising presentation standards. If a store is having issues with lights that are out and not working in your store, here is a quick evaluation to determine Best Practice on how to move forward to resolve.
Track Light Heads
- If the bulb is out, safely remove the bulb from the track head to determine the model number.
- If it’s a standard Par30 track head, you should always have a minimum of 5 lights in your backstock
- Replace the light in the track head and validate that the shining on the correct product.
- If you fall below 5 backstock lights of Par30 lights, then place an order request through Amazon.
- If it’s any other type of track head light, open a Maintenance Support Case for light bulbs with as much of the light’s model information as possible, a picture of the light bulb, and a quantity needed for future replacements.
- Replace the light in the track head and validate that the shining on the correct product.
- If it’s a standard Par30 track head, you should always have a minimum of 5 lights in your backstock
- If the issue is that you need more track heads to add additional lighting to the existing track available, open a Maintenance Support Case with the number of track heads and lights requested along with a photo of the track. We may need to evaluate if the existing track can handle that increased capacity.
- If the issue is that there is an area of the store that needs more track added to improve the overall lighting of the store, open a Maintenance Support Case. The Real Estate Construction team will evaluate the request, including gathering bids from local electricians, with senior management to determine next steps.
Ceiling Lights
- If you have a ceiling light that still has florescent tubes and one of the lights is out, safely remove the bulb from the fixture and insert a replacement bulb.
- If it’s a standard T8 tub light, you should always have a minimum of 5 lights in your backstock.
- If you fall below 5 T8 tube lights, then open a Maintenance Support Case for light bulbs with as much of the light’s model information as possible, a picture of the light bulb and a quantity needed for future replacements.
- If you attempted to replace the tube light and that did not work, it’s likely a bad ballast fixture.
- Replacing these fixtures requires a Licensed Electrician.
- To maximize efficiency of costs, our general guideline is that we will not dispatch an Electrician unless there are 4 or more fixtures that need replaced. There may be exceptions to this guideline based on the size of the store or if there are a cluster of lights out all in the same area. Consult your DM for guidance.If the fixture is not working, place a red dot on the corner of the fixture.
- Once you have accumulated 4 or more fixtures with red dots that are out in your store, open a Maintenance Support Case detailing the number of fixtures that are out in your store and a picture of the fixture(s) that are out.
- If there are other case needs in your store that would involve an electrician, reference those open cases as well so we can evaluate a full scope of work all in one trip.
- If your ceiling light is an LED flat panel, red tag the fixture and open a Maintenance Support Case so we can determine if that fixture is still under warranty.
- If your ceiling height requires a lift because it’s too high to reach with a ladder, open a Maintenance Support Case with the number of lights that are out, a picture of the fixture(s) in question and that a lift is required.
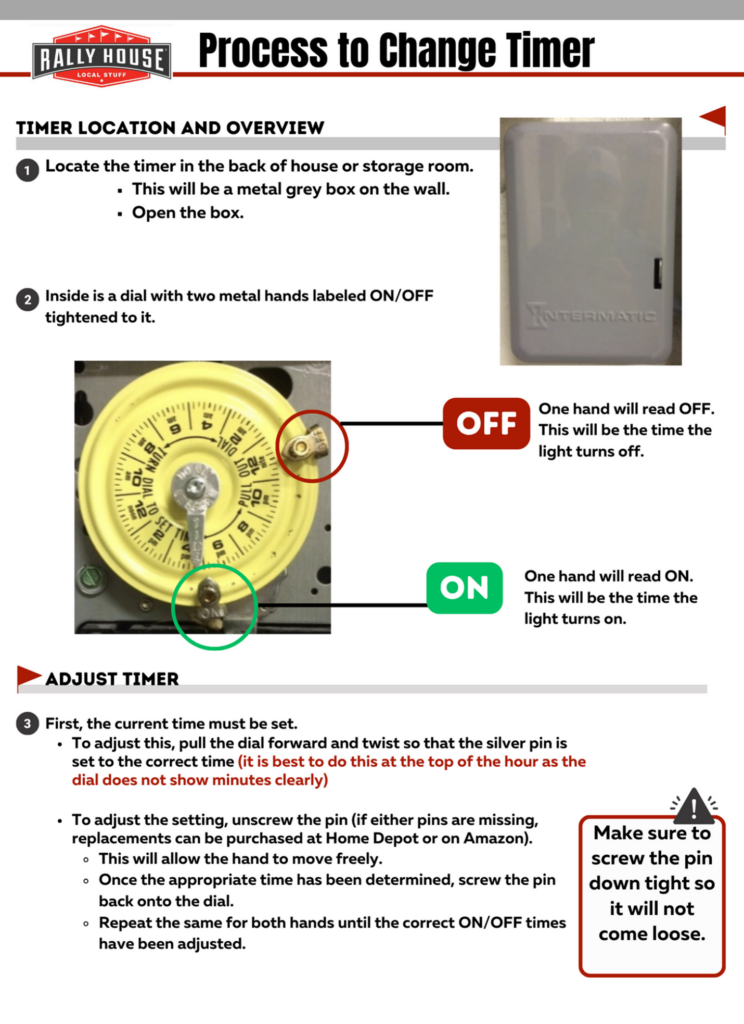
Light Timers
The light timer dictates when the outside signs come on. Due to daylight savings time and the changing of season it is necessary to periodically adjust the times. This will be communicated to the stores once it is required.
Times of Adjustments
- Labor Day
- Turn on at 6 PM.
- Turn off at 9:30 for most stores.
- Turn off at 11 PM for high visibility stores.
- High visibility stores are those that the store front sign can be seen from the main drive by road.
- Fall Daylight Savings Time
- Turn on at 5 PM.
- Turn off at 9:30 for most stores.
- Turn off at 11 PM for high visibility stores.
- High visibility stores are those that the store front sign can be seen from the main drive by road.
- Spring Daylight Saving Time
- Turn on at 7 PM.
- Turn off at 9:30 for most stores.
- Turn off at 11 PM for high visibility stores.
- High visibility stores are those that the store front sign can be seen from the main drive by road.
Thermostats
Programming Schedule
1. On thermostat, find and press the “Menu” button
- If there is no “Menu” button, skip to Step 2
2. Press the “Schedule” button. This will bring up the days of the week. Within each day there are 2-4 different times.
- Wake, day, evening, sleep
- Occupied 1, Occupied 2, Occupied 3, Un-Occupied
- Set the days of the week to be programmed
- M-F or all can usually be programed together, but if not, you must do each day.
- Sunday is a different time some must be done after the rest of the days
- Set the time for the unit to turn on
- This will be 15 minutes prior to store opening
- Ex: Store opens at 10am, set time for 9:45am
- This will be 15 minutes prior to store opening
- Set the unit to the correct temperature
- A/C = 76
- Heat = 66
- Advance to the second time-period by pressing “Advance” or “Schedule”
- Press “Cancel Period” to delete this period
- Some thermostats may not have the ability to delete periods. In this case, set 12:00 and the same temperatures.
- Advance to the third time-period and repeat the steps above.
- If there is no option to cancel, set 5:00pm and the same temperatures.
- Advance to the fourth time-period by pressing “Advance” or “Schedule”
- Set the time for the unit to turn off
- This will be 15 minutes after the store closes
- In most cases this is 9:15 PM
- This will be 15 minutes after the store closes
- Set the unit to the correct temperature– This is so we do not run AC and Heat unless extreme temperatures overnight
- A/C = 80
- Heat = 60
3. When all days have been programmed, press “Done” or “Run Schedule” to set the program.
4. Set fan to Auto not ON
5. Repeat process for Saturday and Sunday
6. Repeat process for each thermostat
Switching Between Functions of Thermostats
1. On thermostat, find “System” button
- Pressing this will cycle between the different functions of the unit: A/C, Heat, and Off
2. Press button until desired function is displayed on screen
3. Repeat process for each thermostat
Propping Store Front Doors Open
1. During nicer, not extreme weather (primarily spring and fall) the thermostat can be turned off and the store front doors propped open.
- Nicer weather is when it is cooler outside but still comfortable than what the thermostat is set to. Think of it like opening your windows at your home on a nice spring/fall day!
2. A doorstop that is attached to the door or a rubber doorstop is used to prop the door open.
- Rubber doorstops can be purchased from the Amazon Store Equipment list if they are needed.
3. Stores should place and inflatable in the open entry way to invite guests into their store!
Changing Date and Time Non-Touch Screen
- Find the “SET” heading
- To set the time, press “Time” (hour selection will automatically display first)
- Press “Forward” or “Back” to adjust to correct hour
- Make sure to set the unit to the correct time of day (AM vs PM)
- Press “Time” to cycle to minute selection
- Press “Forward” or “Back” to adjust to correct minute
- Press “Run” under “Program” heading to set
- Press “Forward” or “Back” to adjust to correct hour
- To set the day of the week, press “Day” (this model will only have the option to set the day of the week)
- Press “forward” or “Back” to adjust to correct day
- Press “Run” under “Program” heading to set
Changing Date and Time on a Touch Screen
- On Thermostat, find and press the “Menu” button
- Find and Press “Time” button. This will automatically bring up the hour selection
- Use the arrows to adjust up or down to the correct hour
- Make sure to set the unit to the correct time of day (AM vs PM)
- Use the arrows to adjust up or down to the correct hour
- Press “Time” to cycle to minute selection
- Use arrows to adjust up or down to correct minute
- Press “Time” to cycle to year selection
- Use arrows to adjust up or down to correct year
- Press “Time” to cycle to month selection
- Use arrows to adjust up or down to correct month
- Press “Time” to cycle to day selection
- Use arrows to adjust up or down to correct day
- When finished, press “Run Schedule/Program” to set
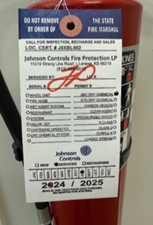
Fire Extinguisher
Service Dates
- Fire Extinguisher tags are dated the day they are serviced, not the expiration date or due date of next service.
- For example: if your Extinguisher tag is dated Aug. 2024, that means it was serviced in Aug. 2024 and is good until Aug. 2025