Flags and Click Home buttons are clickable to make it easy to navigate the page
INTRODUCTION
THE PLAY:
Store technology and IT equipment play an important role in supporting daily operations across Rally House locations. Proper setup, configuration, return processes, and secure access management help ensure stores remain operational, equipment is protected, and Team Members can efficiently complete operational tasks.
The IT Setup and Return Playbook is designed to provide stores with standardized guidance for setting up IT equipment, configuring printers and devices, returning equipment to the IT Department, and accessing secure password-sharing tools. This playbook includes processes for Zebra printer setup, GK420T optimization, wireless camera installation, Keeper password access, and IT equipment return procedures to help stores complete IT-related tasks consistently and accurately.
IMPACT:
Following consistent IT setup and return processes helps reduce setup issues, protect company equipment, improve troubleshooting efficiency, and ensure stores remain operationally prepared. Proper setup and return procedures also help the IT Department maintain accurate equipment tracking, improve response times, and support faster issue resolution.
When done well:
IT equipment is properly configured and operational
Devices and printers are set up consistently across stores
Equipment returns are completed accurately and securely
Password and alarm code sharing remains secure
Stores can complete IT-related setup tasks with greater confidence and consistency
ON FIELD TERMINOLOGY
IT Helpdesk: IT support team that assists stores with technology-related issues.
MobiPrint: Application used to connect Zebra devices to 2×1 printers.
GK420T: Zebra 2×1 label printer model.
ZD410/411: Smaller Zebra printer models used in stores.
Zebra Mobile Terminal: Zebra handheld device used for operational processes.
Keeper: Secure password and alarm code sharing platform.
Asset Number: Unique identification number assigned to Rally House IT equipment.
Network Configuration Page: Printed page containing printer network and IP address information.
IP Address: Network address used to identify and connect printers on store Wi-Fi.
Axis Door Camera: Wireless camera device installed near store entrances.
SETUP & RETURN
GAME PLAN
IT Overview
IT Support Expectations
IT operates during standard business hours.
The IT Case form should be used for most IT issues.
Internet outage or all registers down:
Open IT Case.
Then call 1-888-397-0150.
Other immediate IT needs:
Open IT Case.
Then open Chat.
IT Priority Levels
P1: Emergency/Immediate Priority
Anything affecting customer orders, instore transactions, or internet connectivity.
Resolution Time: Less than 5 minutes – next business day.
Shipping Speed: Saturday Shipping or Next Day Shipping based on store availability.
P2: High Priority
Issues impacting some store operations but not fully preventing operations.
Example: One register not functioning during normal operations.
Resolution Time: Less than 2 days.
Shipping Speed: UPS 2nd Day Air or UPS 3 Day Select.
P3: Medium Priority
Issues causing operational inconvenience without disrupting overall store operations.
Example: One Zebra not printing to the 2×1 printer while others function properly.
Resolution Time: Less than 1 week.
Shipping Speed: UPS Ground.
P4: Low Priority
Minor nuisance issues or intermittent non-emergency system interruptions.
Resolution Time: Less than 10 days.
Shipping Speed: UPS Ground.
How Stores Can Support Faster Resolution
Provide detailed issue descriptions when submitting requests.
Include photos whenever possible or relevant.
Update existing cases with additional information if troubleshooting changes.
Close requests when the issue has been resolved.
Include as much operational impact information as possible when escalating issues.
Setting Up Zebra Devices to Print 2×1 Label Printers
Overview
If this is a new printer setup, or if you are having issues please go to GK420T Printer Resource.
Process
Hard Reset the Zebra mobile terminal.
Hold the power button and volume up button at the same time.
This will hard reset the device and load the new Mobi Print version: 2.01.47
Wait 5-10 minutes after it turns back on.
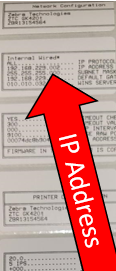
On the Printer, print the Network Configuration Page to find the printer’s IP address.
Print the IP address of the Printer.
On the GK420t printer:
Hold down the feed button and release once the status light blinks once.
On the smaller ZD410 Printers:
Wake the printer up by pressing any button once.
Hold the right two buttons until it starts printing, then let go.
Keep the IP address handy for future reference.
Example IP addresses:
(192.168.062.053)
(192.168.Store_number.XXX)
If the IP address is cut off:
Complete “Manual Width Adjustment” section in the The GK420T Setup & Optimization Page.
If your page is too faint to see:
Make updates using the “Adjusting Label Darkness” section in the The GK420T Setup & Optimization Page.
Set up the Mobi Print Application.
Discovering Printer in Mobi Print App
On the Zebra TC21, find the Mobi Print App and open the application.
Click “Allow” on all prompt screens.
Insert Mobi Print app image here
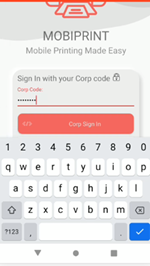
At the login screen, the app should auto-fill the corp code.
If not, type the Corporate Code: 55143721
7. After you sign in, a tutorial page will show up.
Scroll down and select “Close”.
8. Click the “Select Printer” option and then select Wi-Fi.
9. Select “Discover” at the bottom of page.
Troubleshooting this step:
This will only work if your Zebra Mobile Terminal is on the store’s Wi-Fi.
You can open settings in your device to check.
The Wi-Fi name should be “SSIWAN”
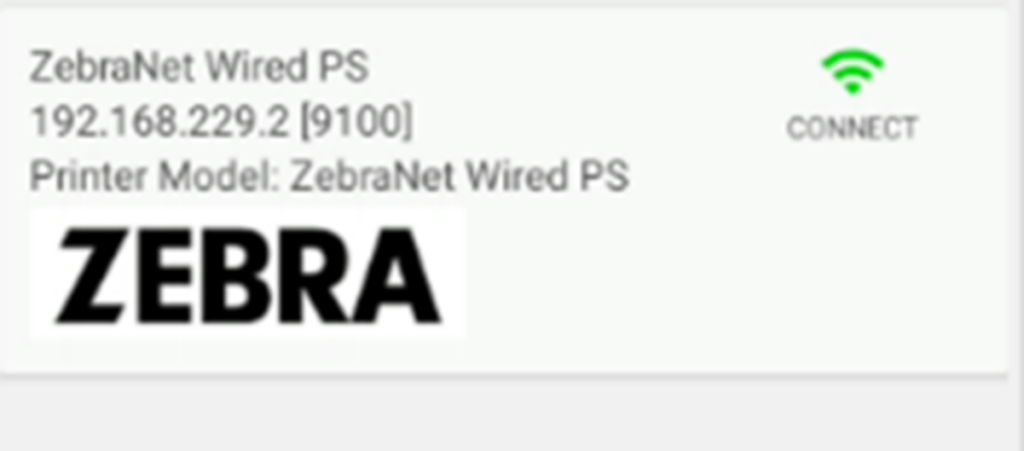
10. Find and select the tile that matches the printer’s IP address from the network configuration page and click “Connect”.
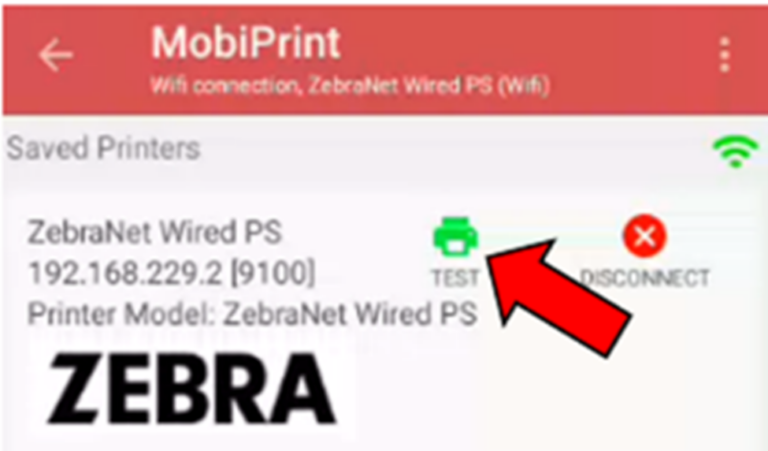
11. Click “Test” and a test page will print.
12. Hit the back button on the top-left of the page to return to the application’s homepage.
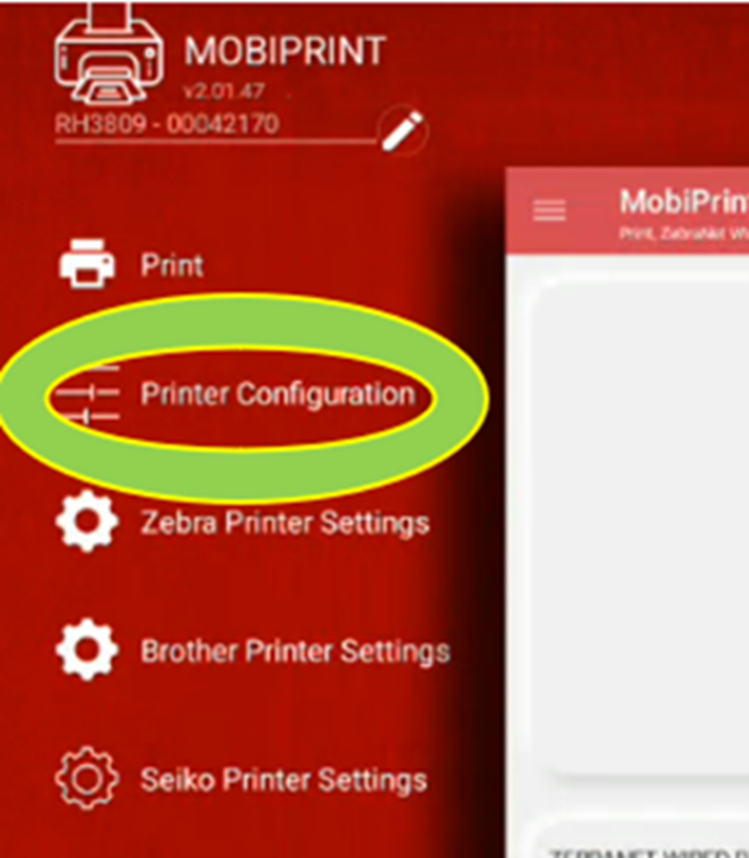
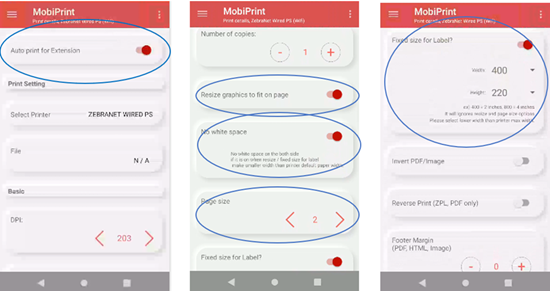
13. Select the hamburger on the page’s top-left corner and select “Printer Configuration”.
14. Make sure your settings in Printer Configuration match all of the settings in the pictures below.
15. Printing a label and setting Google Chrome to always download.
Open Item Matrix on the Zebra, scan a price label, then scroll down until you find a printer icon and tap it to print the label.
Note: If this takes you to a website, then you pressed the size icon and not the printer icon.
Select “MobiPrint” and tap “Always”.
Select the Don’t show again check box to ensure it does not pop up again.
Next click the Download button.
GK420T Setup and Optimization (2×1 Printer)
Overview
The GK420T printer will have to be networked for the MobiPrint application to discover it as an available printer.
Additionally, other steps need to be completed to ensure it prints the best label for guest ease.
Setting Up Power
Plug in the printer’s power cord and the provided internet cord and flip on the power button.
When turned on, you will see the light on the front of the printer next to the manual feed button.
Manual Width Configuration
Hold the feed button until the status light blinks five times and then let go.
The printer will begin to print out small square boxes that grow bigger per page printed.
Press the feed button once to stop the process.
At the seventh printout, the dimensions will read 1.89IN 48MM.
If you press feed prematurely or too late, you will have to go back to step 1.
Adjusting Label Darkness
Hold the feed button for six blinks and release.
The printer will begin to print the print darkness levels.
Press the feed button one time once the darkness reaches 20.0.
Network Configuration
Hold down the feed button and release once the status light blinks once.
The network configuration page will print.
This will show you the Printer’s IP address.
If the IP address is cut off:
Complete the “Manual Width Adjustment” Section.
If your page is too faint to see:
You will need to adjust your brightness (see step 3).
The IP address information needed to set up the Mobi Print app will be at the top (second label).
It will be to the left of the words “IP Address”.
Example IP addresses:
(192.168.062.053)
(192.168.Store_number.XXX)
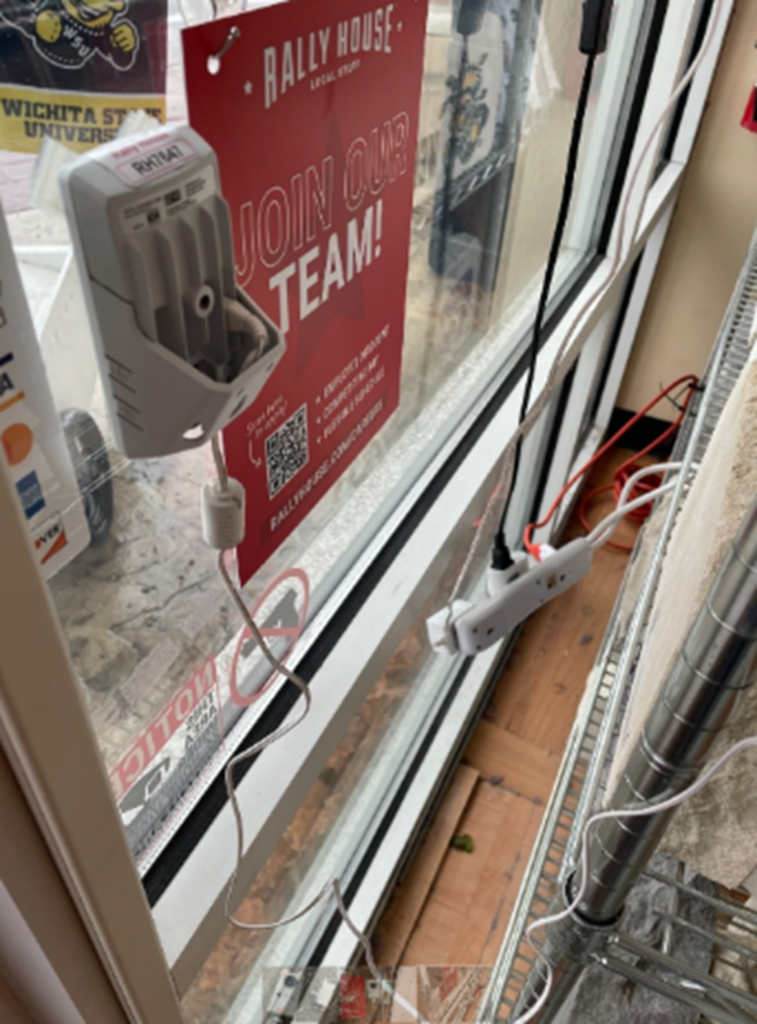
Installing Wireless Axis Door Camera
Installation Process
Remove the film on the 3M adhesive tape and attach to a window to the left or right of the front door.
Place the camera 4 to 5 feet from the ground.
Place the camera 3-6 inches from the door.
Choose a side that has access to an outlet.
The cable it comes with is 10 feet.
A 12-foot extension cord has been provided.
Once it is plugged in and attached to the window, please call IT.
Press 3 on your cordless phone and press dial.
Do not plug into a timer.
Keeper Password Emails and Links
Keeper Password Sharing
To keep password sharing safe, Corporate will use Keeper to share passwords and alarm codes to retail employees.
There is no set-up of the program for Team Members.
Password Sharing Process
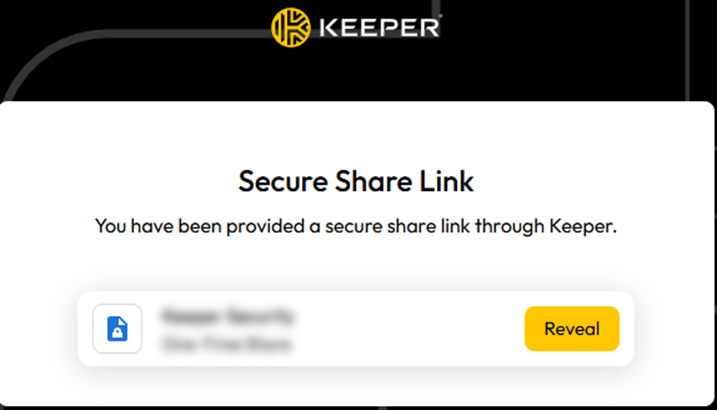
When Corporate is sharing a password or alarm code, they will use the e-mail address in Workday for the Team Member.
The Team Member will receive an email with a one-time access link to the password/alarm code.
Insert Keeper email example image here
Accessing Passwords and Alarm Codes
The one-time access link will take the Team Member to the Keeper platform.
Click “Reveal” to receive the information before the link expires.
IT Equipment Return Process
Overview
Your store has IT Equipment that needs to be returned to the IT Department.