
Please follow the directions regarding the type of point-of-sale system the store has.
NSPOS (NetSuite POS)
- You will need a ruler or tape measure to complete this project.
- The store has been sent 1 Return Policy Sign per register.
- Begin at the first register.
- Center the Return Policy Sign in front of this register.
- Using your tape measure, measure 5” from the customer’s side of the register.
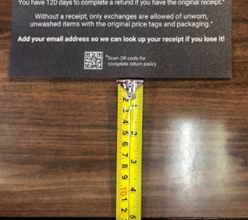
- This is where the Return Policy Sign will be placed.
- Ensure that the Return Policy Sign will not cover any sensor tag collection holes.
- Once placement is determined, remove the backing from the Return Policy Sign.
- Note: this Return Policy Sign is not removeable. Be sure exact placement is decided before placing the Return Policy Sign.
- Lay the Return Policy Sign down beginning at one side, pressing the Return Policy Sign down as it lays on the cashwrap to reduce the amount of air bubbles.
- Complete these steps for all registers and Return Policy Signs.
- Once all Return Policy signs are complete, dispose of the store’s paper return policy sign that is at the cashwrap.
SPOS (Suite POS)
- You will need a ruler or tape measure to complete this project.
- The store has been sent 1 Return Policy Sign and 1 Split Tender Sign per register.
- Begin at the first register.
- Begin with the Split Tender Sign.
- Using your tape measure, measure 3” from the customer’s side of the register.
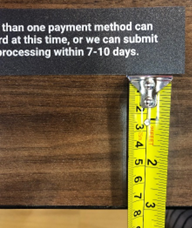
- This is where the Split Tender Sign will be placed.
- Ensure that the Split Tender Sign will not cover any sensor tag collection holes.
- Once placement is determined, remove the backing from the Split Tender Sign
- Note: this Split Tender Sign is not removeable. Be sure exact placement is decided before placing the Split Tender Sign.
- Lay the Split Tender Sign down beginning at one side, pressing the Split Tender Sign down as it lays on the cashwrap to reduce the amount of air bubbles.
- Next grab the tape measure and the Return Policy Sign.
- Measure 1” from the top of the Split Tender Sign.
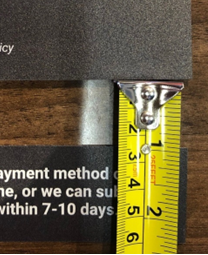
- This is where the Return Policy Sign will be placed.
- Note: this Split Tender Sign is not removeable. Be sure exact placement is decided before placing the Split Tender Sign.
- Ensure that the Return Policy Sign will be positioned directly above the Split Tender Sign.
- Lay the Return Policy Sign down beginning at one side, pressing the Return Policy Sign down as it lays on the cashwrap to reduce the amount of air bubbles.
- Once all Split Tender and Return Policy signs are complete, dispose of the store’s paper return policy sign that is at the cashwrap.